|
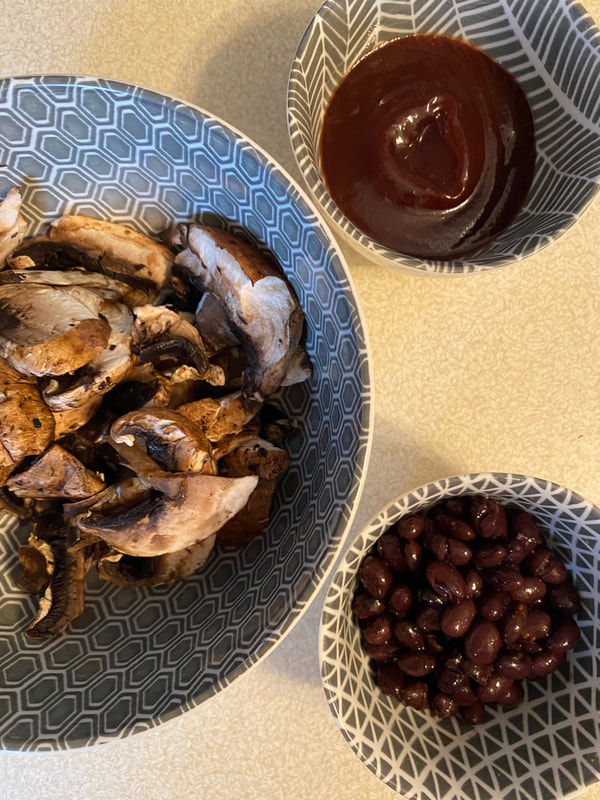
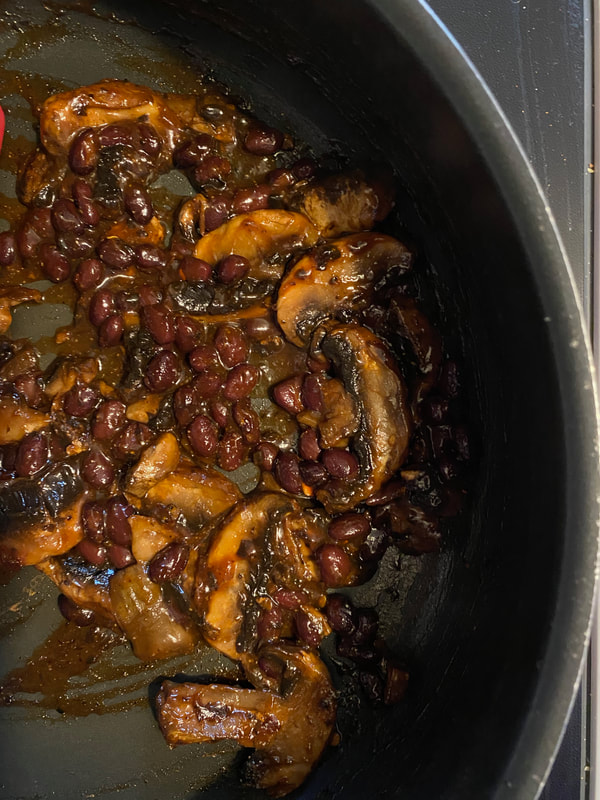
Do you need an easy, delicious idea for meatless Monday? I've got a perfect solution for you! I'm a big fan of mushrooms in just about anything. Mushrooms are a great replacement for meat if you are trying to make some healthier choices or just trying to be more budget friendly. I will often add diced mushrooms to ground beef when making tacos or lasagna - the textures are very similar and when mixed with spices, sauces, etc, they blend really well together. Last week, BBQ mushroom tacos were created in an effort to use the mushrooms in my refrigerator that were looking a little sad. You could absolutely add ground beef or shredded chicken to this dish if you have some. These quick little street tacos were a hit at my house! BBQ Mushrooms Tacos (makes 6 street tacos) 2 cups sliced mushrooms 1 cup black beans - drained and rinsed 1/3 cup BBQ sauce of your choice 2 tsp olive oil 1/2 tsp salt 1/4 tsp pepper 1/4 tsp smoked paprika Pinch of cayenne pepper Slaw Topping: 2 cups shredded slaw mix - you could use traditional cole slaw mix, broccoli slaw mix, or make your own combination. I love cabbage, carrots, and broccoli together. Dressing: 1/3 cup mayo 2 tsp white vinegar 2 tbsp sugar 1 tsp spicy brown mustard 6 corn tortillas (street taco size) for serving For topping: queso fresco crumbles, fresh cilantro, pickled onions or jalapenos, lime wedges 1. Wipe the mushrooms with a paper towel and slice. Drain and rinse the black beans. 2. Heat a large skillet over medium heat and add 2 tsp of olive oil. Add the mushrooms and saute until starting to soften (3-5 minutes). 3. Lower the heat and add the black beans. Add BBQ sauce and stir to coat the mushrooms and beans well. Season with salt, pepper, smoked paprika, and a pinch of cayenne pepper. Lower the heat to a simmer. Let the mixture cook until heated through. 4. While the mushrooms and beans are cooking, prepare the slaw. 5. Wash, peel, and shred vegetables if using fresh. If using bagged, pre-cut slaw, wash and drain well. Add to a medium mixing bowl. 6. In a separate bowl, whisk together the mayonnaise, vinegar, sugar, and spicy mustard. 7. Pour the dressing over the slaw and mix to coat well. 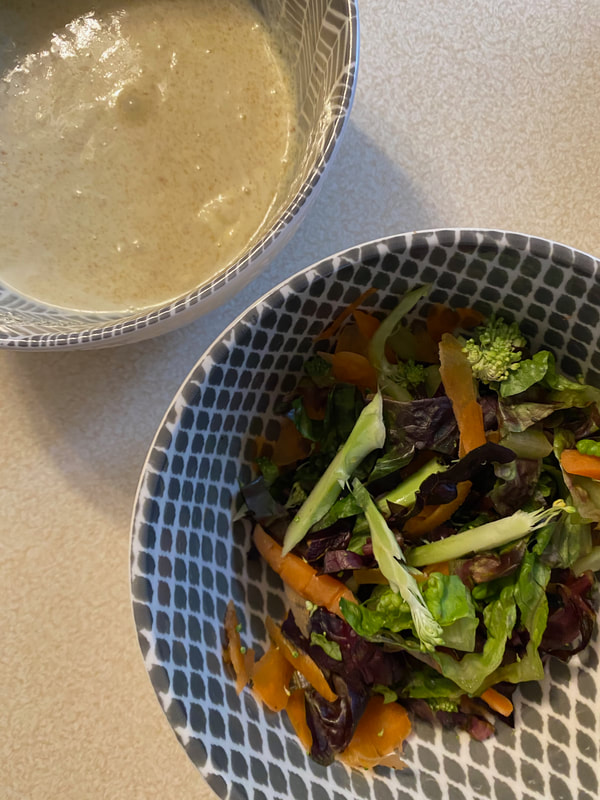 8. In a small skillet over medium heat, warm the corn tortillas. 9. Once the mushroom mixture is heated through, divide amongst the 6 corn tortillas. 10. Top each taco with slaw. Garnish with queso fresco crumbles, fresh cilantro, and pickled onions or jalapenos. Serve with a squeeze of fresh lime juice. 
0 Comments
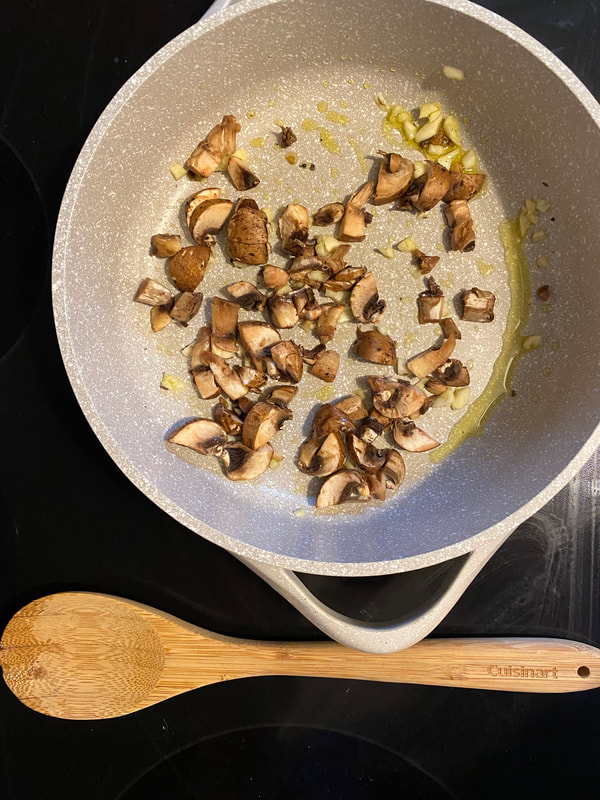
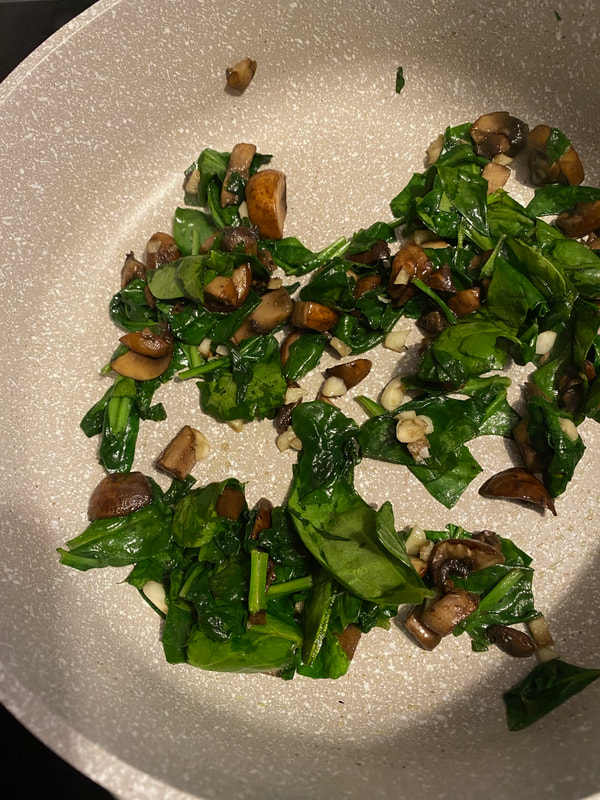
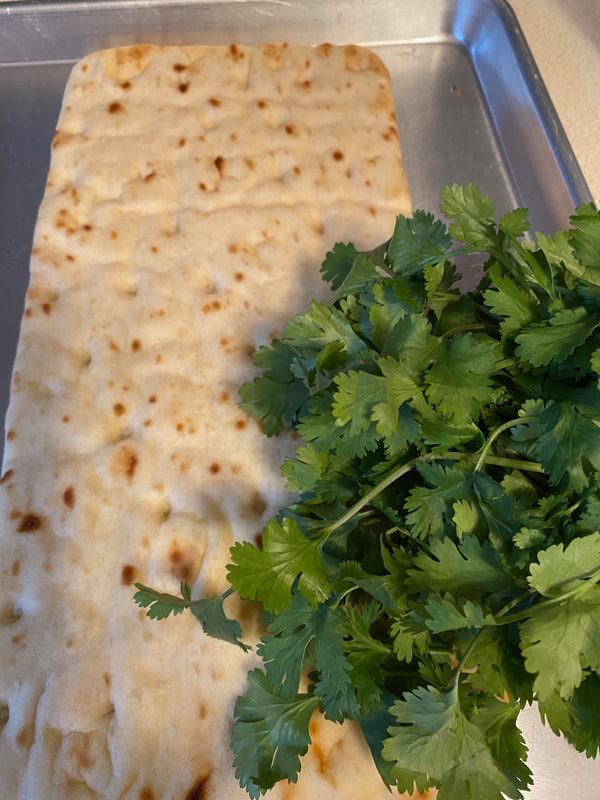
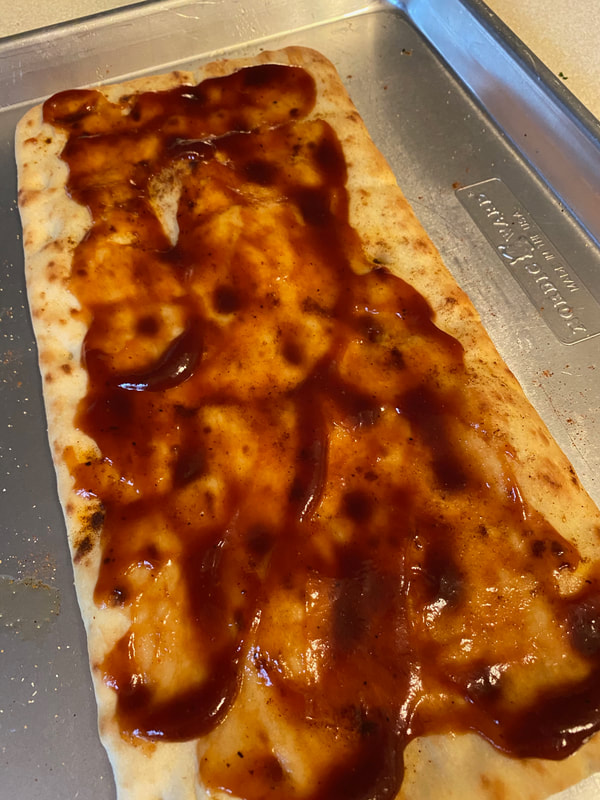
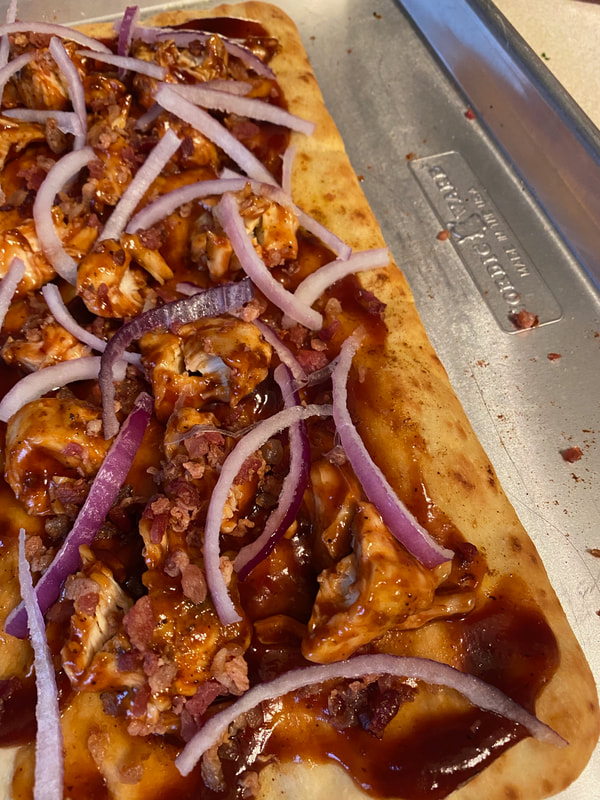
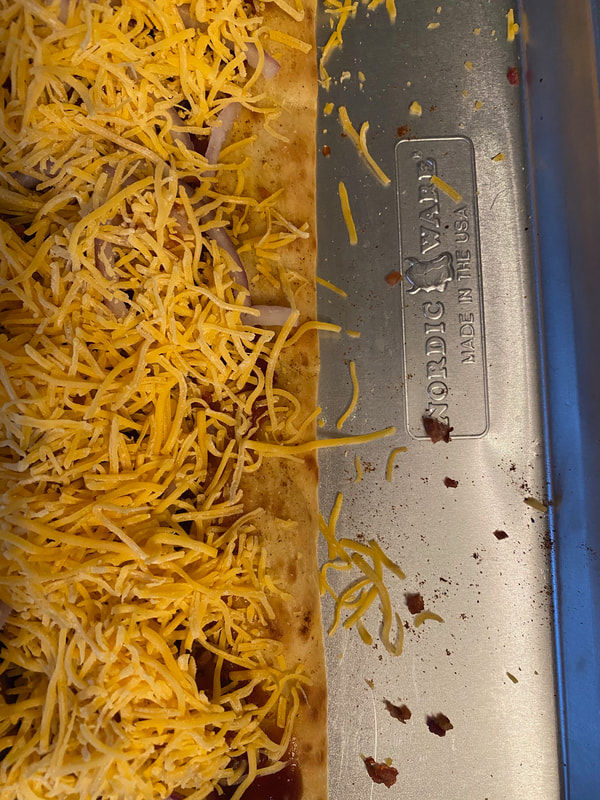
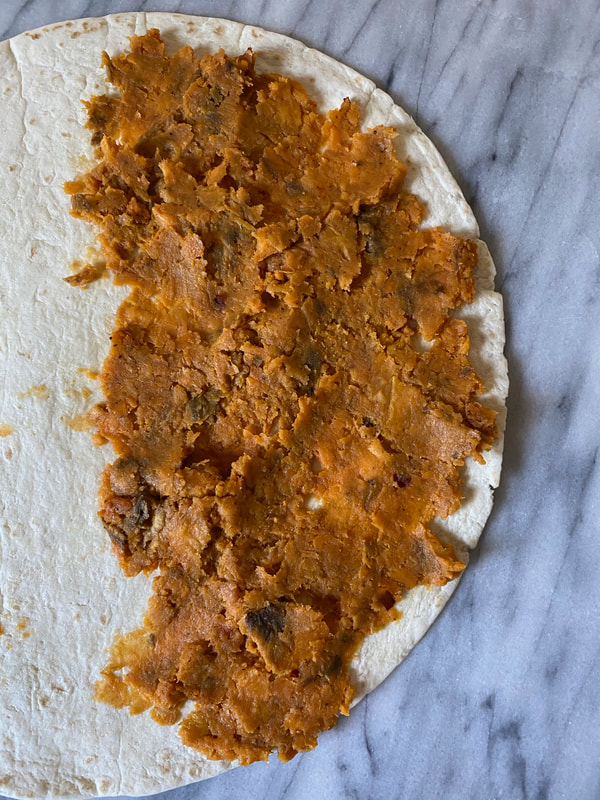
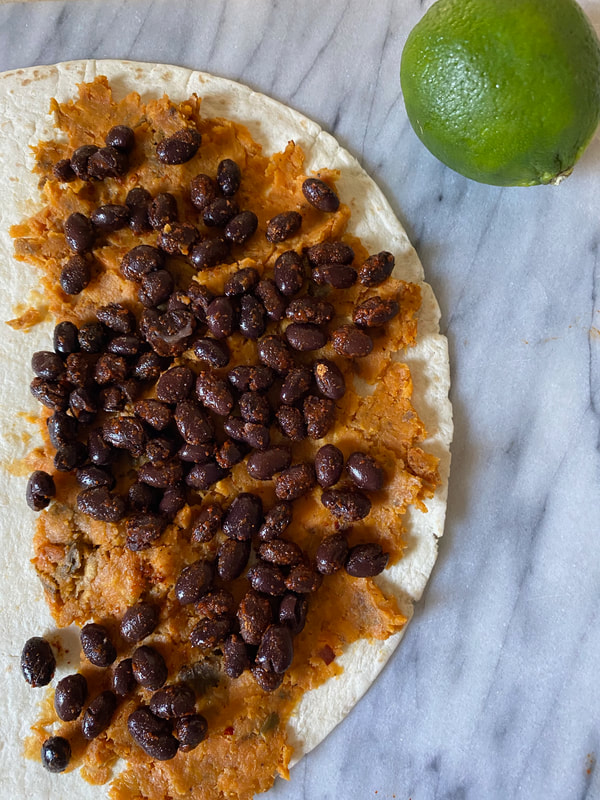
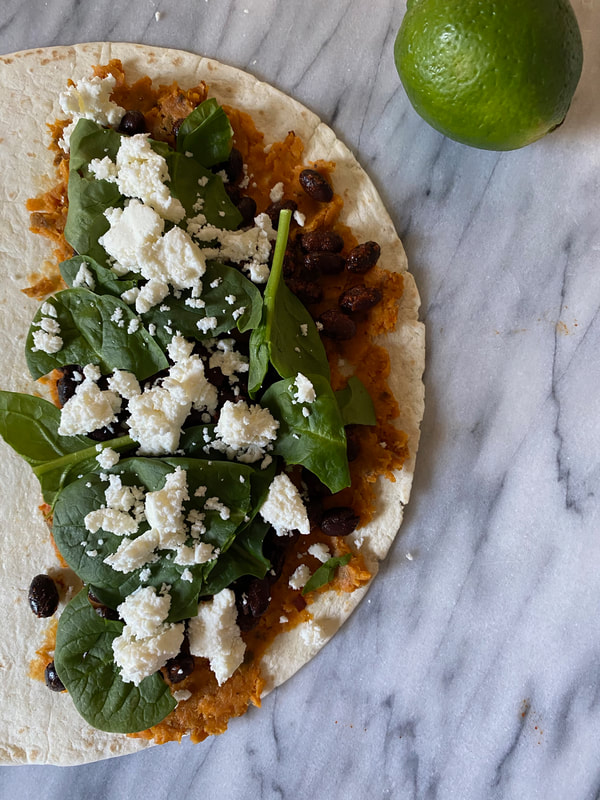
Good morning, friends! Sundays in my house are usually for cooking all of the things. This Sunday is no exception, I have a quick breakfast frittata in the oven as we speak. If you have not had a frittata before, may I highly recommend it? They're a great way to use up leftover produce in your refrigerator and they also look pretty fancy so they are a great addition to any brunch or party you may be hosting. Let's get started.... Breakfast Frittata 8 eggs 2-3 garlic cloves - minced 1 tbsp olive oil 1 tsp salt 1/2 tsp black pepper 1/2 tsp paprika Pinch of cayenne pepper 1 cup chopped spinach 1/2 cup chopped mushrooms 1/4 cup bacon bits 3 tbsp green onions - diced 1/2 cup shredded cheddar cheese 1 cup vegetables of your choice - This is a great spot for leftover items. Roasted broccoli is one of my favorite additions to this. This time, I used 1 cup of leftover quesadilla vegetables (peppers, onions, black beans, and corn that had been cooked down previously). For garnish: chopped cilantro, sour cream, diced green onions 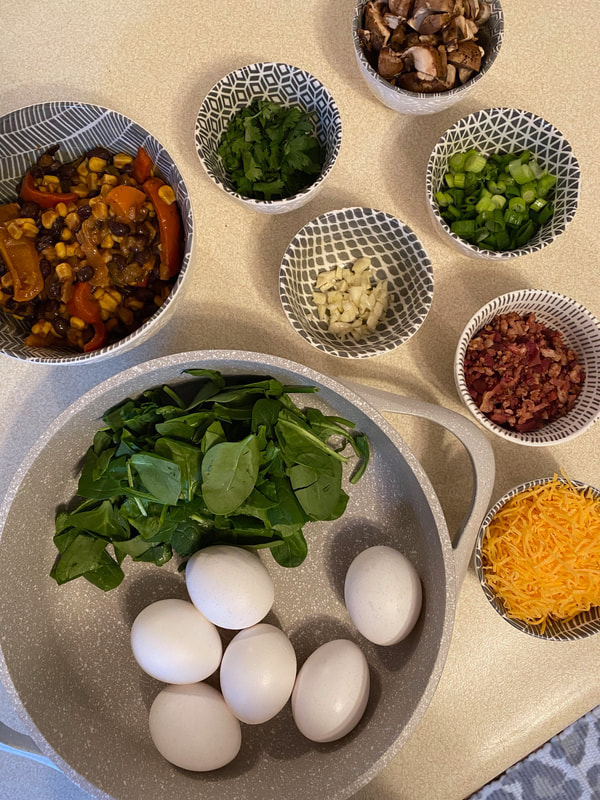 1. Pre-heat your oven to 350 degrees. 2. In a medium, oven-safe, 2"-4" deep skillet, heat 1 tbsp of olive oil and saute chopped mushrooms with garlic. If you are using fresh vegetables for your 1 cup of veggies, add them in as well. Cook until vegetables have started to soften. 3. Add chopped spinach and saute for 2-3 minutes until the spinach has wilted. Season with salt and pepper. If using leftover vegetables, add them to the spinach/mushroom mixture once the spinach is wilted. 4. In a separate mixing bowl, crack the eggs. Whisk together with salt, pepper, paprika, and a pinch of cayenne pepper. 5. Fold in shredded cheese, green onions, and bacon pieces. 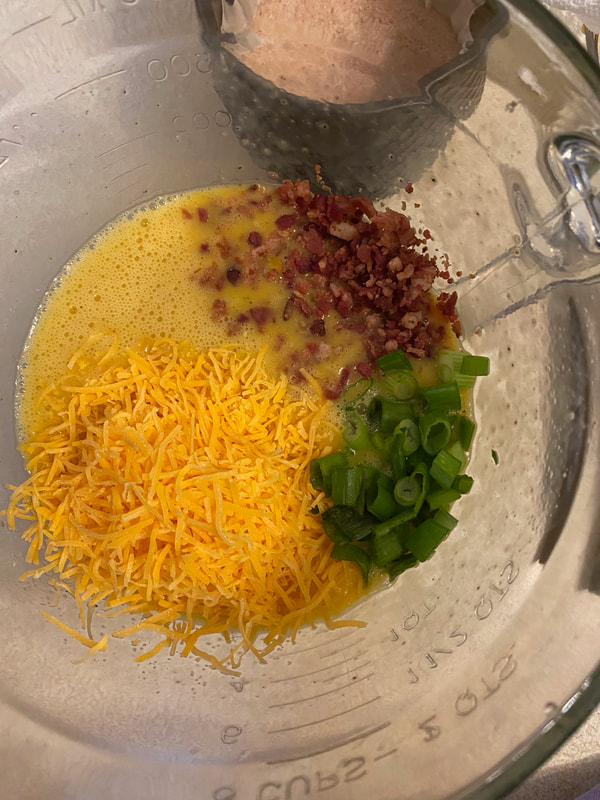 6. Pour the egg mixture over the vegetables making sure ingredients are evenly distributed. 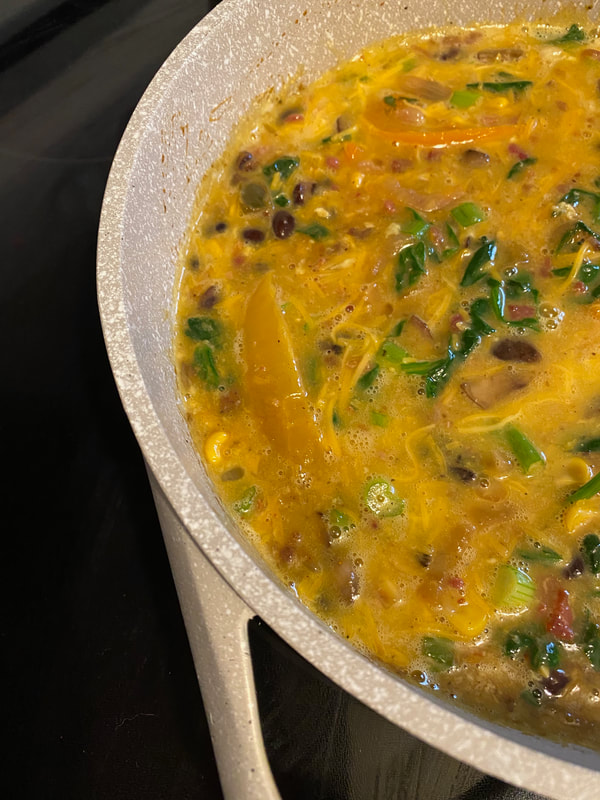 7. Place in the oven and bake for 20-30 minutes until eggs are set and the edges have begun to brown. 8. Allow frittata to rest out of the oven for 10 minutes before serving. Cut into wedges and serve with sour cream, fresh cilantro, and chopped green onions. Yum!  Three years ago my advanced culinary students prepared a spectacular brunch for our culinary competition. Not only did they take first place at competition but they also created one of my favorite menus ever. Take a trip down memory lane here. I thought about that group of students the other day and how much fun we had that semester. Our award wining "breakfast brunch stack" inspired my latest dinner plans. I'm not usually a huge fan of sweet potatoes but this creation sure did change my mind... Sweet Potato Waffle 1/2 cup shredded sweet potato (approx. 1 large) 2 tbsp diced green onion 1/4 cup shredded cheddar cheese 1 slice of bacon - crispy and crumbled 1 egg 1/4 tsp salt 1/4 tsp garlic powder 1/8 tsp pepper 1/8 tsp red pepper flakes For serving: 2-3 bacon slices, 1 egg (fried or scrambled as desired), spring greens 1. Wash, peel, and shred a large sweet potato. Place in a dry dish towel and squeeze out excess water. Place in a medium mixing bowl. 2. Preheat and grease a waffle iron (I have a large, deep waffle iron so this will make 1 large waffle, if your waffle iron is smaller this will make 2 thin waffles). 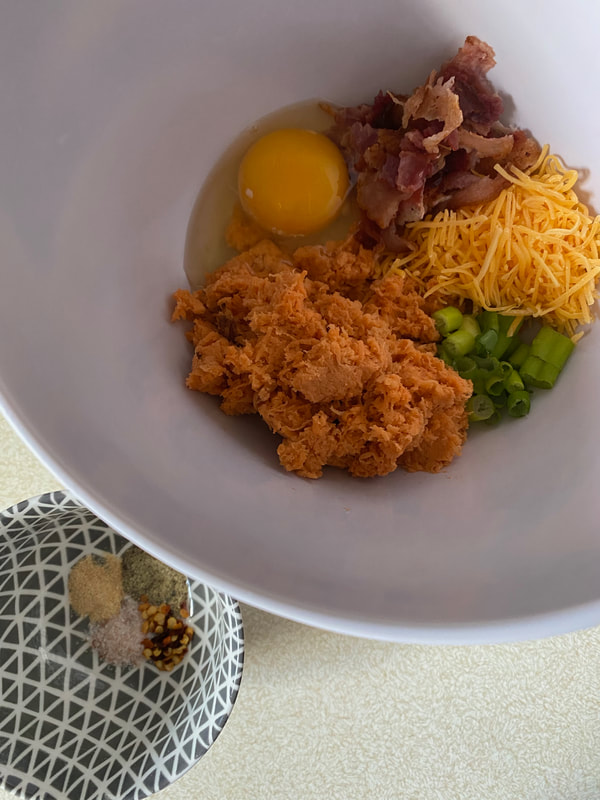 3. Mix sweet potato with green onions, cheese, bacon, and the egg. Add in spices and stir to form a dough texture. 4. When your waffle iron is pre-heated, place the dough in evenly. Close the waffle iron and cook until the waffle is golden, crispy, and cooked through. 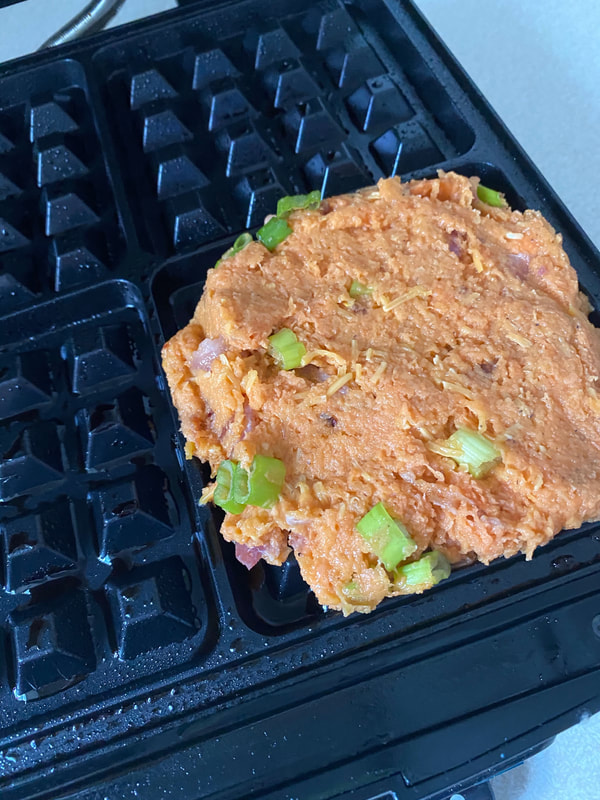 5. While your waffle is cooking, prepare your toppings. 6. When your waffle is finished, remove from the waffle iron and slice in half diagonally. Place bacon slices and spring greens on top. You can also top with avocado and/or tomato slices. 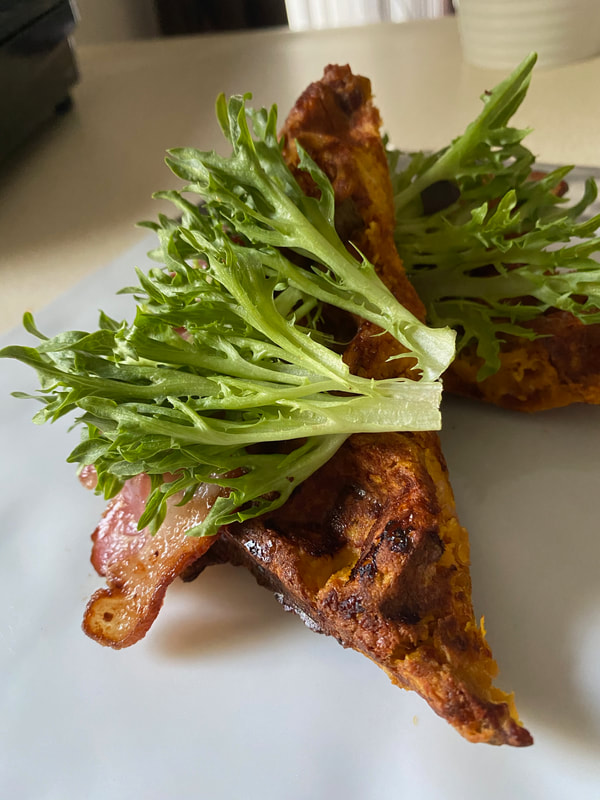 7. Place a fried egg on top of the spring greens. Cut into the fried egg and allow the yolk to run over the waffle when eating. This dish is also delicious when served with salsa. Enjoy!  Hi friends! While cruising the aisles of Aldi awhile back I purchased some of their flatbread crusts and was pleasantly surprised. They're fresh, delicious, and reasonably priced. In preparation for some quarantine cooking, I picked up a few more to create my favorite BBQ chicken pizzas. This recipe can easily be adjusted to fit your preference or items you have on hand. It's easy, it's quick, but more importantly, its delicious! Check it out below. BBQ Chicken Flatbread 2 flatbread crusts (I used the large rectangle ones from Aldi) 1 tbsp olive oil Garlic powder, smoked paprika to taste 1/2 cup BBQ sauce of your choice 1/4 cup BBQ sauce (for coating chicken) 1 cup fully cooked, diced chicken (I like to to use leftover or rotisserie chicken for this) 1/4 cup bacon crumbles 1-2 cups shredded cheddar cheese (depending on size of flatbread/amount of cheese desired) 1/4 cup thinly sliced red onion Fresh cilantro, pickled red onion (recipe below), feta cheese crumbles for garnishing 1. Preheat your oven to 350 degrees. Place your flatbreads on a baking sheet and lightly brush the top with olive oil. Season with garlic powder and smoked paprika. 2. Pre-bake the flatbreads for 10 minutes until they are just slightly browned. 3. Remove the flatbreads from the oven and brush with BBQ sauce. 4. In a separate bowl, toss fully cooked chicken in 1/4 cup of BBQ sauce until coated. Place chicken on flatbread. 5. Sprinkle bacon pieces and red onion slices evenly over chicken. 6. Top the entire flatbread with shredded cheddar cheese. 7. Place flatbreads in the oven and bake for 10-15 minutes until cheese is melted and crust edges are golden brown. 8. Remove flatbreads from the oven and garnish with fresh cilantro, feta cheese crumbles and pickled red onions if desired. Quick pickled red onions: 1 red onion - thinly sliced 3/4 cup white vinegar 1/4 cup water 1 tbsp sugar 1 pinch of salt Mix vinegar, water, sugar, and salt together in a medium bowl. Place sliced onions in and stir to coat evenly. Allow onions to sit in pickling liquid at least an hour before serving. These are delicious on salads, pizzas, and tacos! 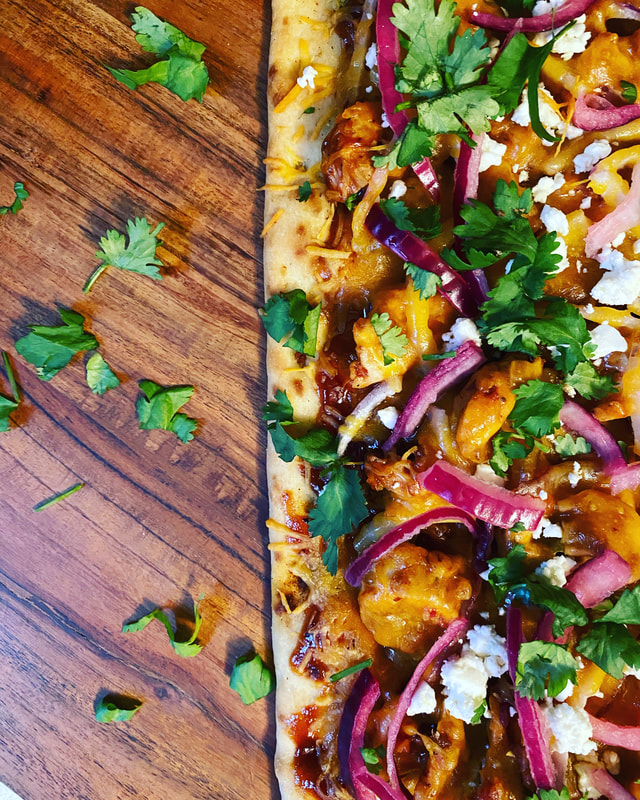 Midway through a quarantine seems like a perfect time to start dropping new blog posts on you guys. Hope everyone is staying safe out there. I have been cooking my way through quarantine and there's no end in sight. Last week as a solution to my excess sweet potato problem, I created some quick, easy quesadillas. No, really, so quick and so easy. Check it out below. 2-3 sweet potatoes (washed, peeled, and cubed) 1 tbsp olive oil 1/2 tsp cumin 1/2 tsp paprika 1/2 tsp garlic powder salt and pepper to taste 1 cup black beans - drained and rinsed 1 cup chopped spinach leaves 1/2 cup queso fresco 2 large flour tortillas Limes, cilantro, salsa, and sour cream for serving 1. Wash, peel, and cube sweet potatoes. Toss sweet potatoes in olive oil, cumin, paprika, garlic powder, and salt/pepper. Place on a baking pan lined with parchment paper and roast at 425 degrees for 15-20 minutes until tender. Once softened, mash sweet potatoes. 2. Spread mashed sweet potatoes on half of 2 large flour tortillas. 3. Top the sweet potatoes with black beans. I added a little taco seasoning to the black beans as well but they are delicious without it too. 4. Place chopped spinach and queso fresco on top of the black beans. 5. Fold the tortilla in half and cook over medium-high heat in a large skillet until golden brown and crispy. 6. Cut each tortilla into 4 wedges and serve with limes, cilantro, salsa, and sour cream. Yum!  At the beginning of each semester, I always ask my culinary students for menu ideas that they would like to learn to prepare. Much to my surprise, cauliflower pizza crust was high on the list for many students this year. Several students were interested in learning about some healthier choices and many students have allergies in their family. As usual, I was met with a little hesitation when I announced the recipe for the week but many students found that they actually liked the end result. While cauliflower crust doesn't taste EXACTLY like pizza crust, its a lower carb option and perfect for gluten free meals. Check out the instructions below: Cauliflower Pizza Crust 1 bag frozen, riced cauliflower (12oz) - thawed in the refrigerator 1 cup shredded mozzarella cheese 2 tbsp grated parmesan cheese 1 egg ½ tsp salt ½ tsp Italian seasoning ¼ tsp pepper ¼ tsp garlic powder Toppings for pizza
Let cool. Once cooled, you can start with step 1. 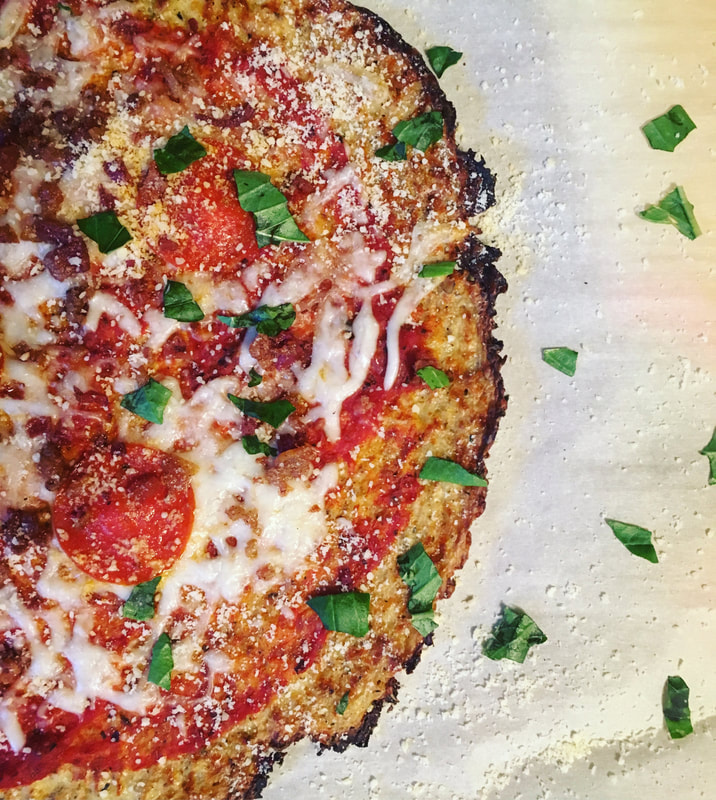 Savory tarts have been my recent obsession! I have been using so many beautiful farmers market vegetables to create a variety of different flavors and I might have really found my new favorite brunch dish. Even better, this tart can be prepped ahead and assembled just before baking. Let's get started! You will need: 1 sheet puff pastry dough - thawed 1 egg + 1 tsp. cold water whisked together for egg wash 1 large yellow onion - sliced into strips 2-3 large bell peppers - sliced into strips 2 tbsp. diced jalapeno 3-4 garlic cloves - minced 1/3 cup cherry tomatoes - halved 1/4 cup bacon pieces 2 tbsp unsalted butter salt, pepper, oregano, and thyme for seasoning 6 eggs Fresh oregano, green onions for garnishing Cheese spread: 6 oz feta cheese crumbles - room temperature 4 oz cream cheese - room temperature 1 tbsp olive oil 1 tsp. dried oregano 1 tsp. dried thyme 1/2 tsp garlic powder 1/2 tsp black pepper Juice from half a lemon 1. Prepare the cheese spread. Using an electric mixer, beat cream cheese and feta until semi-smooth. Mixing on low speed, add the olive oil and mix until smooth. Add the spices and mix well. Beat in lemon juice. Refrigerate the cheese spread if not using it right away. Cheese spread should be room temperature for assembly. 2. To prepare veggies: Using a large skillet, melt butter over low-medium heat. Add garlic and cook until fragrant (approx. 1-2 minutes). 3. Add onions and toss in melted butter. Turn on low heat and allow onions to caramelize. Stir periodically for 15-20 minutes. 4. Add jalapeno and bell peppers to the onions. Continue to cook over low-medium heat until vegetables are caramelized and cooked (approx. 15-20 minutes) 5. Season vegetables with salt, pepper, dried oregano, and thyme to taste. Set aside until ready to assemble tart. 6. When ready to assemble the tart, lightly flour your surface and roll out puff pastry slightly larger than a 9x13 baking pan or stone. Transfer puff pastry to a parchment lined pan. Pre-bake puff pastry for 8-10 minutes until starting to brown. Cool slightly. 7. Spread cheese evenly over puff pastry. Top cheese with cooked vegetables, cherry tomatoes, and bacon bits. Stretch edges of the puff pastry to slightly cover the outer the vegetables. 8. Brush edges of puff pastry with egg wash. Bake at 400 degrees for 15-20 minutes until pastry is browned around the edges. 9. Remove from oven and crack 6 eggs on top of vegetables. Return to oven for 10 more minutes until egg whites have set but yolks are still runny. 10. Squeeze fresh lemon juice over veggies and garnish with salt, pepper, fresh oregano or chopped green onions.  Do you need something yummy for dinner that screams summer? This peach and walnut salad might be just the thing you're looking for! In-season produce makes this quick side dish a real win! Check out the recipe below! 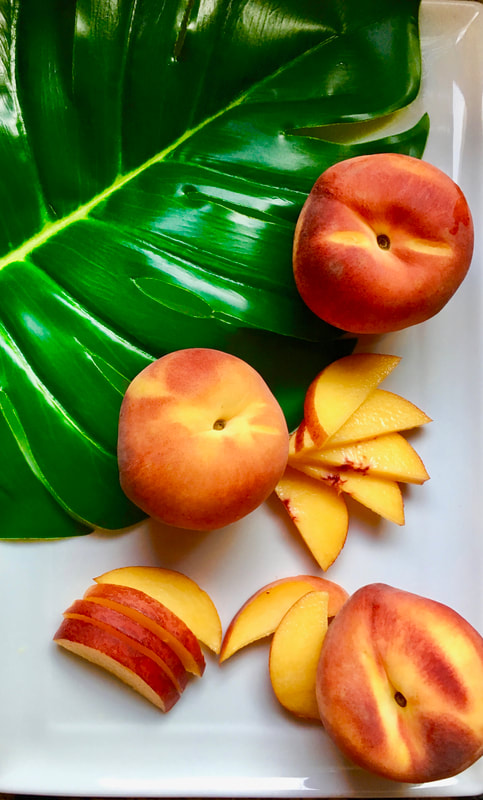 Peach and Walnut Salad 1 large romaine heart 1 small cucumber - thinly sliced 1/4 cup red onion - thinly sliced 2 large, ripe peaches - peeled and sliced 3 tbsp. bacon bits 1/4 cup walnuts - toasted 1/4 cup crumbled feta cheese Dressing: 1/4 cup olive oil 1/4 cup fresh lemon juice 1 tbsp honey 1 tsp salt 1/2 tsp pepper 1. Wash and prepare the vegetables. Toss the veggies, bacon, walnuts, and feta together in a large mixing bowl with salt and pepper to taste. 2. Place all the ingredients in a mason jar and shake well. Pour over salad just before serving and toss. 3. Serve as a side dish for all of your favorite summer meals or add some grilled shrimp to use as a main dish. Ask me what my favorite food is. I always have 2 answers and 1 of those answers is always guacamole. l make it all the time and I really feel like there isn't anything better. Grocery store guacamole is great when you're in a rush but it's so easy to make your own! Guacamole: 3 ripe avocados 3-4 garlic cloves - minced 1/3 cup red onion - diced 1/3 cup cherry tomatoes - halved 2 tbsp jalapeno (approx. half of one small jalapeno) Juice from 2 limes 1 tsp. sea salt 1/2 tsp black pepper 1/4 cup chopped cilantro *All amounts can be adjusted for personal preference. Sometimes I like extra spicy and add double jalapeno, other times I add tons of garlic! 1. Using a food processor or hand-held chopping tool, chop garlic, onion, tomatoes, and jalapenos roughly. 2. Open avocados and remove pit. Mash avocados with a fork and add lime juice. Mix well. 3. Add chopped veggies, salt and pepper, and cilantro to avocodos. 4. Cover with saran wrap directly on the guacamole (this will help to prevent browning) and refrigerate for at least an hour before serving. The flavors will develop after refrigeration. Taste and add more lime juice or salt to fit your personal preference. I could eat tortilla chips and guacamole every single day but guacamole is also great to use in many other ways. Try adding it to sandwiches (BLT's are my favorite), use it as a salad dressing, or even add it to toast for a delicious lunch! 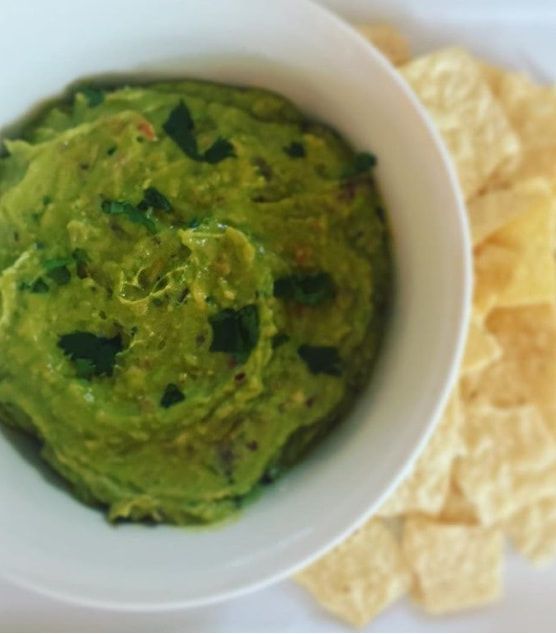 |
Archives
April 2020
Categories
All
|

 RSS Feed
