|
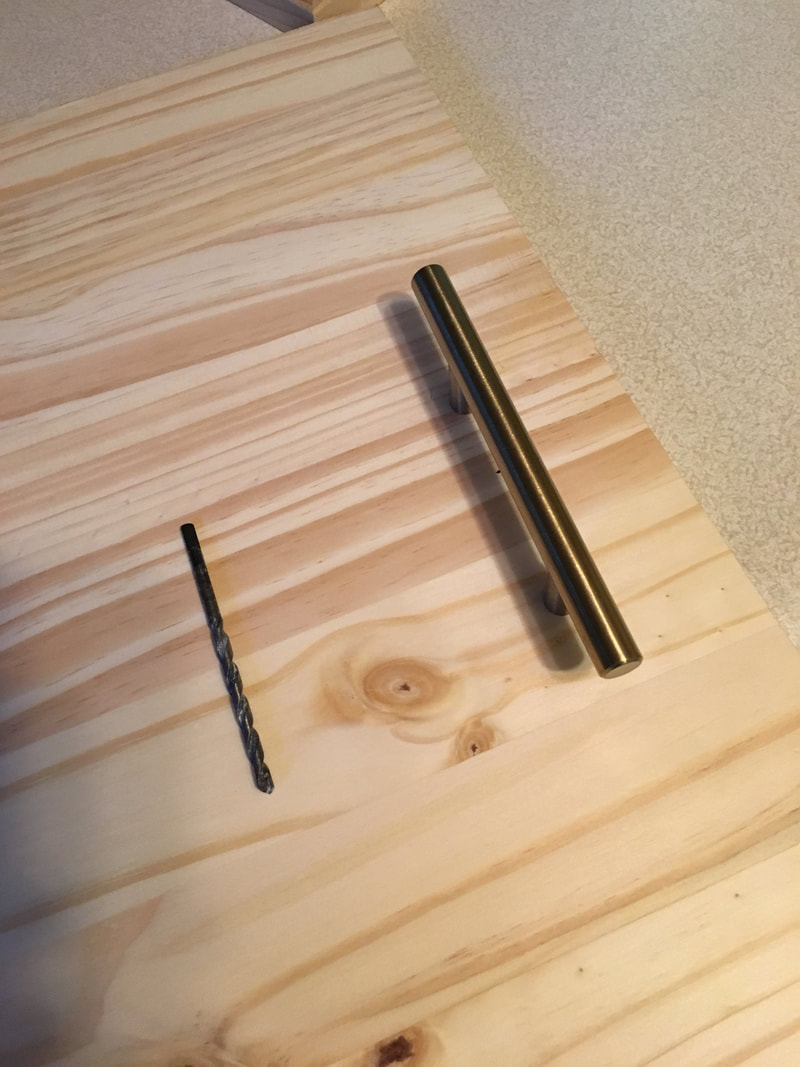
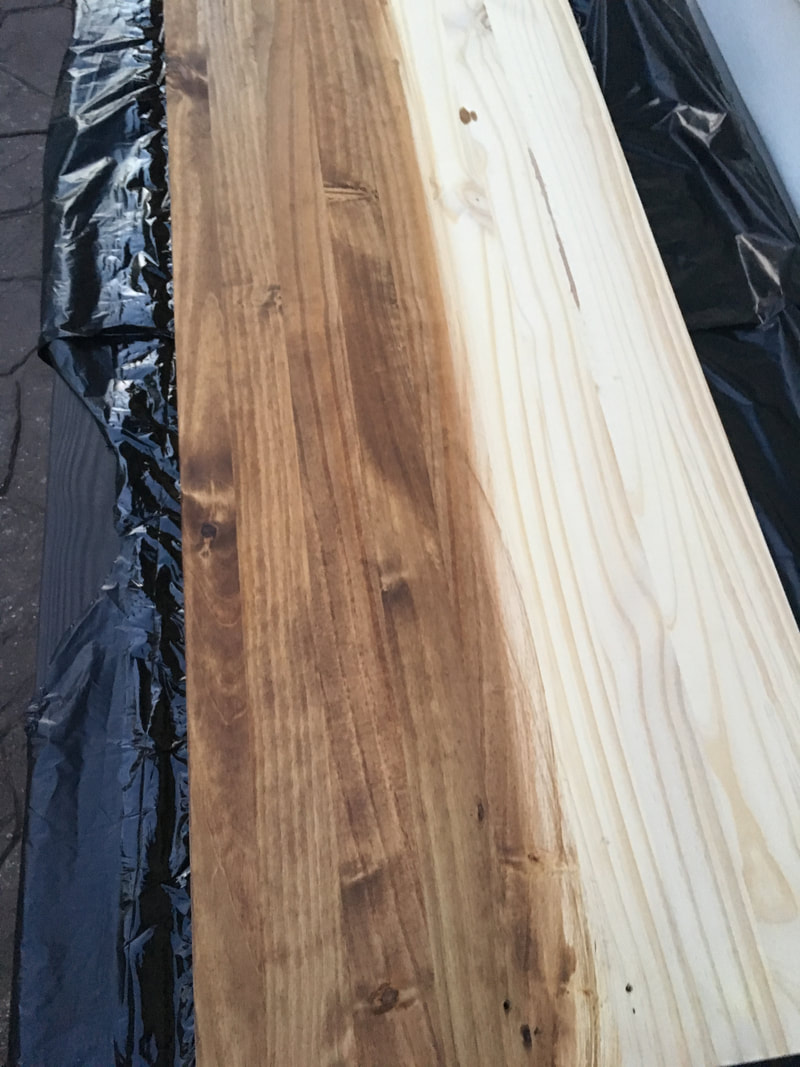
I don't know about you but I am 100% obsessed with wooden serving trays right now. I'm embarrassed to tell you how many I currently own. I think a wooden tray is a perfect styling piece - you can layer them, use them for height and contrast, and most importantly, they add so much warmth to your design. A couple months ago when I hosted brunch for my friends, I wanted to create a bar/drink area for my guests to serve themselves. After some other recent crafty projects, I discovered a section of edge-glued wood boards at Menards - they're inexpensive and come in a variety of sizes that are great for craft projects. I picked another one up and decided to make a wood serving piece for my drink station. Check out below how to make this quick project. Supplies needed: 1 edge-glued board (I selected pine in the 4 foot length) Stain or paint of your choice (I used Minwax in the color Early American) Polyurethane seal (if you plan on using water on the surface) Hardware for decoration Equipment: Brushes or rags for staining Electric drill for creating openings/installing hardware Drop-cloths or trash bags to cover your work surface  Let's get started! 1. Cover your workspace and make sure your area is well ventilated. 2. Lightly sand your board if necessary. Wipe clean. Mark and drill holes for your hardware if you are using any. 3. Stain your board using a staining cloth. Allow to dry. Flip, and stain opposite side. Let dry completely. 4. Lightly brush polyurethane seal on both sides (allowing to dry between sides). 5. Once dried and cured (at least 24 hours), place hardware on and enjoy your new serving piece! I loved using mine as the drink station for brunch and most recently, on my dining table as a fall centerpiece! I love quick and easy projects that fit my vision perfectly! 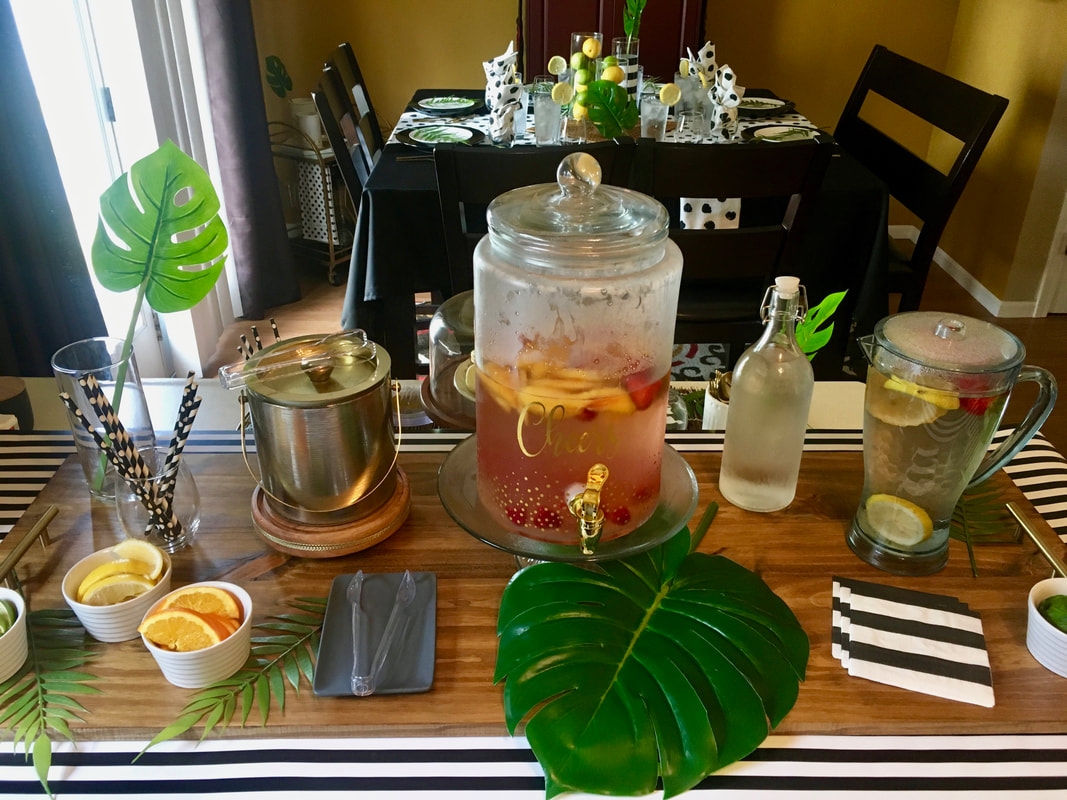
0 Comments
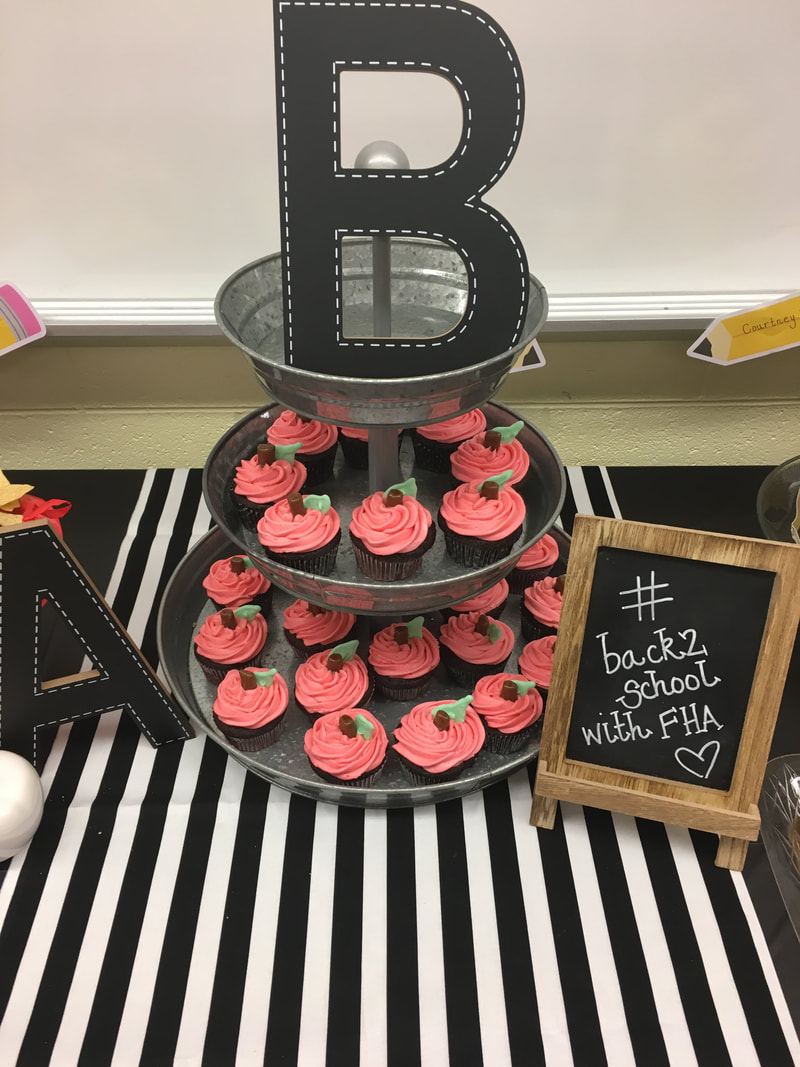
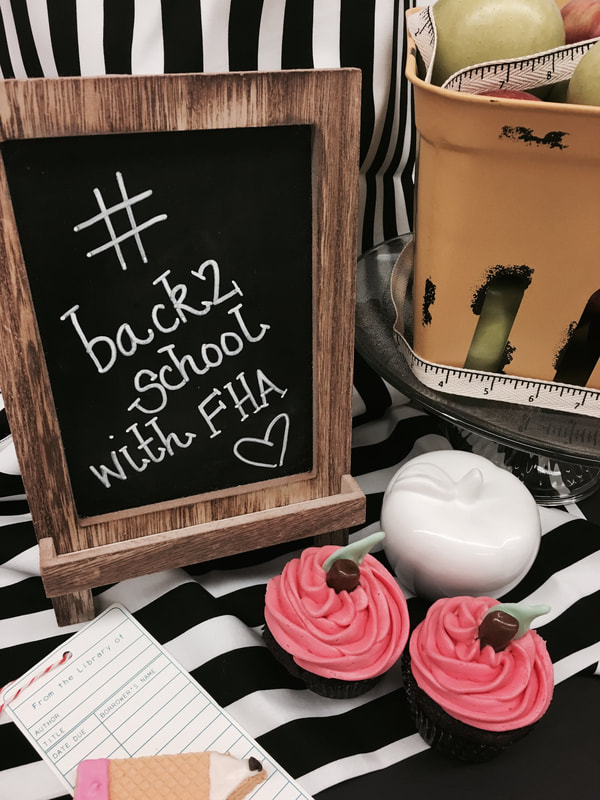
I know some people have mixed feelings about heading back to school but if the end of summer has to arrive, what better way to celebrate than with bright yellow pencils and brand new lunchboxes? If the mood should strike you and you decide to throw a back to school bash, I've got some quick and easy ideas for you! How fun would it be to have a back to school themed breakfast or dinner for your family? Or you could always surprise your fellow teachers with a back to school lunch in the lounge! Let's get started with some ideas! First up, paper goods. I love paper plates from the Dollar Tree; they're so affordable and come in a variety of great colors. I picked up the red plates and added some construction paper for the leaf and stem. The cute black and white napkins are also from Dollar Tree! 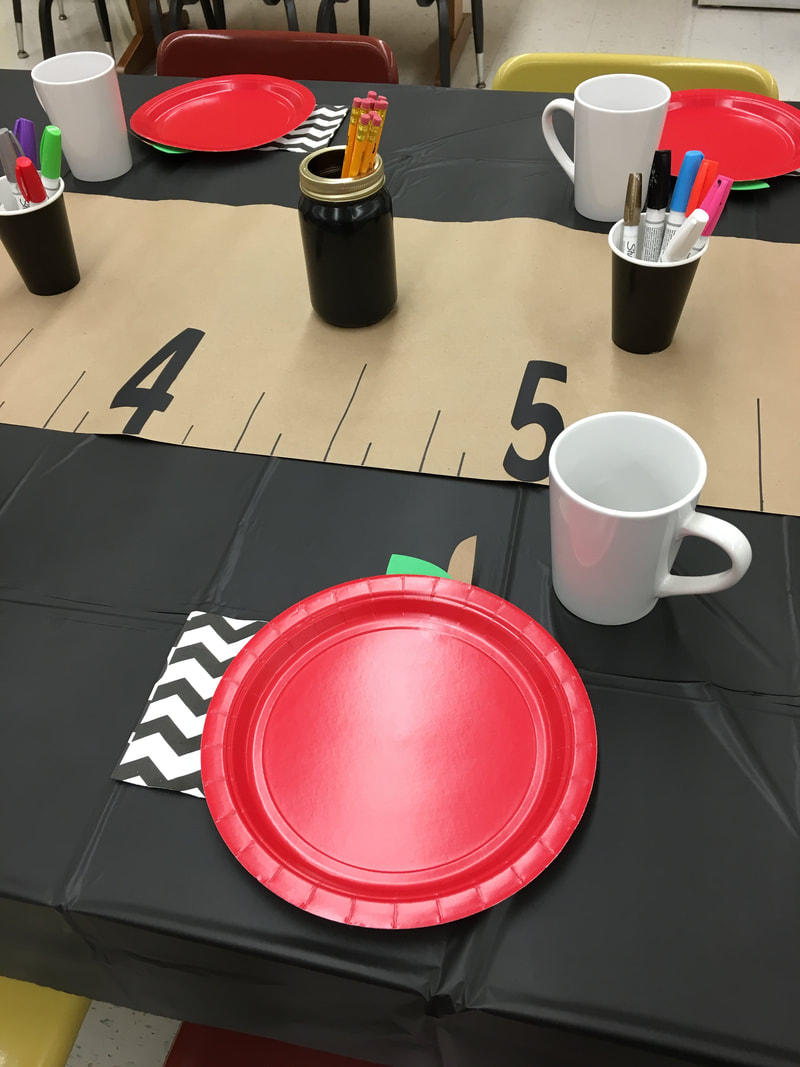 I created the table runners using brown kraft paper rolls from Dollar Tree. I love that stuff! You get so much paper for only $1 and it makes the best table runners! The mason jars are also from Dollar Tree - they were clear and I used inexpensive black spray paint to cover them. Throw some pencils in there and you have the perfect back to school centerpiece. Bonus points! It's a centerpiece that doesn't go to waste. Move that cute jar to your desk or homework area when your celebration is over and use it throughout the school year. 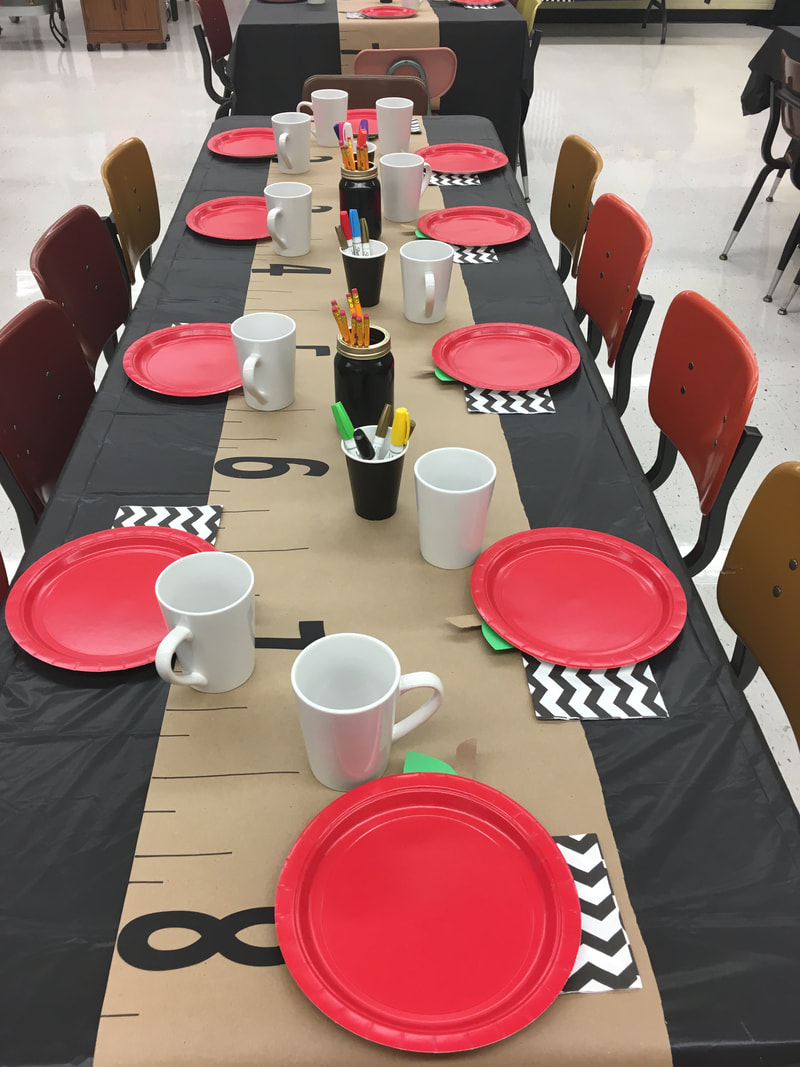 I think that black and white stripes is just the cutest pattern for a back to school party! Grab some black and white wrapping paper or fabric next time you're at the store and use it to decorate your snack table. The back to school banner was made with my silhouette machine and the sweet pencils are from the Target dollar spot. The oversized ABC letters and apple baskets are also from Target. Target always has a great back to school section. I spotted some adorable mason jars this year that are painted to resemble apples and pencils. Check Target early and often for some great deals! Tissue paper poms are still one of my favorite party decorating moves. The red ones below have construction paper stapled to the back to resemble apples. So simple and cheap and so cute! 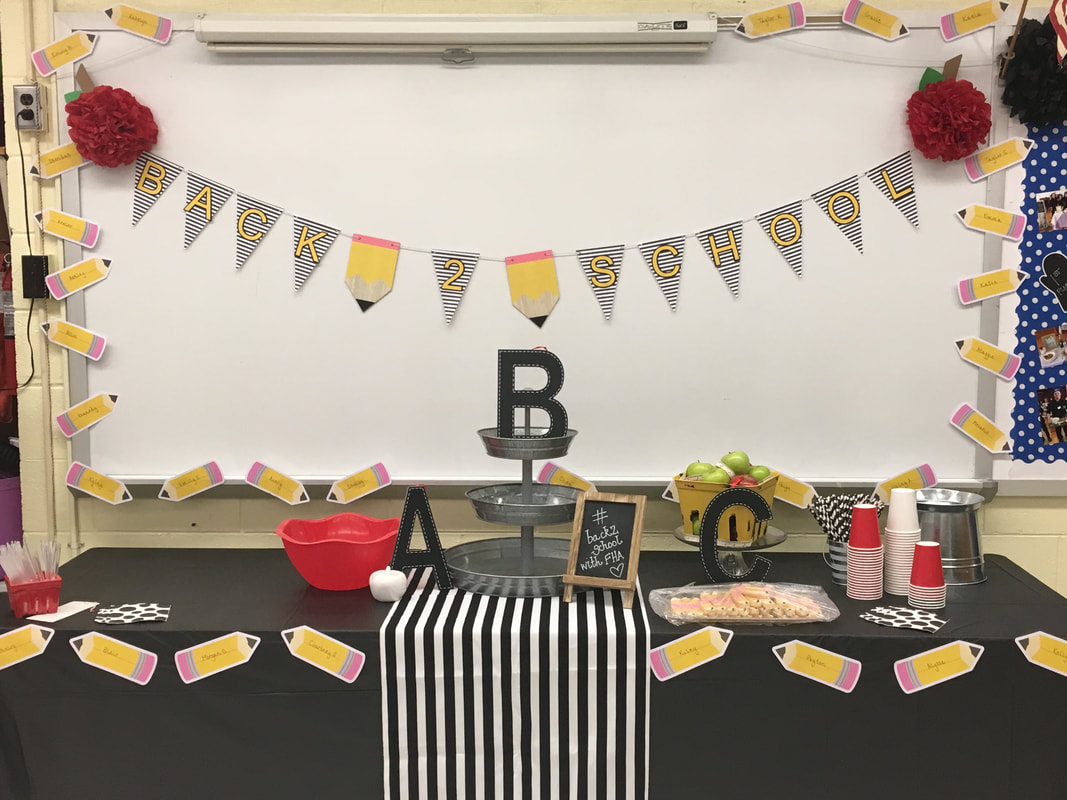 If you are in search of a treat, these "apple" cupcakes scream back to school. Grab a bag of tootsie rolls for the stems and green fondant for the leaves. Most cake decorating supply stores carry green fondant ready made but you could also purchase white and color it. Don't have time for that? The green sour straws in the candy aisle also work great! One of the best things about a back to school party is you may already have a lot of the "decorations" you need. Use school-themed items from around your house. Crayons, glue sticks, and rulers all make great vase fillers. Composition books and notebook paper look great stacked under serving trays and flash cards make perfect banners. Get creative and use those items you already have! If your school supply stash at home is looking a little depleted, head to Dollar Tree to stock up! 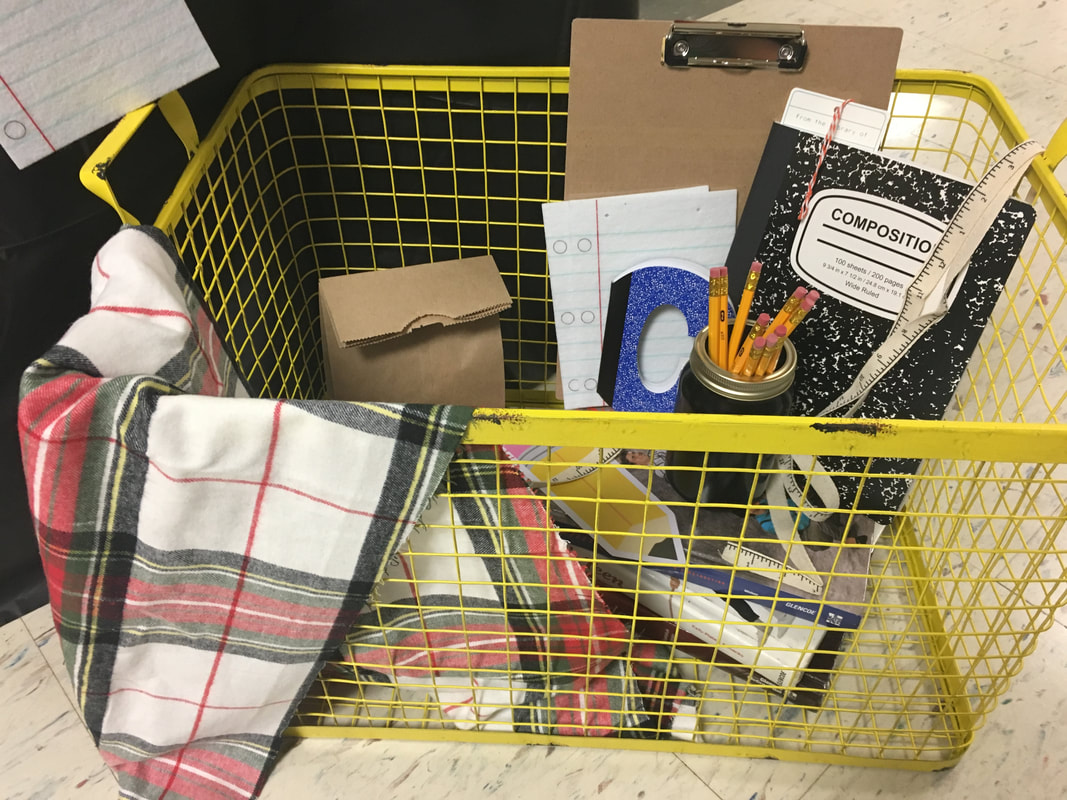 Last but not least, create a photo memory of the day! Whether it's the first day of kindergarten or high school, a photo booth is always a fun idea! I created this "school bus" using a a few cardboard boxes, some duck tape, and a lot of school bus yellow paint! I never imagined my high school students would have so much fun with it! 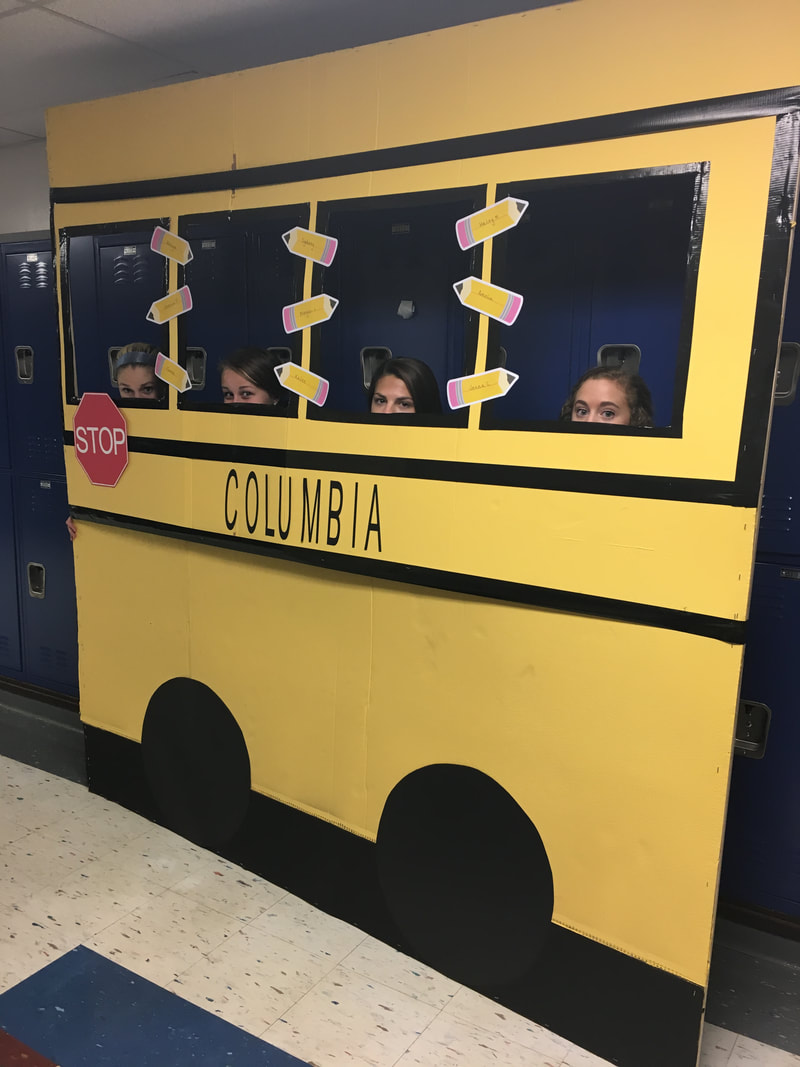 Whether we like it or not, school is on it's way so embrace it and have some fun with your people! A new school year is a great opportunity to make friends, learn something new, and most importantly start fresh. Wishing you the best year ever!
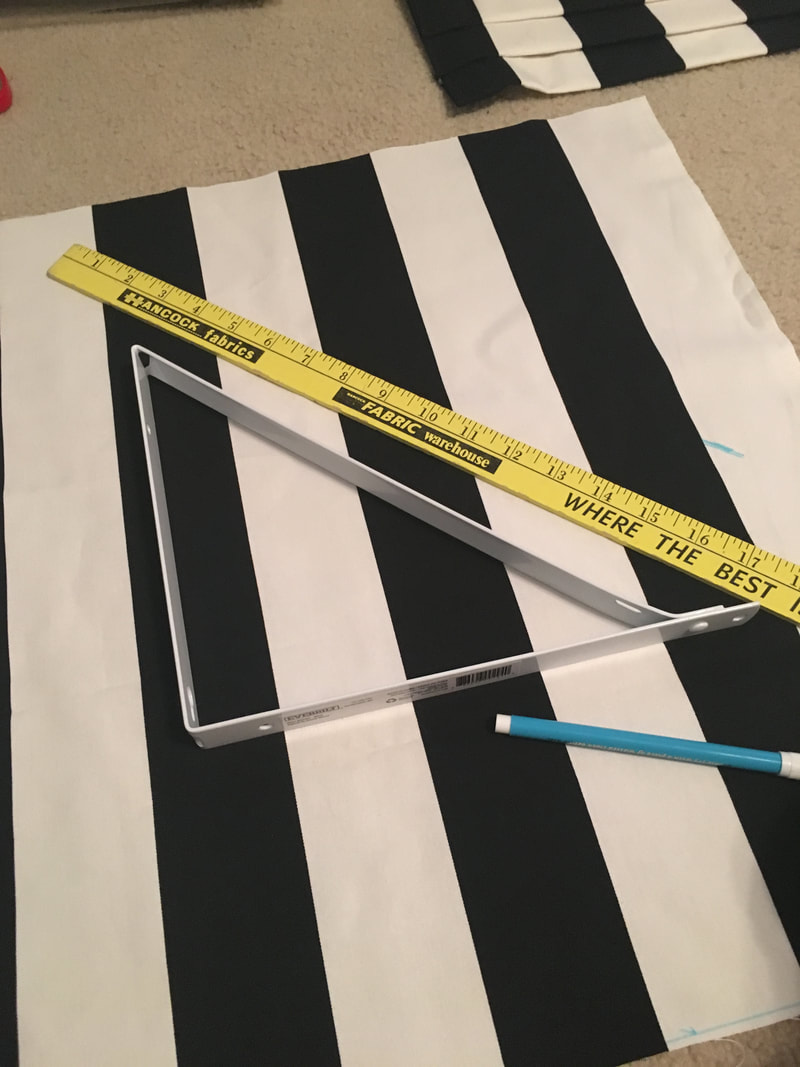
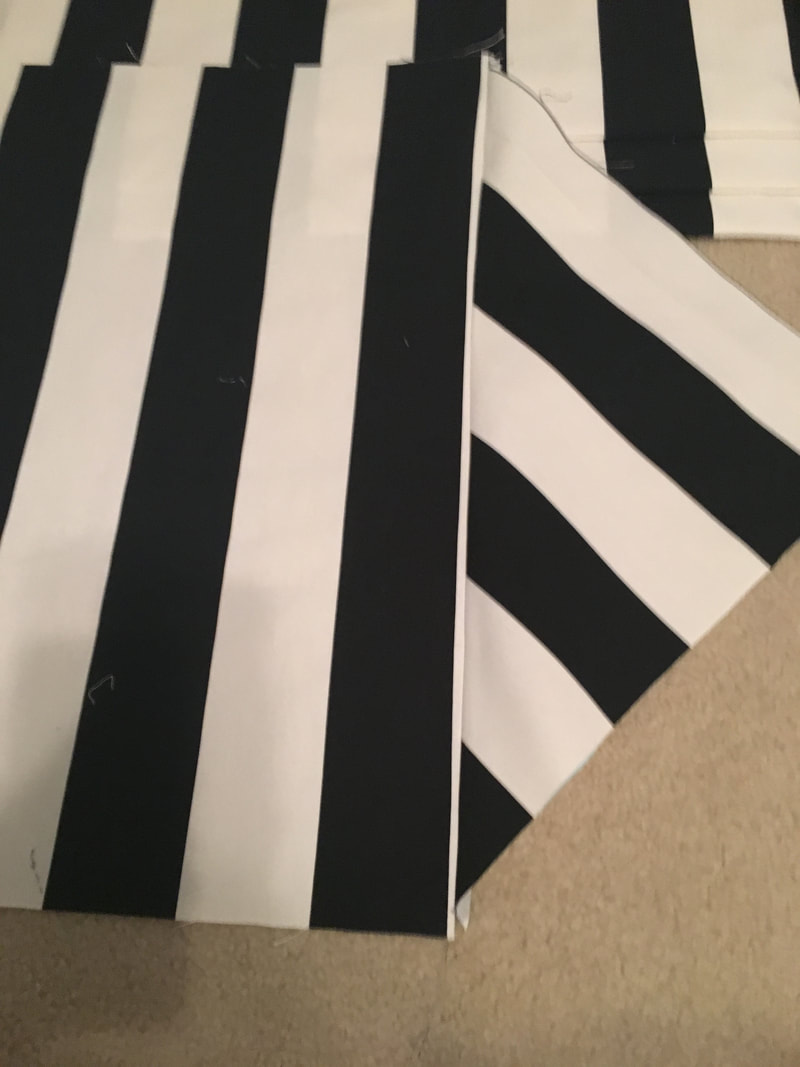
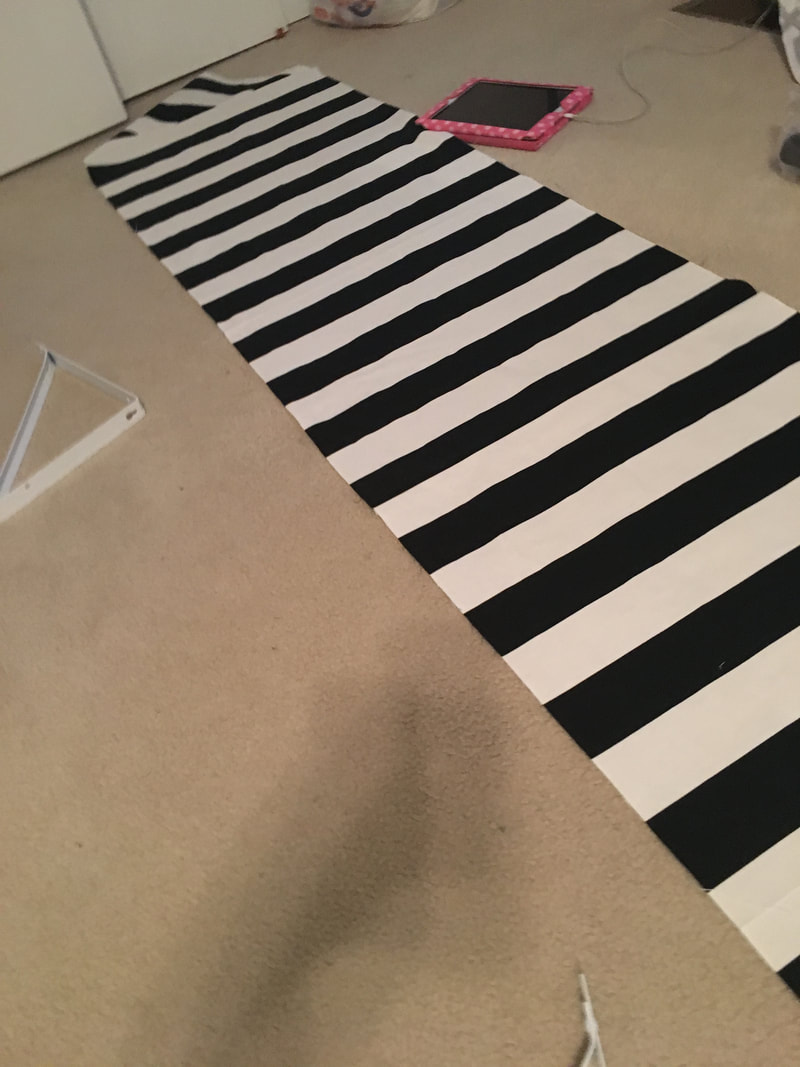
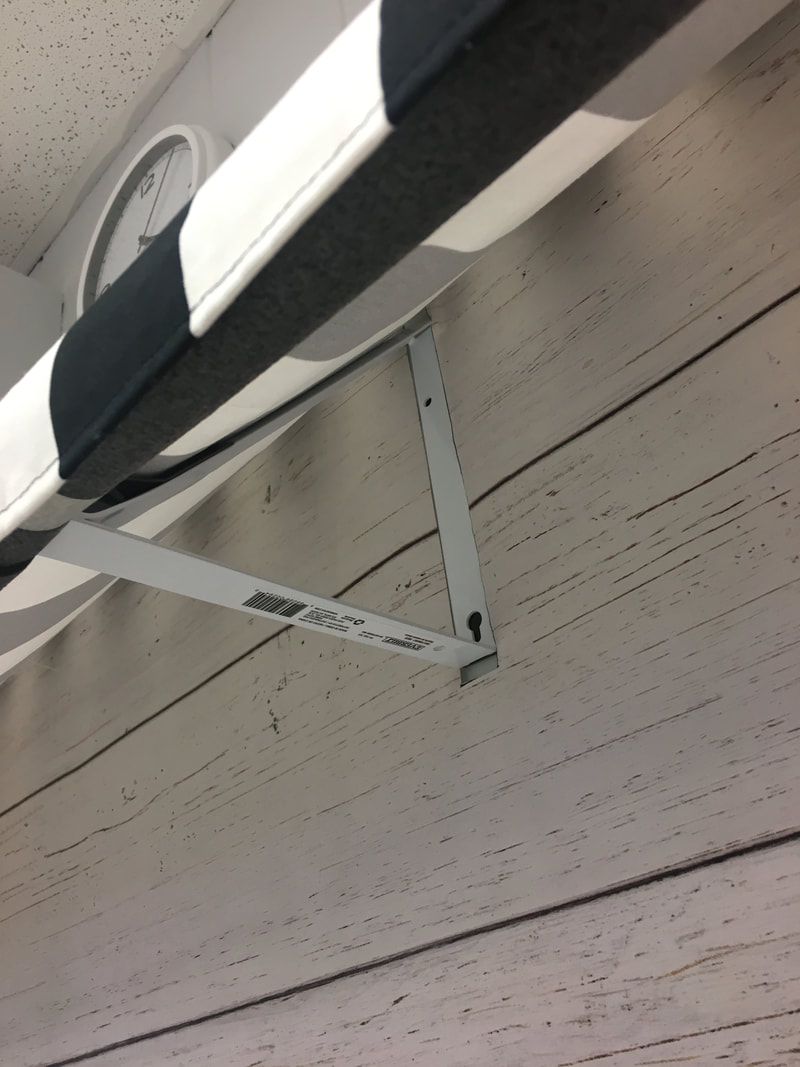
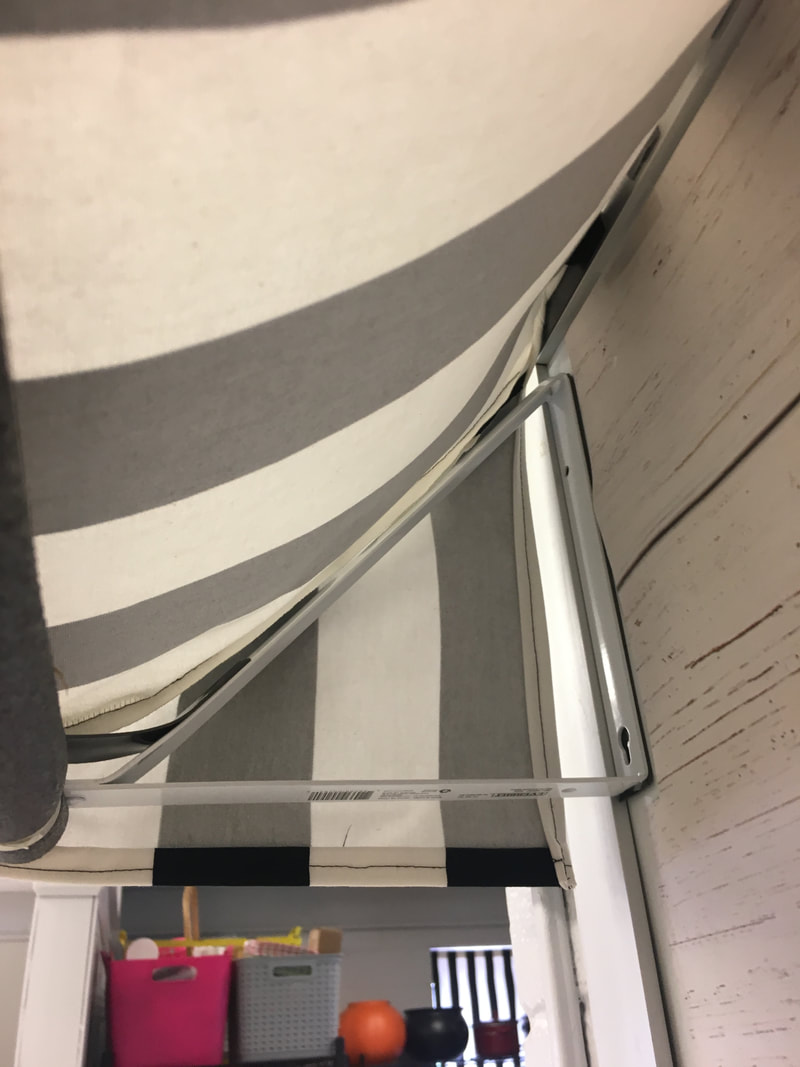
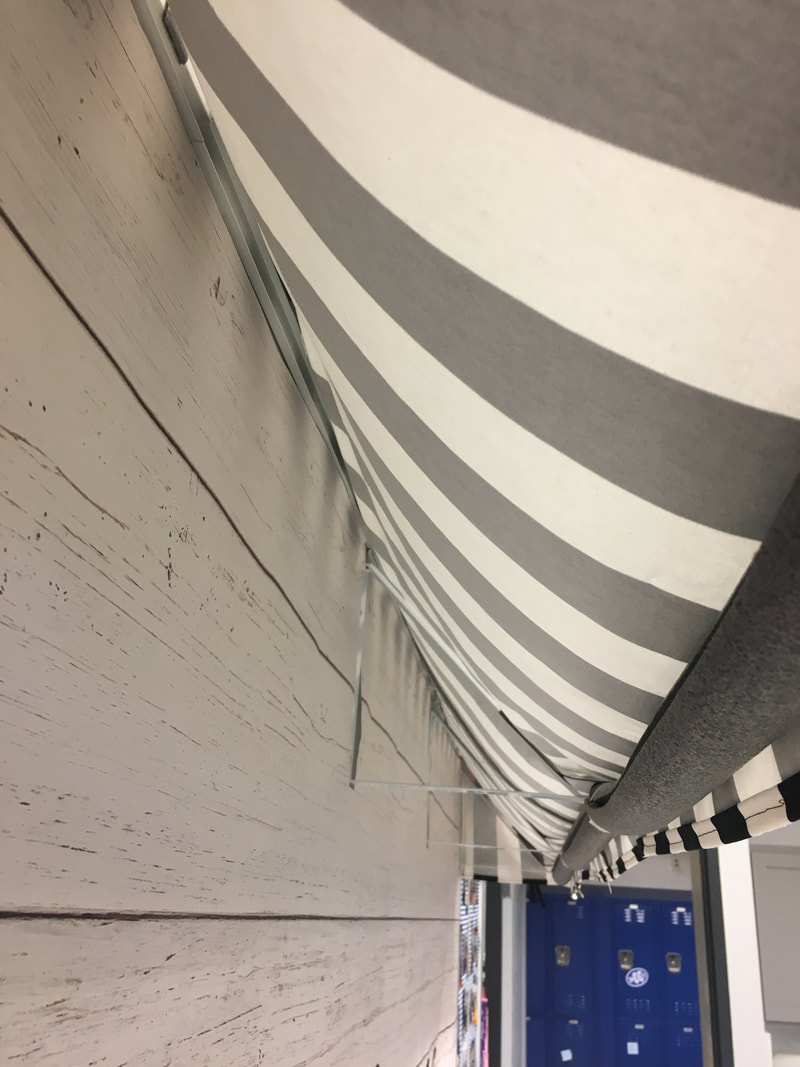
How do you plan on celebrating the new school year?? I have a dry erase board in my classroom kitchen that rarely gets used. It’s basically a giant white space that occasionally gets written on when students get ahold of a marker. Last summer I started thinking: if my classroom is getting a transformation, shouldn’t my dry erase board get a facelift too? I considered many options for the blank space including banners, garlands, and paper flowers but nothing really seemed to fit in the updated space. I had a moment of brilliance in the middle of Hobby Lobby and the awning idea was born. I was inspired by visions of sweet little French patisseries adorned with black and white stripes. It took a little planning but was actually very easy to put together! Supplies needed: 3-4 closet shelf brackets (depending on the length of your space. I used 4) fabric or paper of your choice mounting tape or screws to attach brackets to the wall (I used gorilla tape since this was going on my dry erase board) pvc pipe/insulation pipe/dowel rod - Any will work to support and create the correct shape. 1. Measure the length of your space. Add 1-2 inches to accommodate seam allowance. 2. I decided to have an awning with a length of 16 inches. My brackets were 14 inches tall. 3. Cut the fabric the length and width desired. To make the panels for the sides, I used the bracket as a diagram. Cut the triangle slightly larger that the bracket in order to have room for the seam allowances. 4. Attach the side panels to the main portion of the fabric. I placed mine right sides together and stitched. I aligned the side of the fabric with the long edge of the side panel. 5. I also hemmed all edges of the fabric for a finished look. If you are using paper, you can staple or glue paper to attach and finish edges. 6. To attach the awning, I taped the brackets to my dry erase board placing 1 on each end and 2 in the center of each half for additional support. 7. The fabric awning is taped directly to the dry erase board and rests against the brackets. 8. In order to create the correct "rolled edge" shape, I used a pipe insulator. It rests against the brackets and fabric and creates the appropriate shape.  How easy was that? I'm so excited that it made such a big impact with a little price tag. Have you made your own classroom awning? Share your photos below!
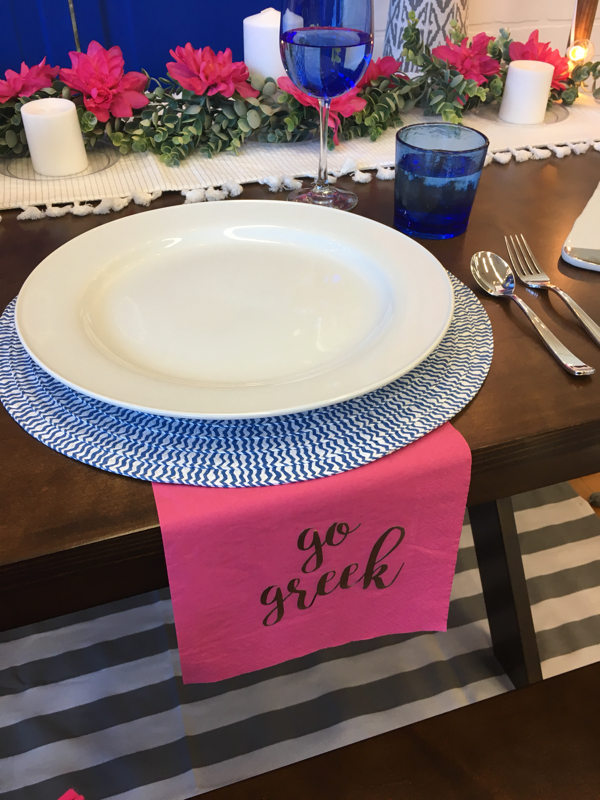
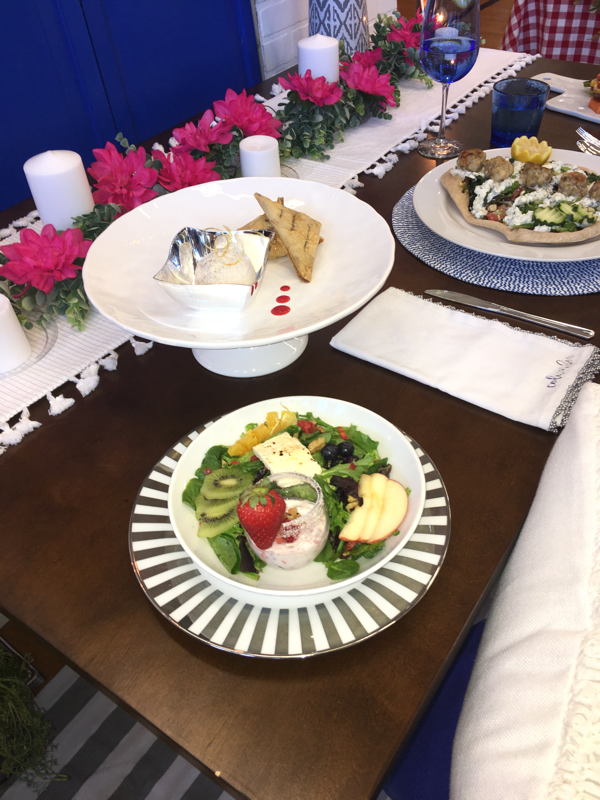
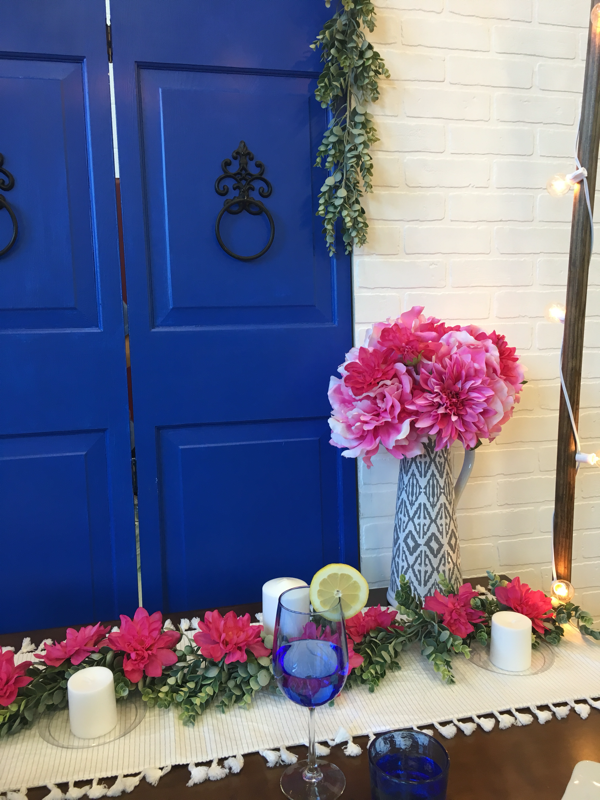
Platinum Chef season has wrapped up once again and I am proud to announce that it was yet again a very successful year for my team of high school students! The inspiration for this years theme came from a photo on Pinterest of Santorini, Greece. I couldn't get over the beautiful, bright white against the shades of ocean blue. That picture stayed in my mind and with that, a Greek outdoor dinner party was born! All of my table styling secrets are below. I started with this old closet door I purchased from ReStore for only $10. The door was painted with two coats of Behr Beacon Blue in a satin finish. I found the amazing door knockers for $6 a piece at hobby lobby. Once the paint was finished, my students assembled a frame to make to door stand alone.  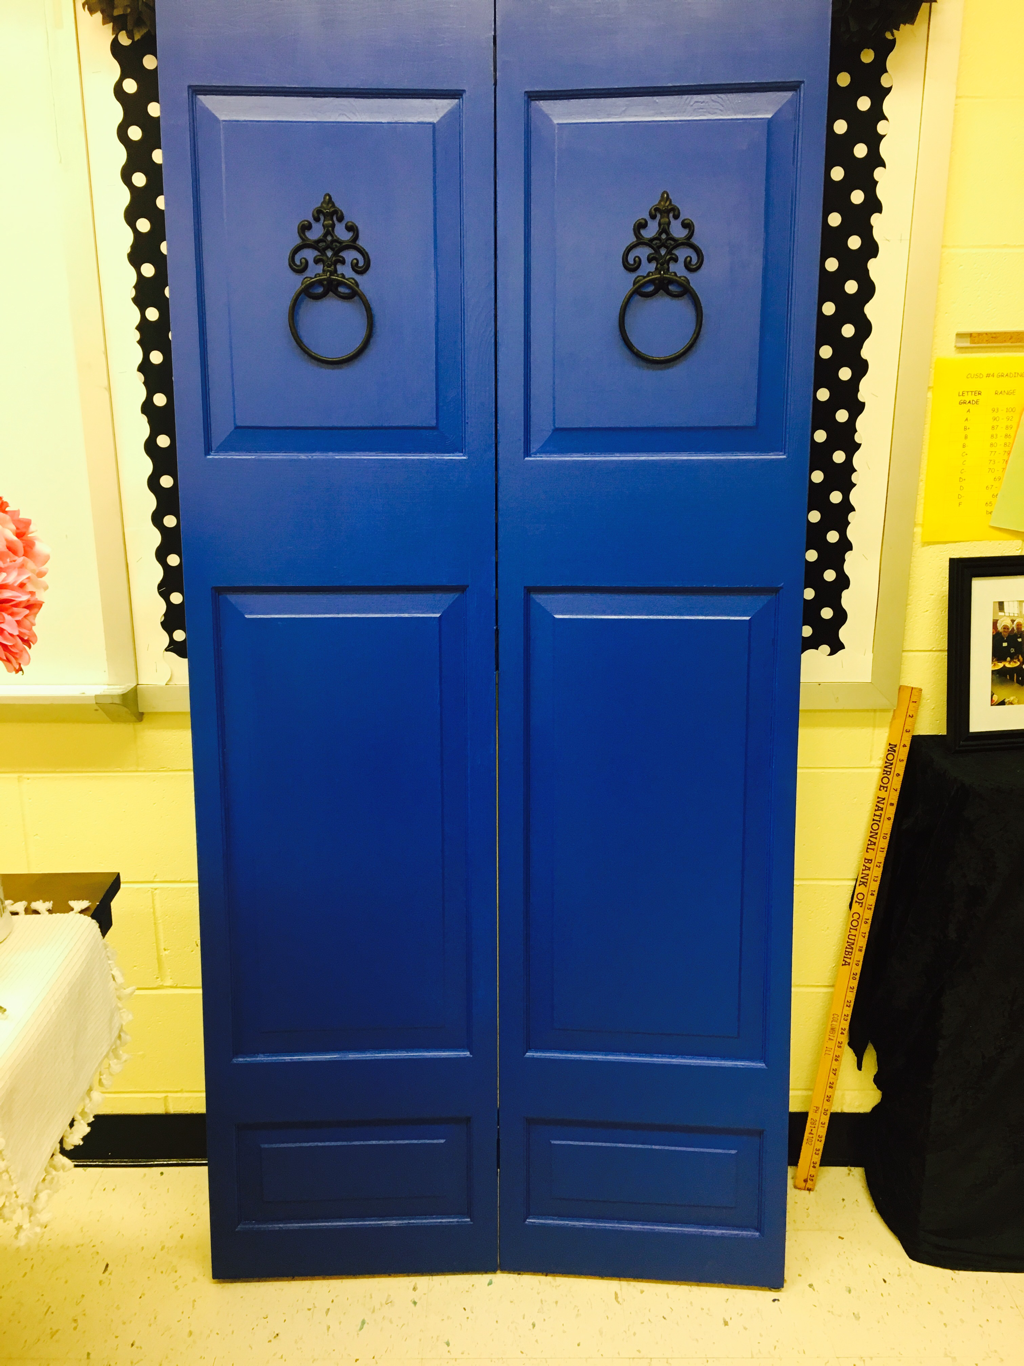 I was inspired by a farmhouse-style dining table I found at Pottery Barn, however Pottery Barn furniture isn't exactly in this teachers budget. I lucked out when I found a similar style at my local Kmart. They were going out of business and the table was only $100! To complete our backdrop, I purchased a large piece of white "brick" wall paneling which we cut into 3 smaller pieces to frame the door. Bright pink became my accent color and things quickly started to fall into place. White dinnerware, pops of blue, and a touch of grey helped pull the entire display together. Varying heights helped draw the eye in while still making all pieces visible. The bar bar cart on the side gave extra room to decorate without overpowering the food. If this were a real party, I would totally style the cheese plate the same way- various textures, heights, and colors make for an appetizing display. I searched everywhere for an area rug to place under the table and was unsuccessful. Instead, a large piece of fabric was trimmed with handmade yarn tassels. Total cost for that project was $20 - way less than a real rug and it was exactly the look I wanted! Last year I ordered custom napkins that were gorgeous but a little expensive. This year I cut chrome vinyl on my silhouette machine and adhered it to hot pink napkins from IKEA - they looked great for a fraction of last years cost! Scroll down to see the finished project!  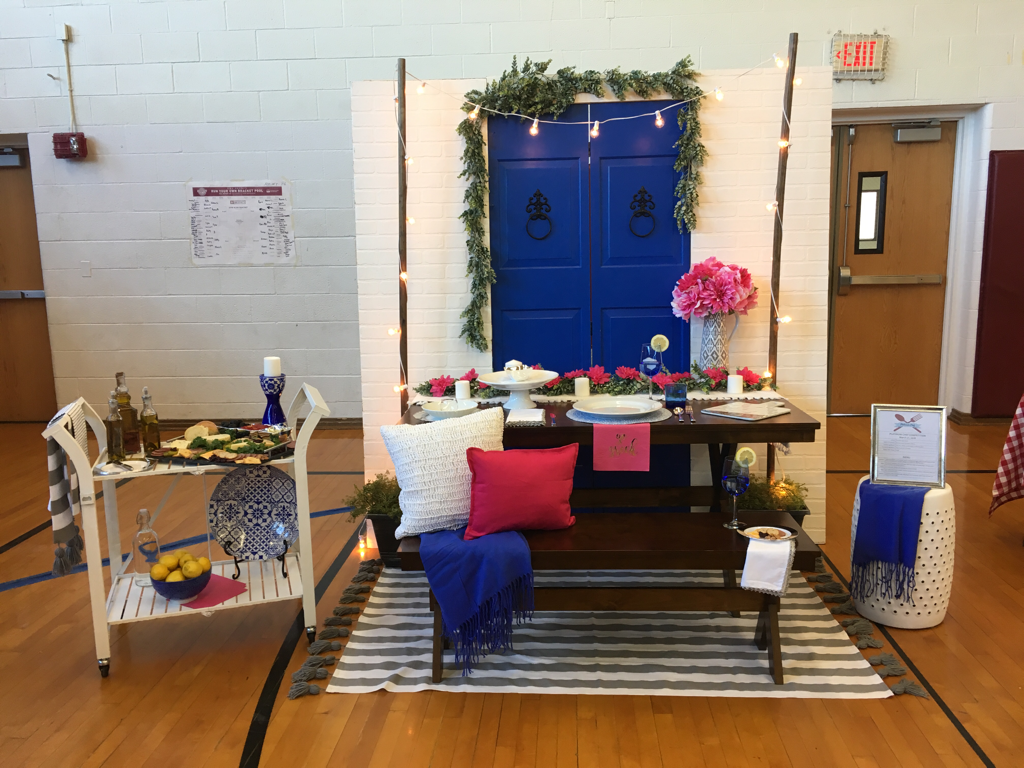 It just makes my heart squeal! Lots of shopping went into this fun project; locations of all the table items are listed below. Greenery, grey/white vase, and fabric for the "rug" - Hobby Lobby Table and bench - Kendall dining collection from Kmart Pink pillow and pink party napkins - IKEA White bar cart, silver picture frame, white/chrome cheese plate, white/chrome striped salad plate, white cake stand - Home Goods Olive oil bottles, blue wine glasses, chrome ice cream bowl and flatware - Dollar Tree Blue blankets, blue candlestick, white pillow, large blue platter, pink florals - At Home White linen napkins - Pier 1 Large dinner plates, small blue tumbler - Pottery Barn Salad Bowls - World Market White and blue charger - Sur la Table White stool and "brick" wall - Menards Party lights - Target It was so fun to see our vision finally come together. My students knocked it out of the park with their food as well! Their teamwork was incredible and they brought home Best Presentation Table, Best Dishwashing/Support Team, Competition MVP, and 1st Place Overall! I am so proud of them! Remember those sweet little baby bibs we made a few weeks ago?? Do you need a burp cloth to match? If so, this tutorial is for you! Materials needed: pre-washed cotton fabric (cut to 10"x 18") backing material - I used the same pre quilted material I used for the bibs ( cut to 10"x 18") thread, scissors, sewing machine, and an iron 1. Begin by cutting your front and back material to the correct size. 2. Place the two materials right sides together and pin all around the perimeter. 3. Stitch all around the edge leaving a 2"-3" opening for turning right side out. 4. Trim the excess material on the edges and clip the corners. 5. Turn the burpcloth right side out and press making sure to press the opening closed. Top stitch the entire edge and press one last time. You're all finished! This is such a quick and easy project to complete. Combine it with a baby bib from part 1 and it also makes the sweetest little baby gift!  Exciting news my friends, I finally bought a place of my own! The buying process has kept me pretty busy over the last few weeks but I've still had plenty of time to create big plans for my new space. One of the things that I'm most excited about is that I will finally have a craft room! I have an awesome sewing machine that once belonged to my MaMa; it's built into a cabinet with great storage space. Unfortunately, it's been collecting dust in my parents basement for quite some time due to lack of space at my apartment. In the next few weeks, it will get a well-deserved home in my new creative space. The cabinet has recently received a fresh coat of white paint and new drawer pulls but it was missing a chair. I considered using several different styles of chairs but couldn't find anything I loved. A couple weeks ago, I ventured into a second hand store and stumbled upon this cutie for only $5! 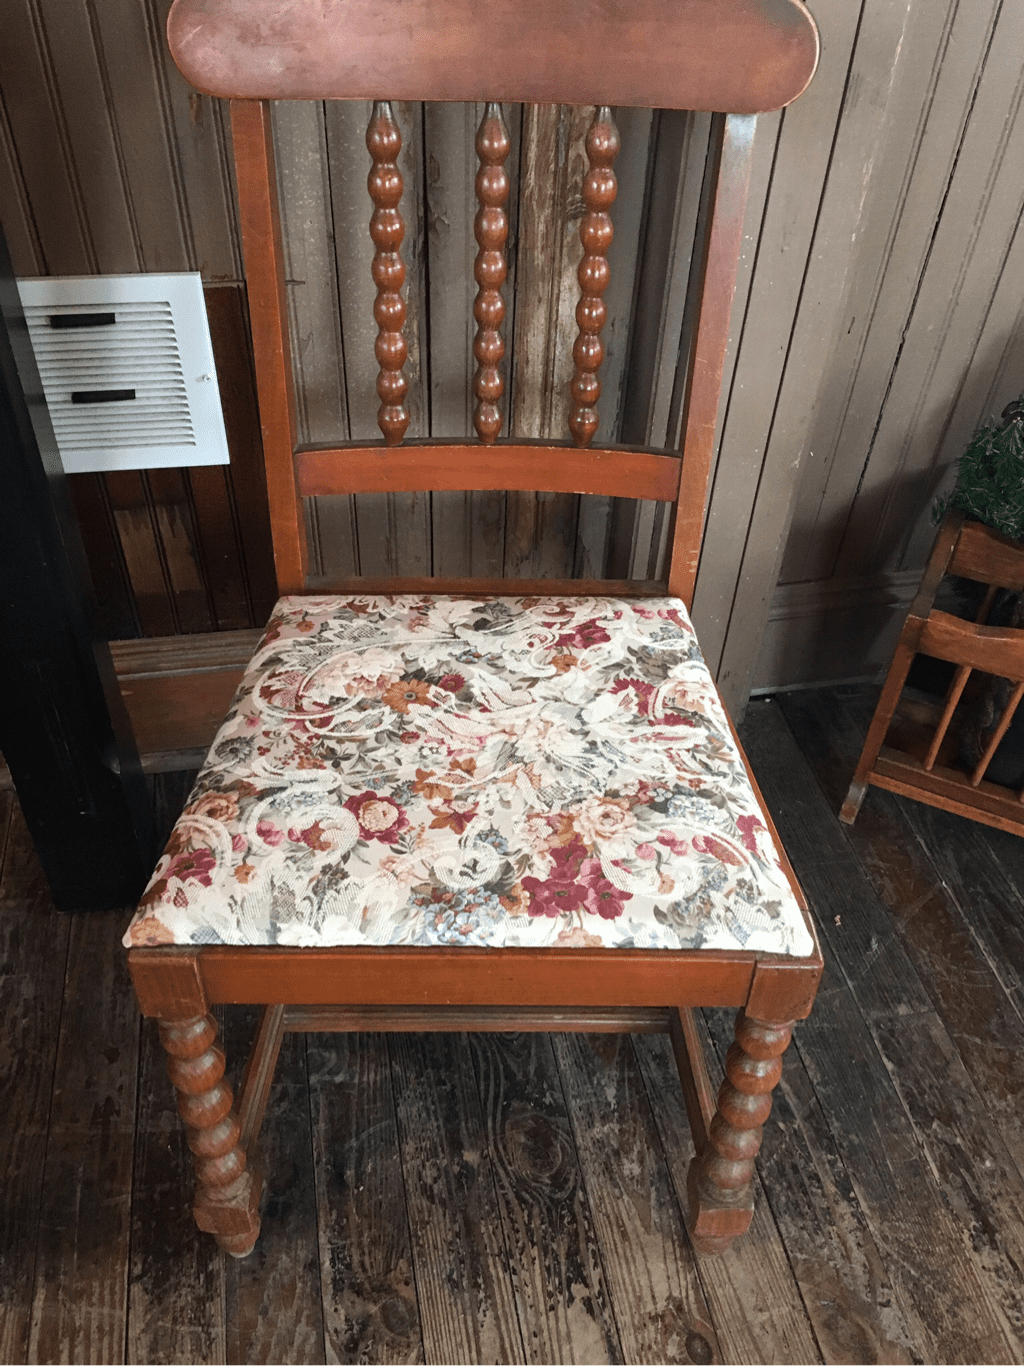 It was the perfect height to accompany the sewing desk; for $5 I just couldn't pass it up! After removing the cushion, I decided to paint the chair white to match the desk. I used a white primer first and then an additional coat of white appliance paint. 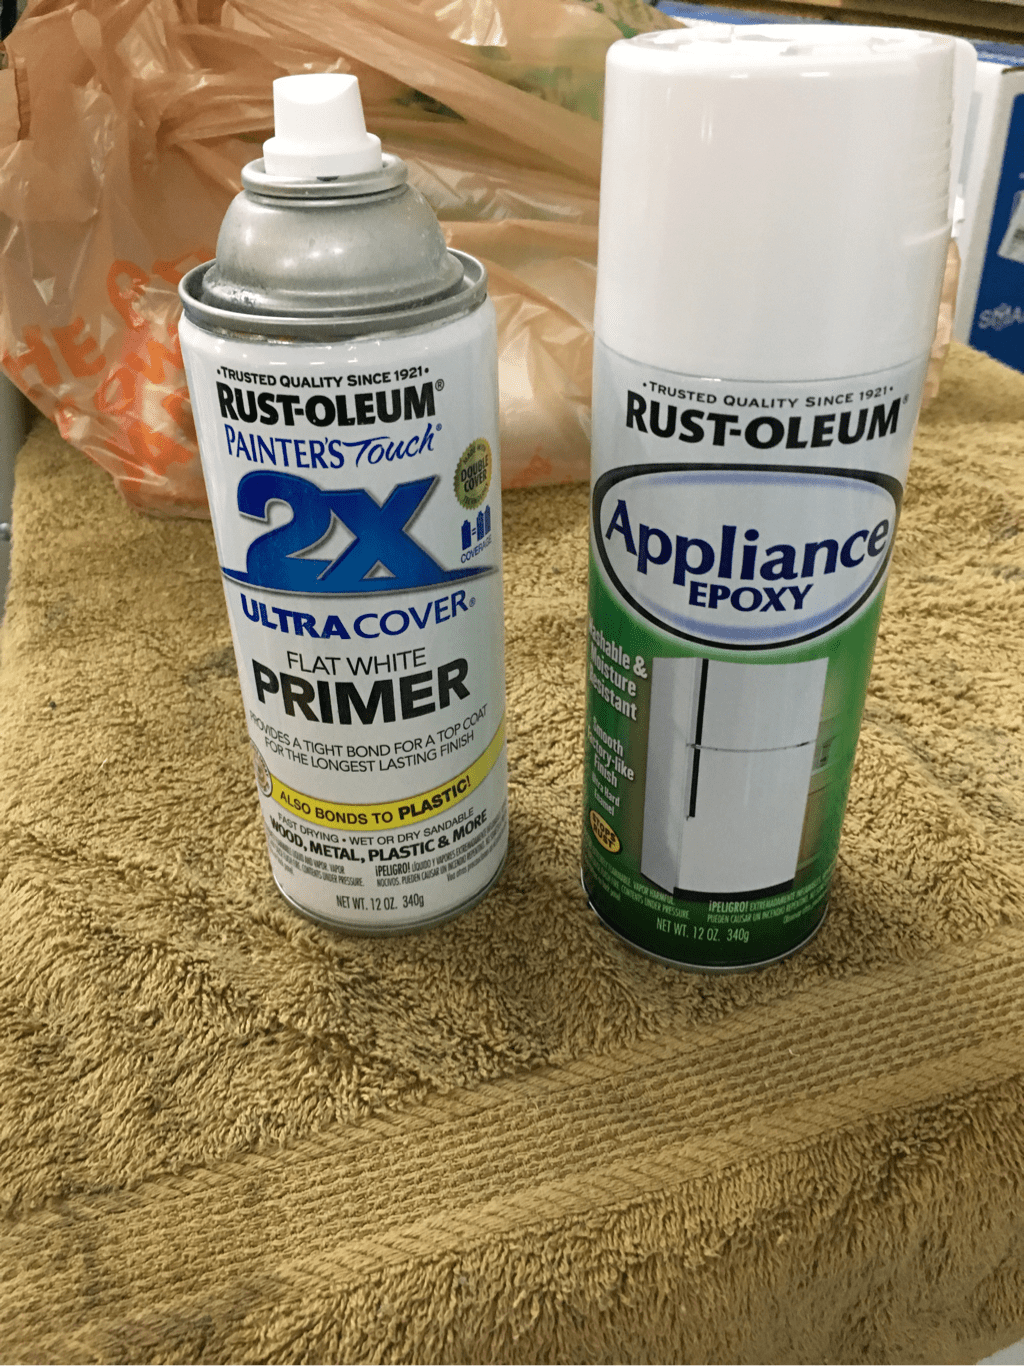 The craft room is grey and will be accented with yellow and white. For the chair cushion, I selected upholstery fabric from Jo-Ann's in a fun yellow print; I used half a yard for this project. The fabric was wrapped around the existing cushion and stapled to the back. 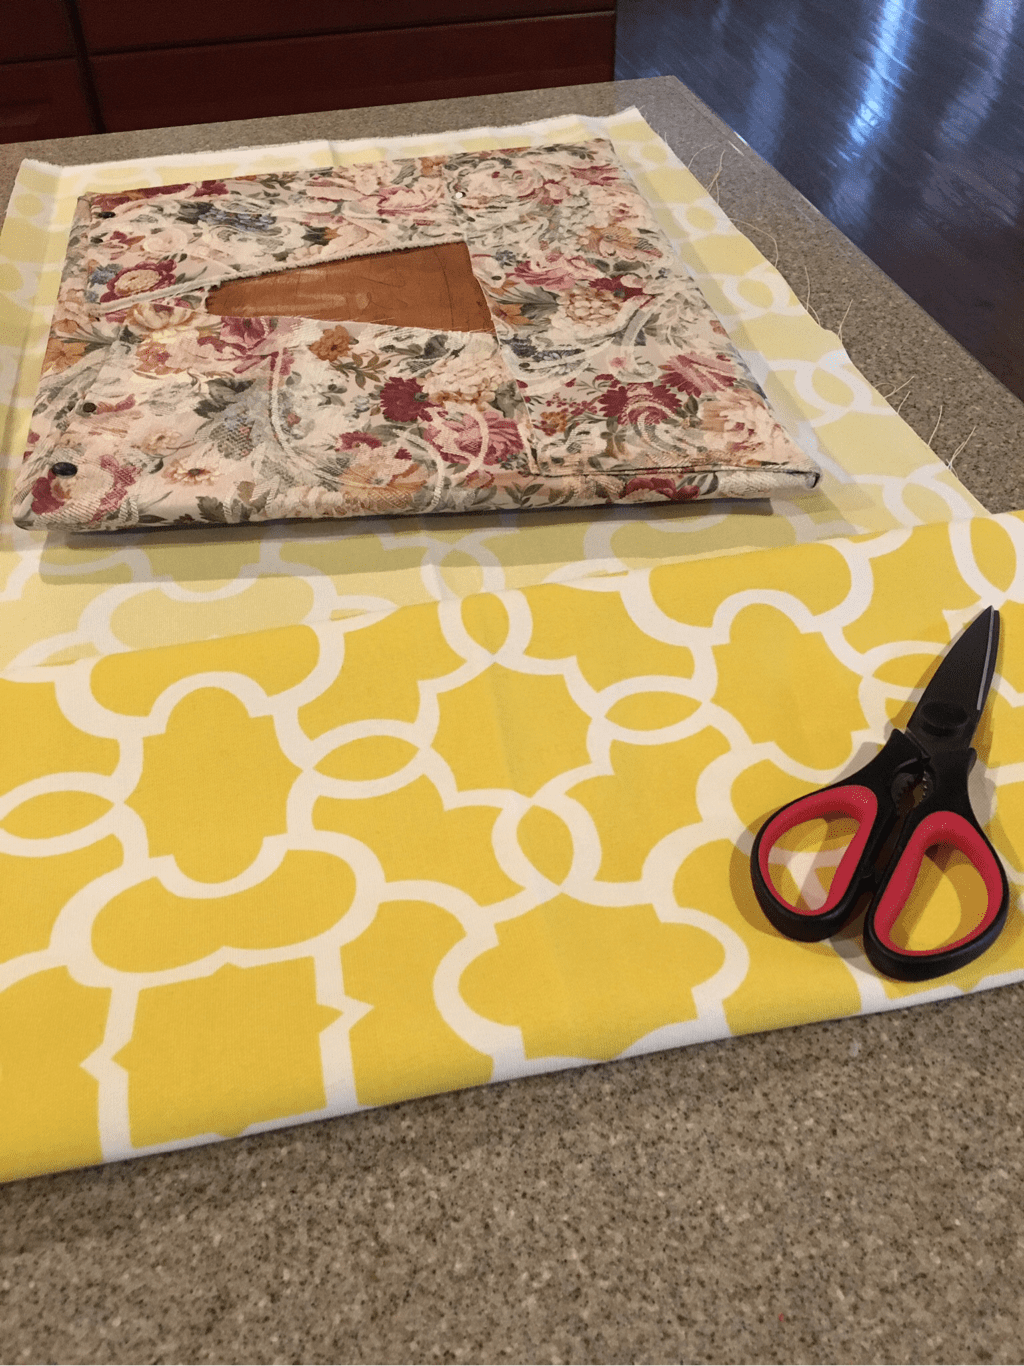 Once my paint was dry, the cushion was secured back into the chair frame. 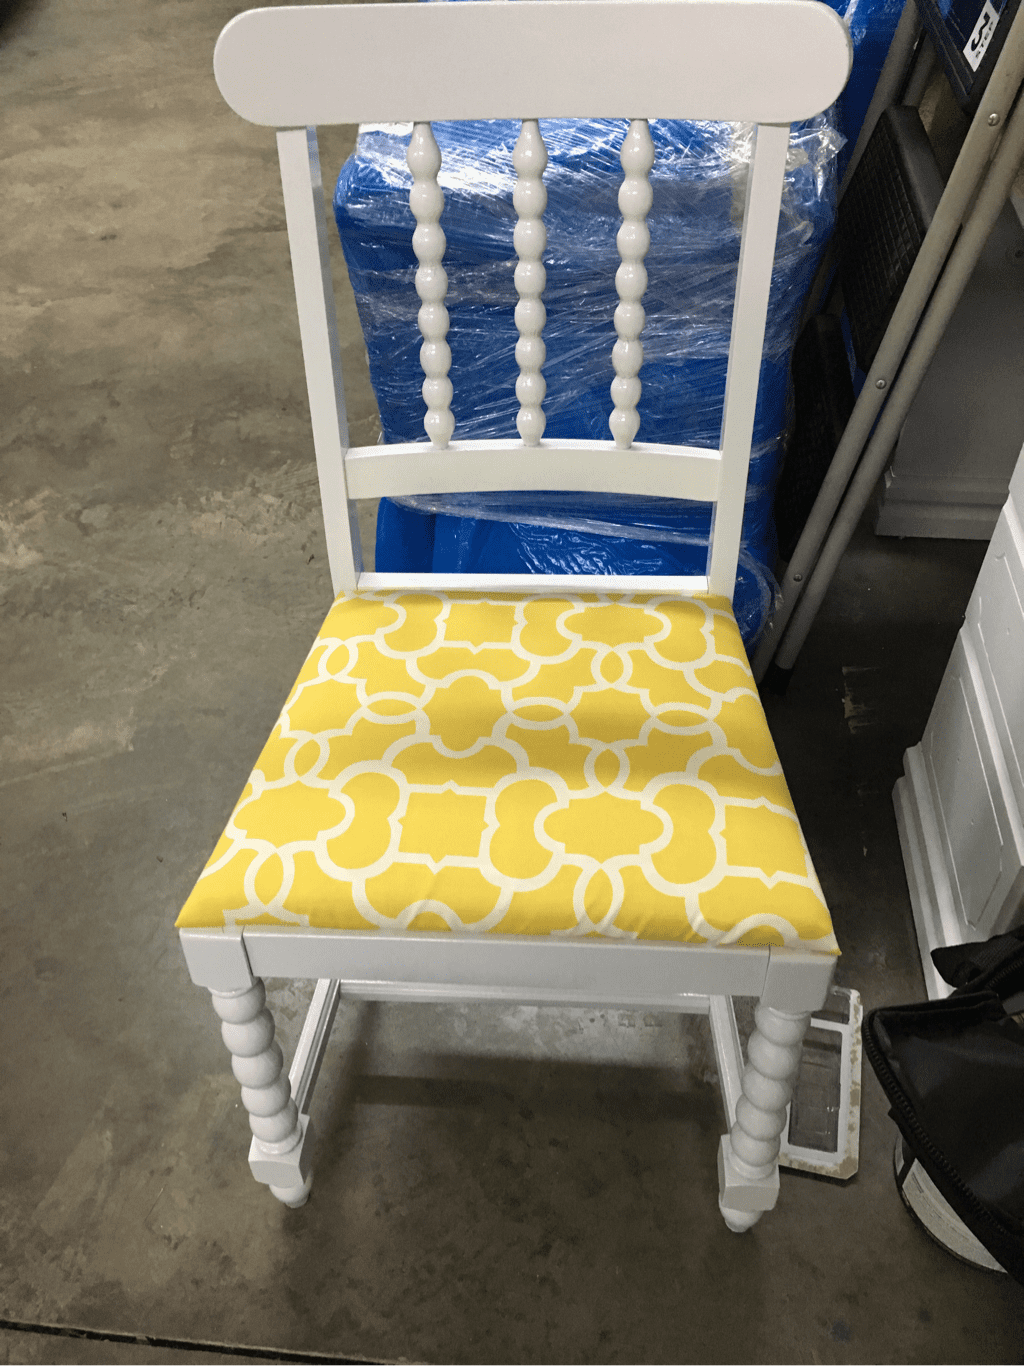 I'm so happy with how it turned out; I can't wait to use it in the new craft room! Come back soon to see the craft room when it's finished!
I am totally obsessed with plaid. I love decorating with plaid just as much as I love wearing it. I'm so excited that buffalo plaid is a huge trend right now- you can find it everywhere on all kinds of items! When it comes to party planning, I find inspiration in all kinds of places. Recently, I was doing some shopping in At Home (formerly Garden Ridge) when I stumbled upon these buffalo plaid Christmas ornaments. Instantly I knew that this was going to be my inspiration for the upcoming FHA holiday cookie exchange. This will be our fourth year to host the event and each year the cookies get fancier, the cocoa gets hotter and the outfits get tackier. P.S. - if you have an At Home near you, you should check it out. They have great home decorating items but their seasonal section totally rocks and is very reasonably priced. 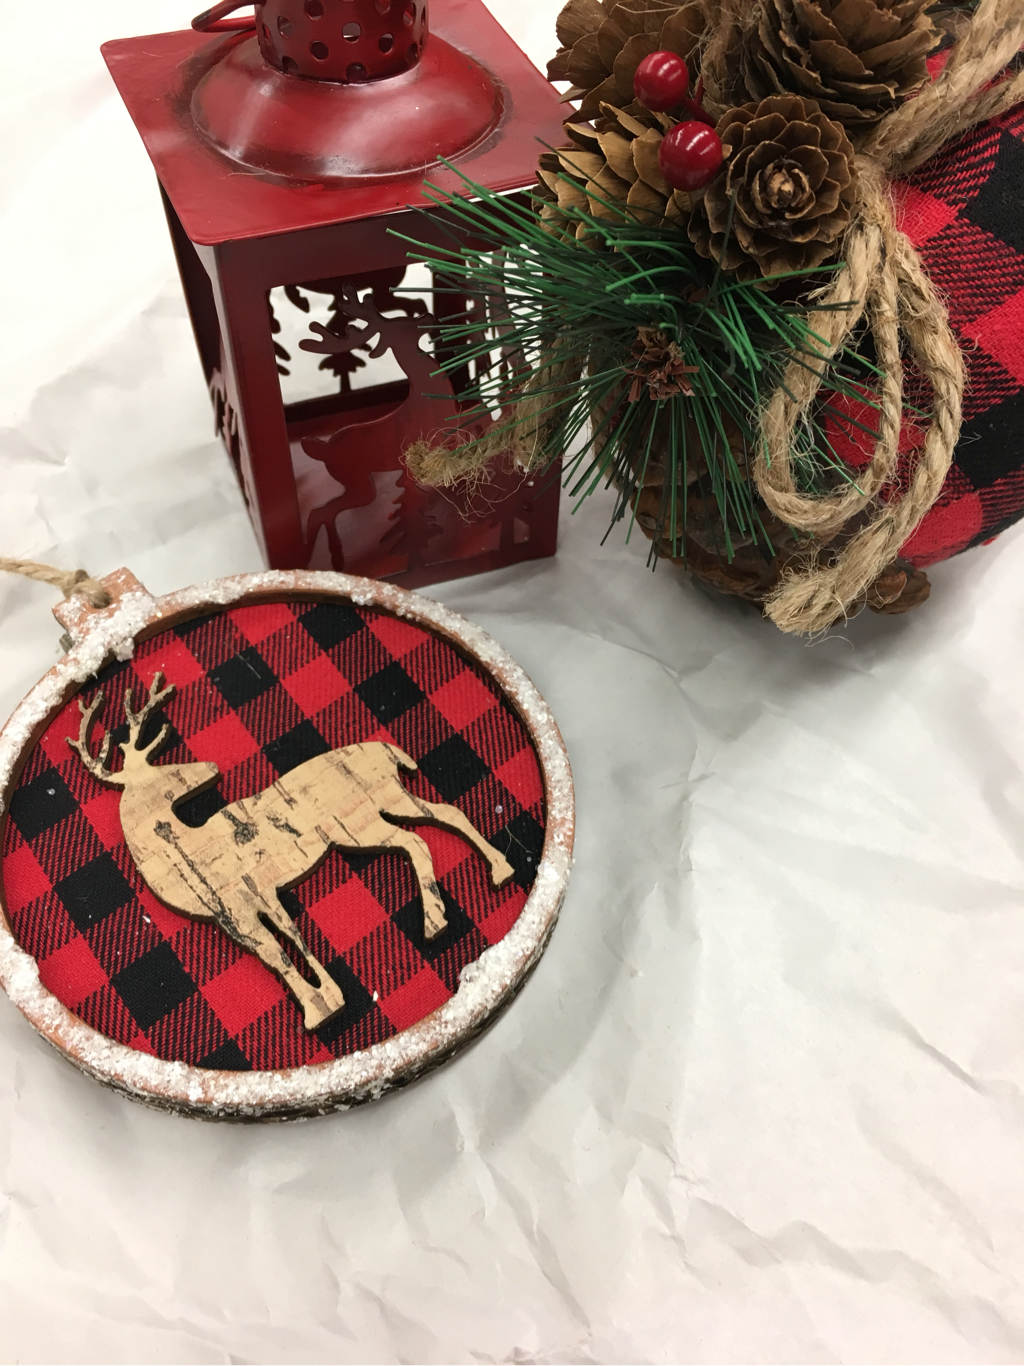 In order to prepare for our upcoming cookie exchange, I have been working on a few buffalo plaid projects that I'm going to share with you today. First up, fabric garland. I love to make fabric garland for all different events; it's super easy to do and can be a great way to use up extra fabric. For the cookie exchange, I am using 1 yard of buffalo plaid material, a roll of burlap ribbon, and 1 spool of twine. 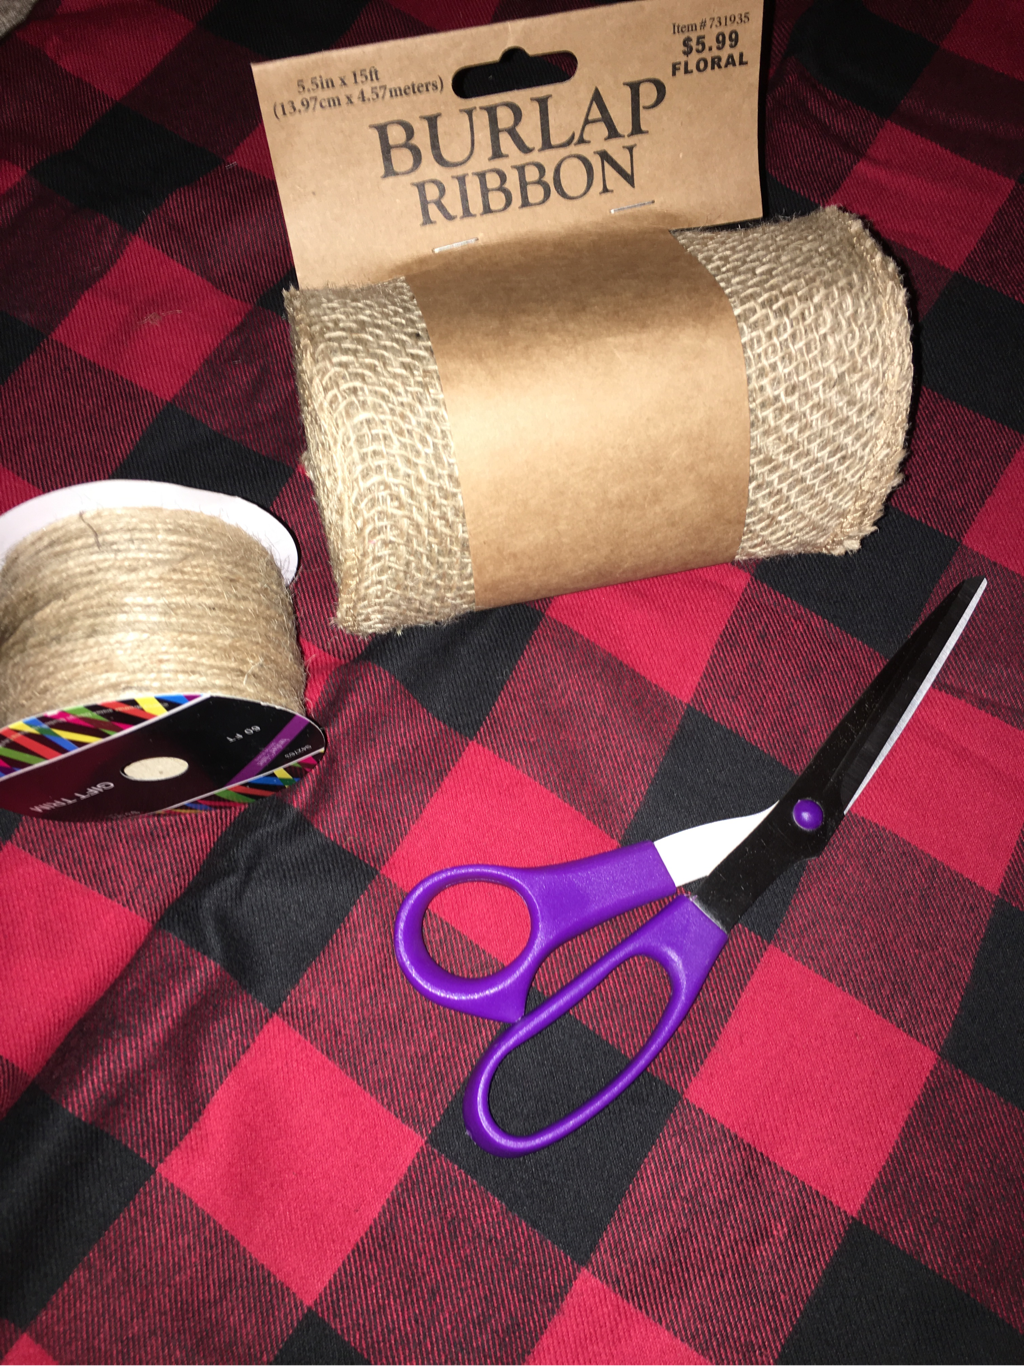 1. Fold your fabric in half lengthwise. Next, decide what width you are going to make you fabric strips. Since I am using the burlap ribbon, I'm going to cut my fabric the same width. 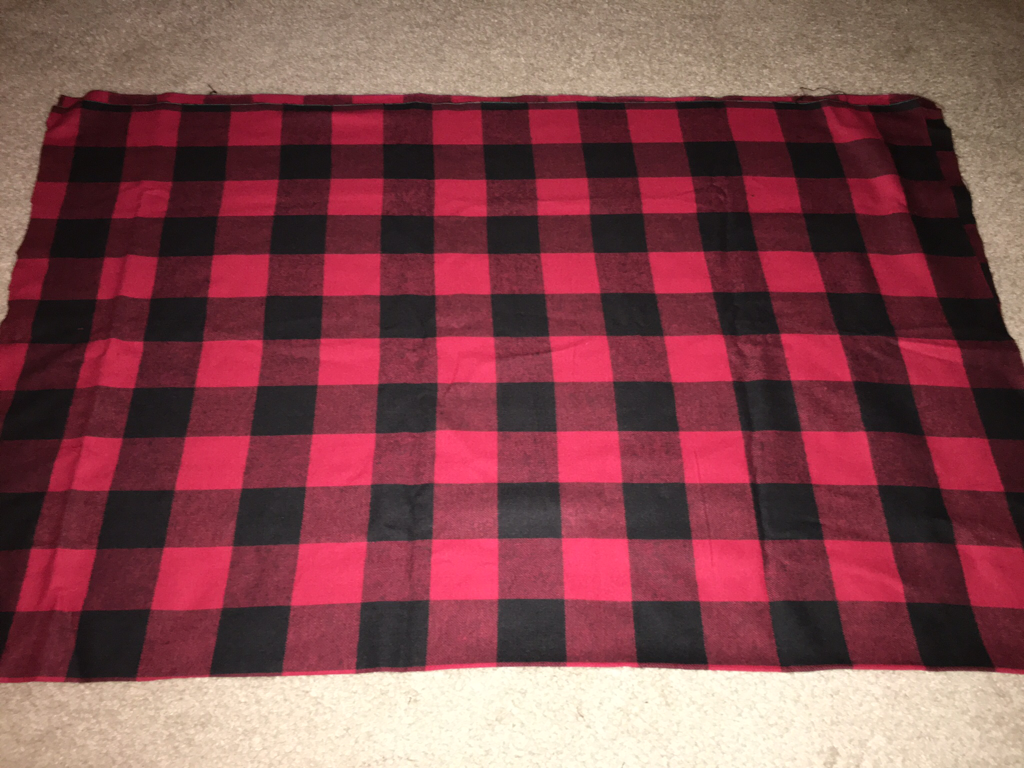 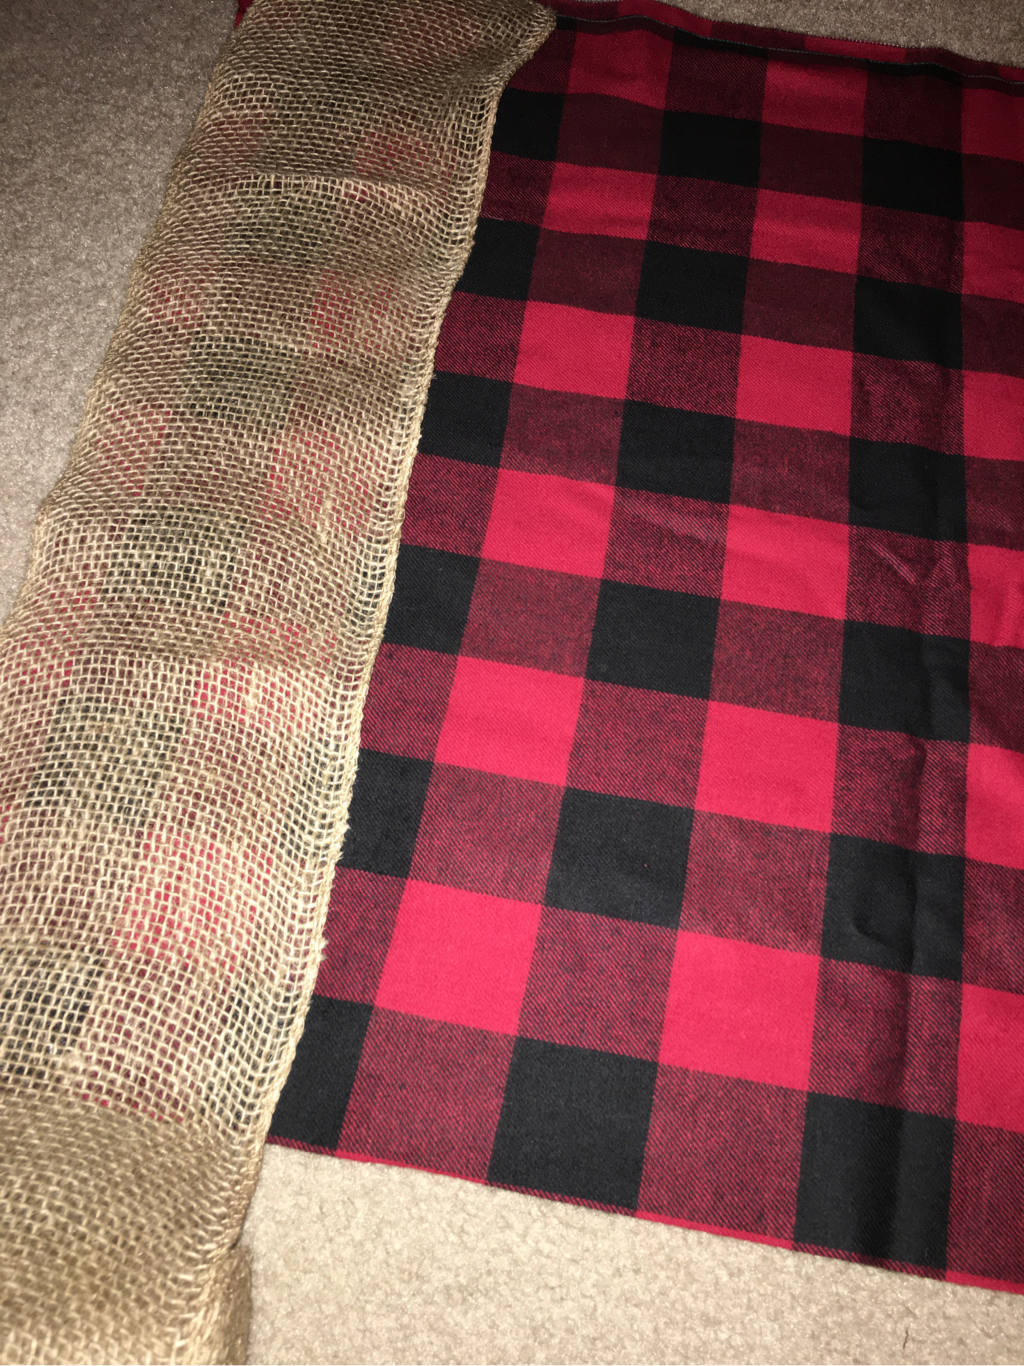 2. Cut all your strips of fabric and burlap. I didn't cut through the fold so all of my strips are approximately 44 inches long. You can adjust this just as you can the width to suit your needs. Place a strip underneath your twine and tie in the center. Repeat this process with each strip alternating colors. Leave plenty of twine on each end in order to tie or hang your garland. 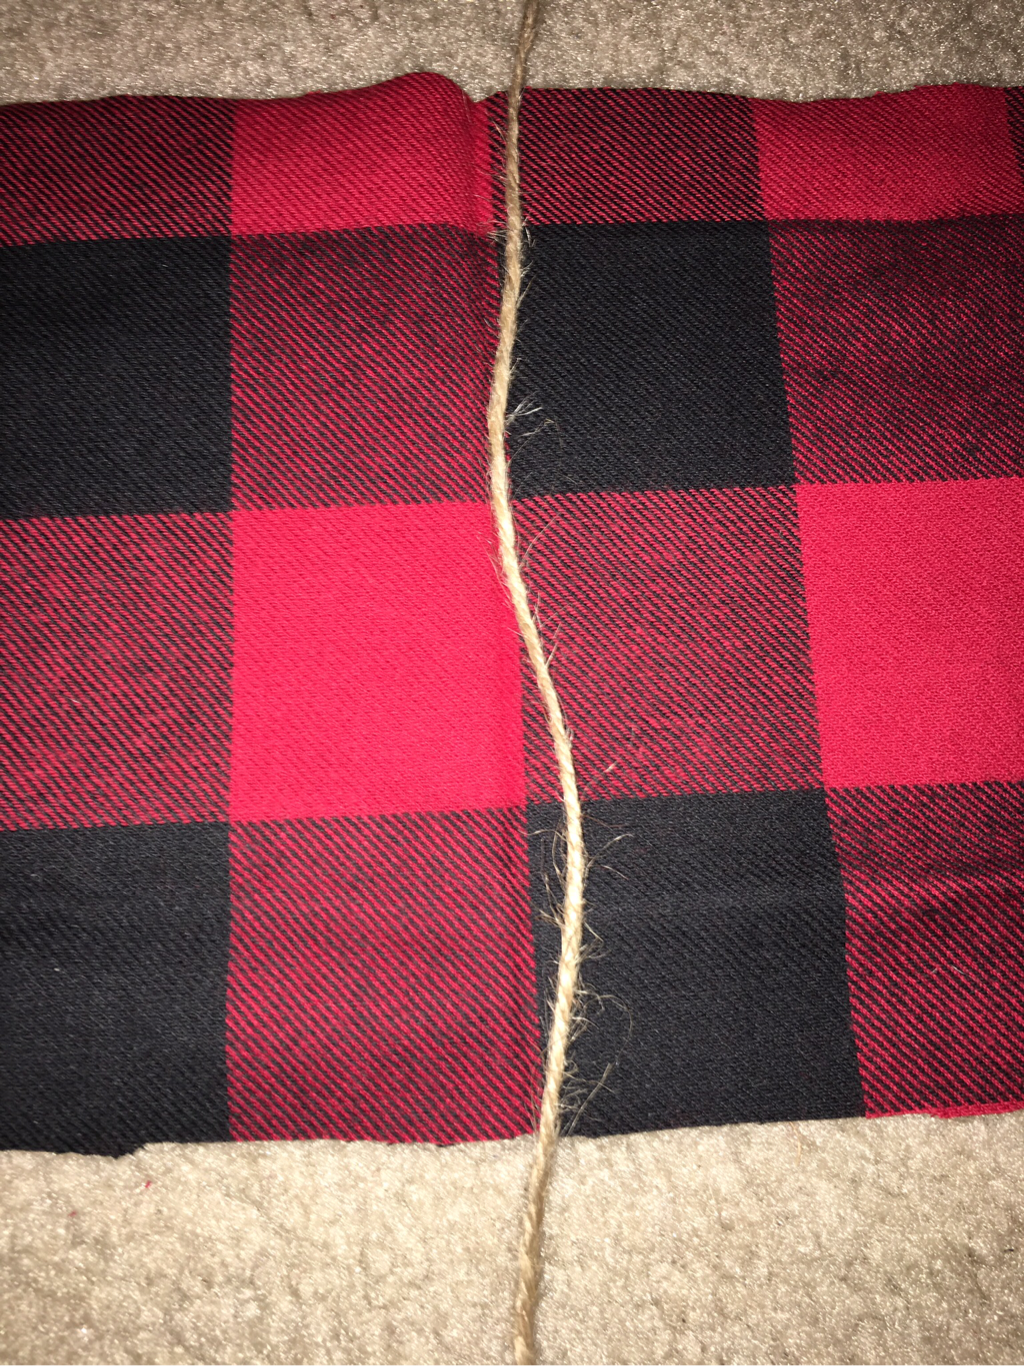 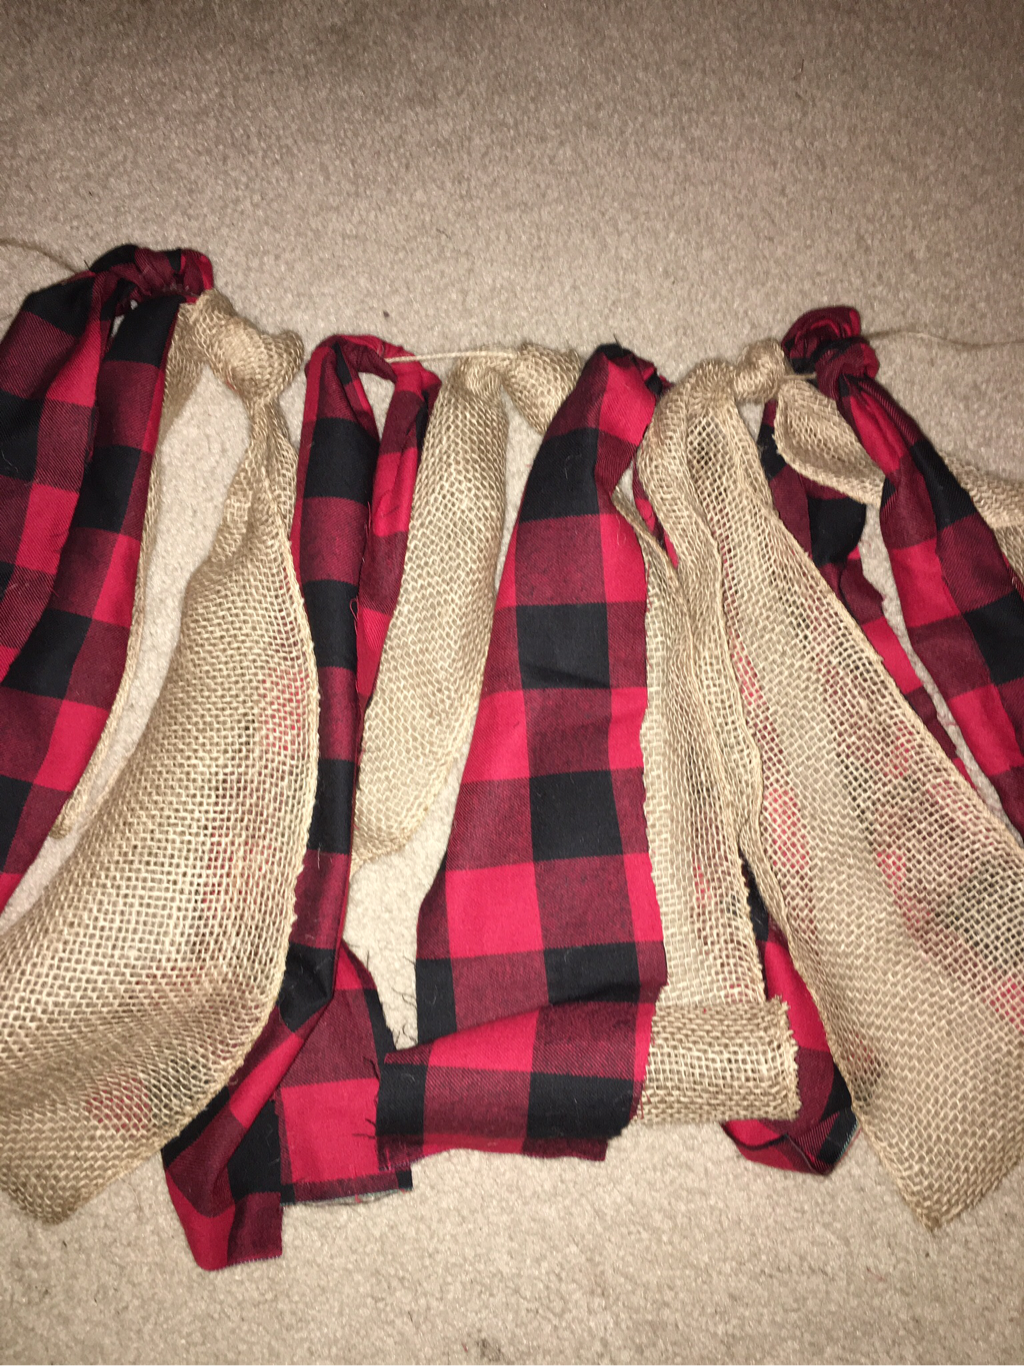 I also cut a few things on my silhouette machine to use for the party. After my reindeer and trees were cut, I realized that my remaining paper was just too cute to throw away. I backed each opening with some cardboard colored cardstock and added it to the center of my garland. 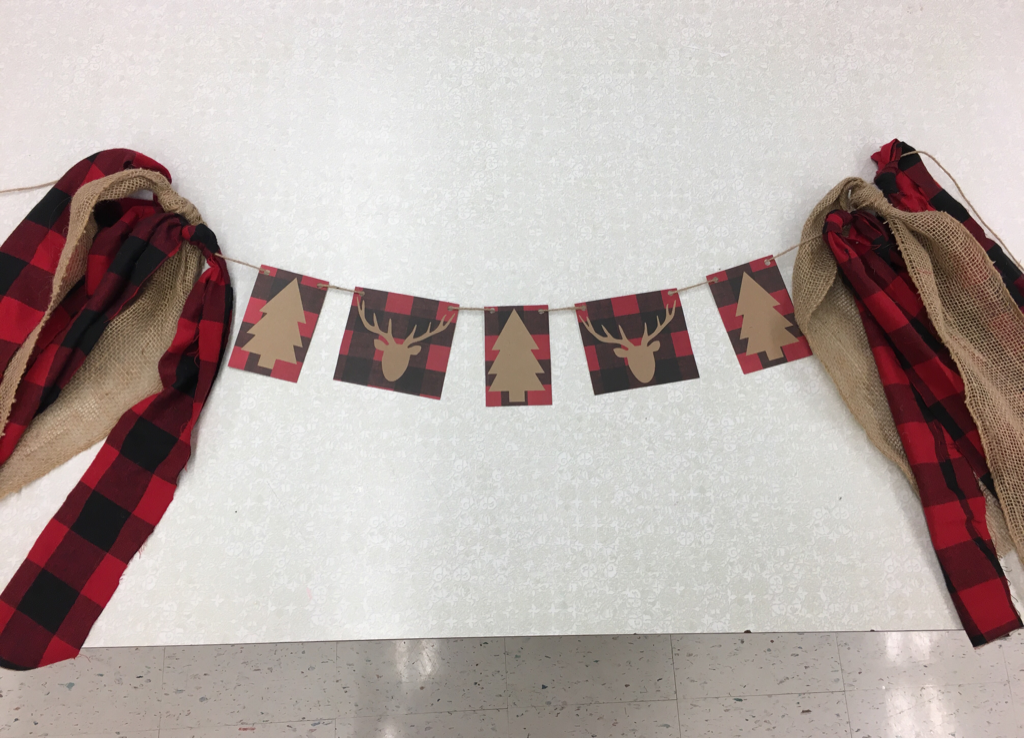 Cookie exchange is a great way for us to showcase our baking talents, enjoy each other's company, and spread a little holiday cheer. This year I purchased cardboard cake boxes so the students will have somewhere to store their cookies and of course I can't allow them to be plain. A little silhouette cut-out and a sharpie name makes an extra special take home box. We will also have a hot chocolate bar during our cookie exchange. Our toppings will be placed in mason jars that I purchased at Dollar Tree. I have so many of these jars because they are a great size for pantry items. The jars will be wrapped with a scalloped label that I also made on my silhouette machine.  The fourth annual cookie exchange will be here before we know it. Check back soon to see our winning cookies and holiday festivities!
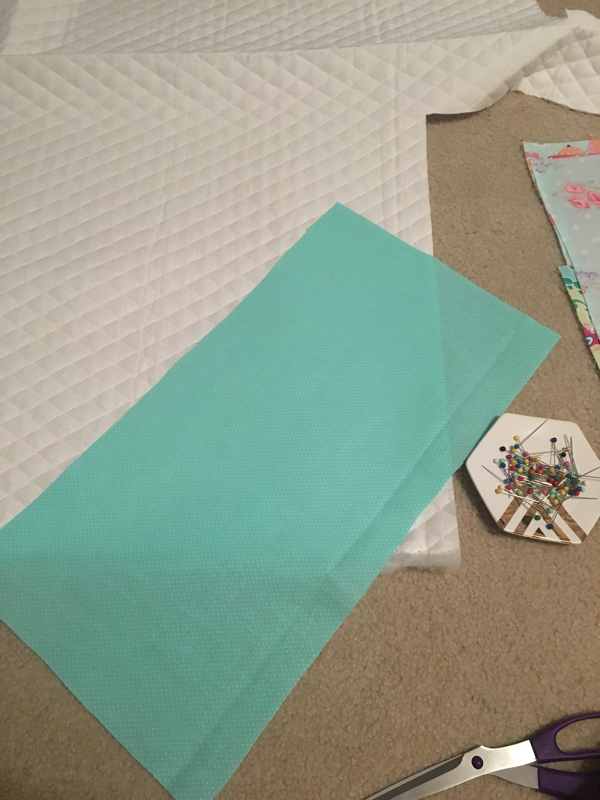
Whether it's for groceries, a day at the beach or everyday necessities, everyone needs a tote bag for their treasures. Reusable bags are great for our planet and a super stylish addition to your everyday travels. The finished size of this bag is: 20wx18h but the dimensions can be adjusted to meet your needs. The inside pockets are great for smaller items such as lipstick and change. The dimensions of the pockets are: small (2)- 4 1/2 w x 6 1/2 h zipper pocket- 9 w x 6 h Hobby lobby is my favorite place on the planet so of course I purchased my materials there. I selected 2 cotton prints in my favorite colors and styles but a variety of materials will work well for this - cotton, canvas, duckcloth or even oilcloth. Consider what you are planning on using the bag for before purchasing your fabric. I will be using the black and white stripe for the outside of my bag and the lining of my zipper pocket. The pink polka dot will be for my bag lining and my 2 small pockets. 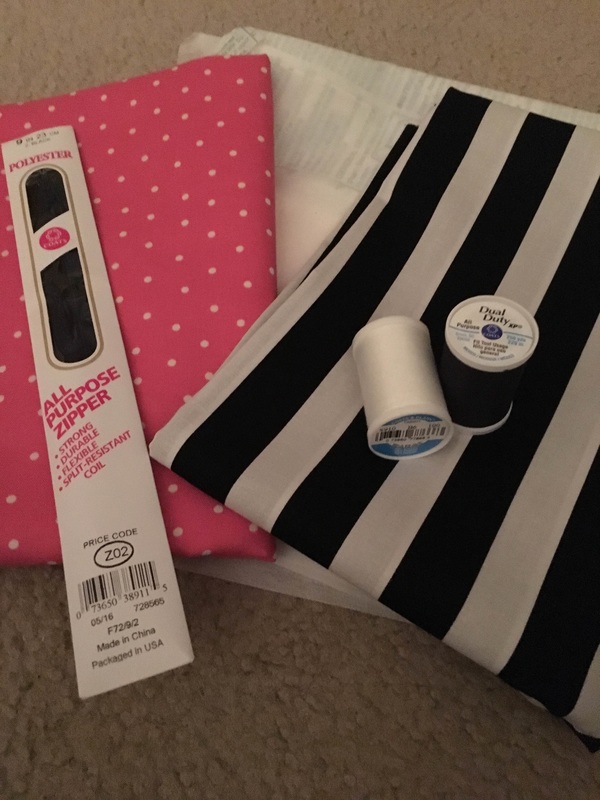 Materials needed: 1 yard for outer bag 1 yard for lining 2 yards of nylon webbing for straps ( you could also use ribbon but it is less durable) 9 inch zipper in a coordinating color 2 ½ yards fusible interfacing (medium weight is my favorite) - interfacing is also optional, I like to use it to help stabilize my material but it may not be necessary if you are using a heavier material such as canvas. Coordinating thread Fabric tape such as wonder tape (optional)
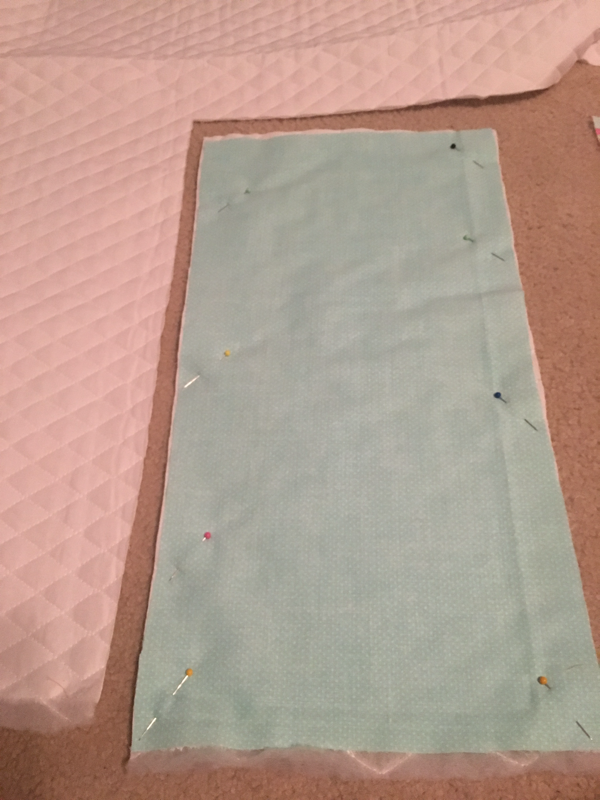
Outer fabric - 20x22(2) Lining fabric - 20x22(2) Interfacing - 20x22(4) optional Small pockets - 5x7 (4) this will make 2 pockets. These are optional and you can adjust sizes. Zipper pocket lining - 13x15. This is also optional and the size can be adjusted. On each of your bag side pieces, remove a 3 inch square from the 2 bottom corners (this will be your box corner bottom) 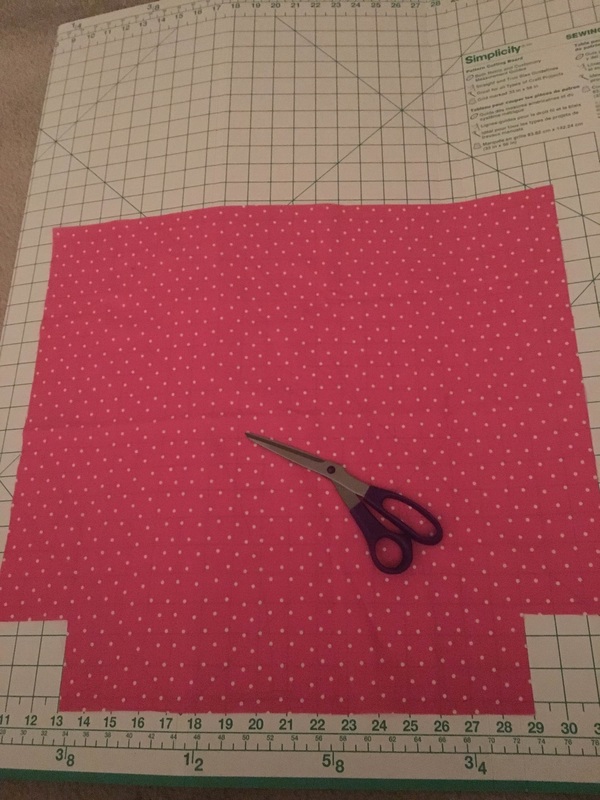 2. Interface your pieces if you have chosen to do so. I prefer fusible interfacing (follow the directions on how to fuse it). You can also use sew-on interfacing if you'd like. 3. Small pockets: Place 2 pocket pieces right sides together, pin and stitch around the perimeter leaving a small opening for turning. Clip the corners. 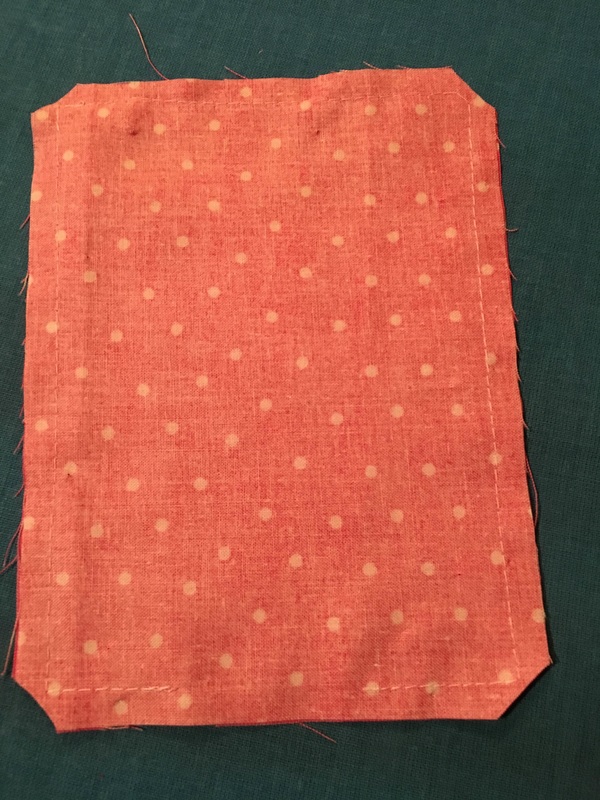 4. Turn pocket right side out, press, and topstitch. Repeat for the other pocket. 5. Once your small pockets are complete, pin and stitch them where you would like them on a lining piece. I am putting mine next to each other on one side of my lining. Remember to leave the top of your pocket open for use. 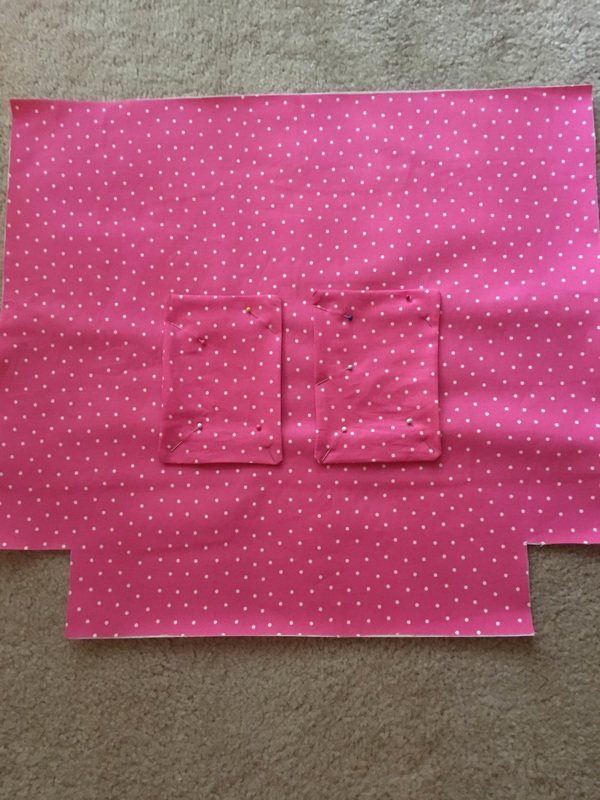 6. Zipper pocket: for this step you will need the lining piece that does not have pockets yet, your 13x15 zipper lining piece, a ruler and a marking pencil. Place your 13x15 piece right sides together with your lining 1 ½ inches above the place you want your zipper. 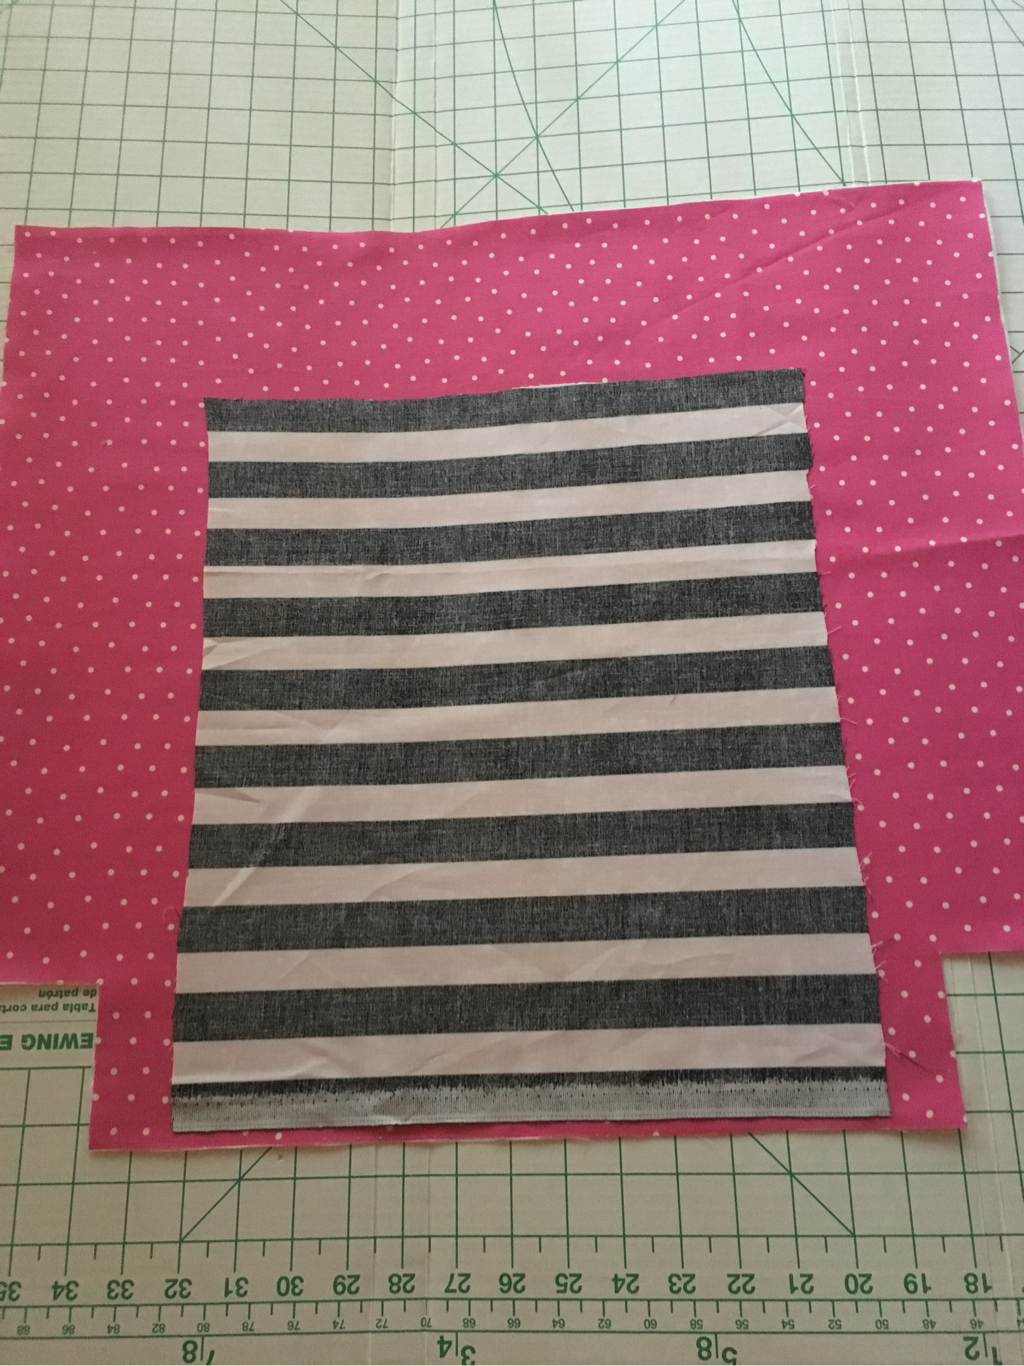 Mark 1 ½ inches from the top and draw a line all the way across. Mark 2 inches from the top and draw a line all the way across. Mark the center and the length of your zipper in between your 2 lines. I added triangle at each end and connected them down the center (this will be used for cutting). When this is done, it should give you a box that looks like this: 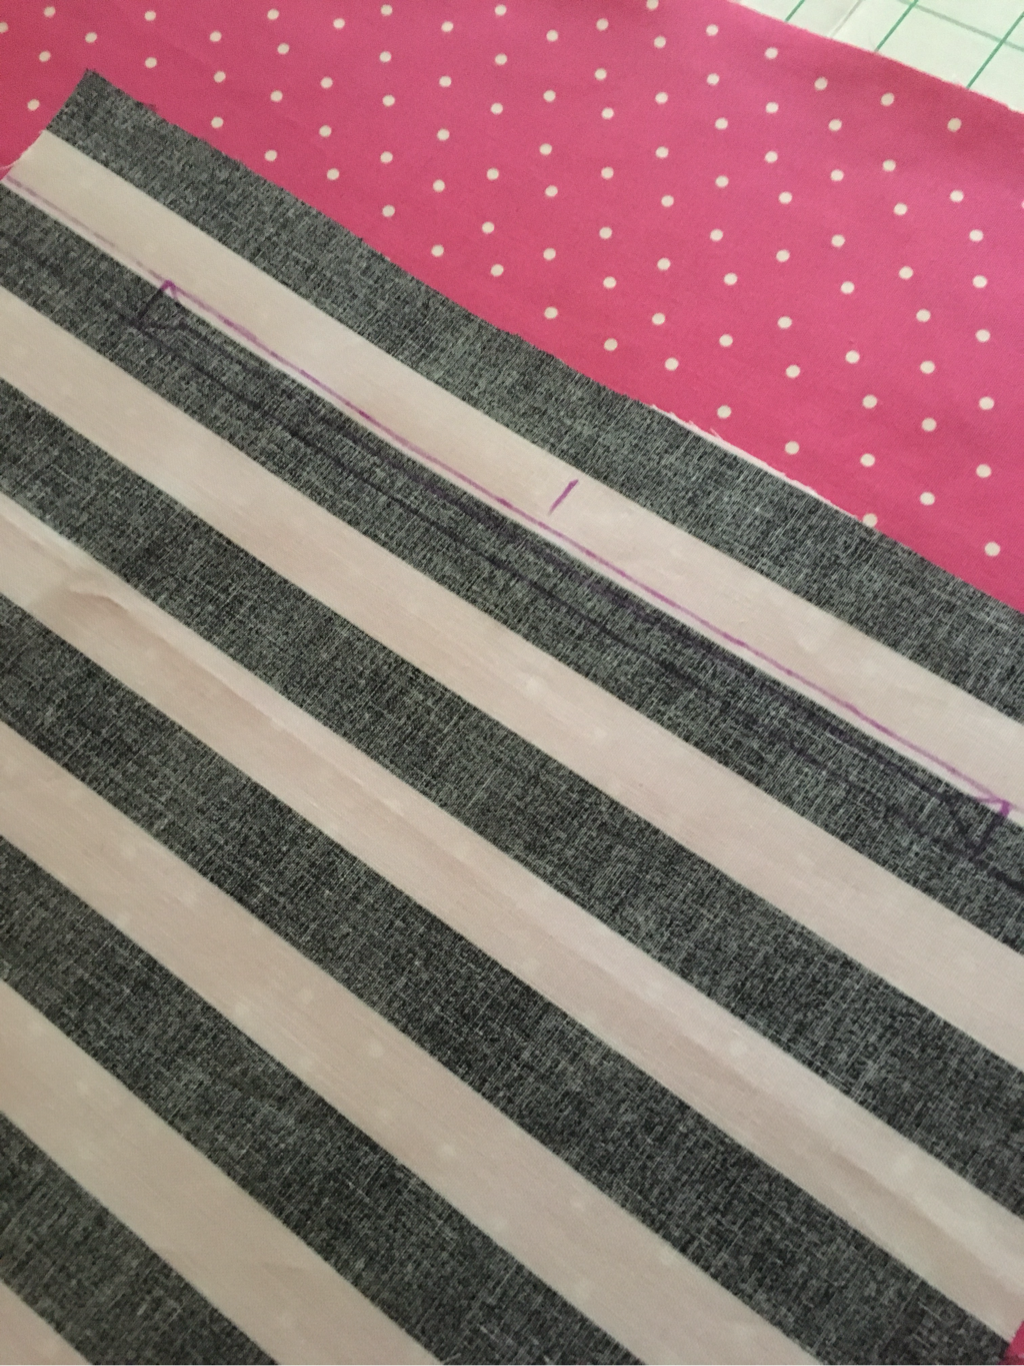 Pin your fabrics together and stitch around the perimeter of the box. 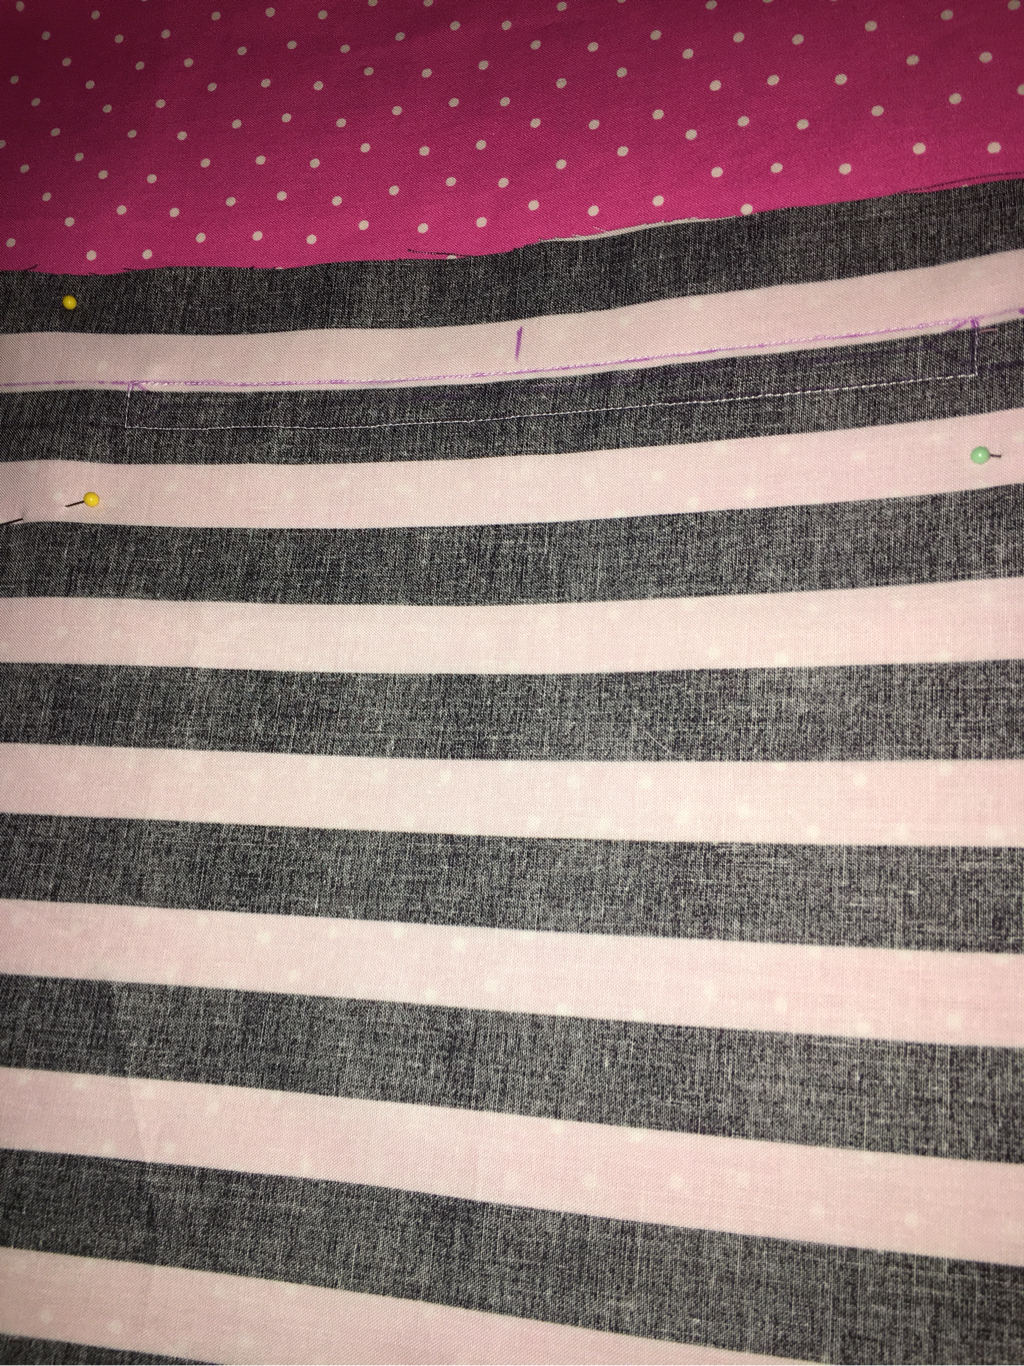 Use the center line to cut an opening in both layers of fabric. Cut the sides of your triangles as well. 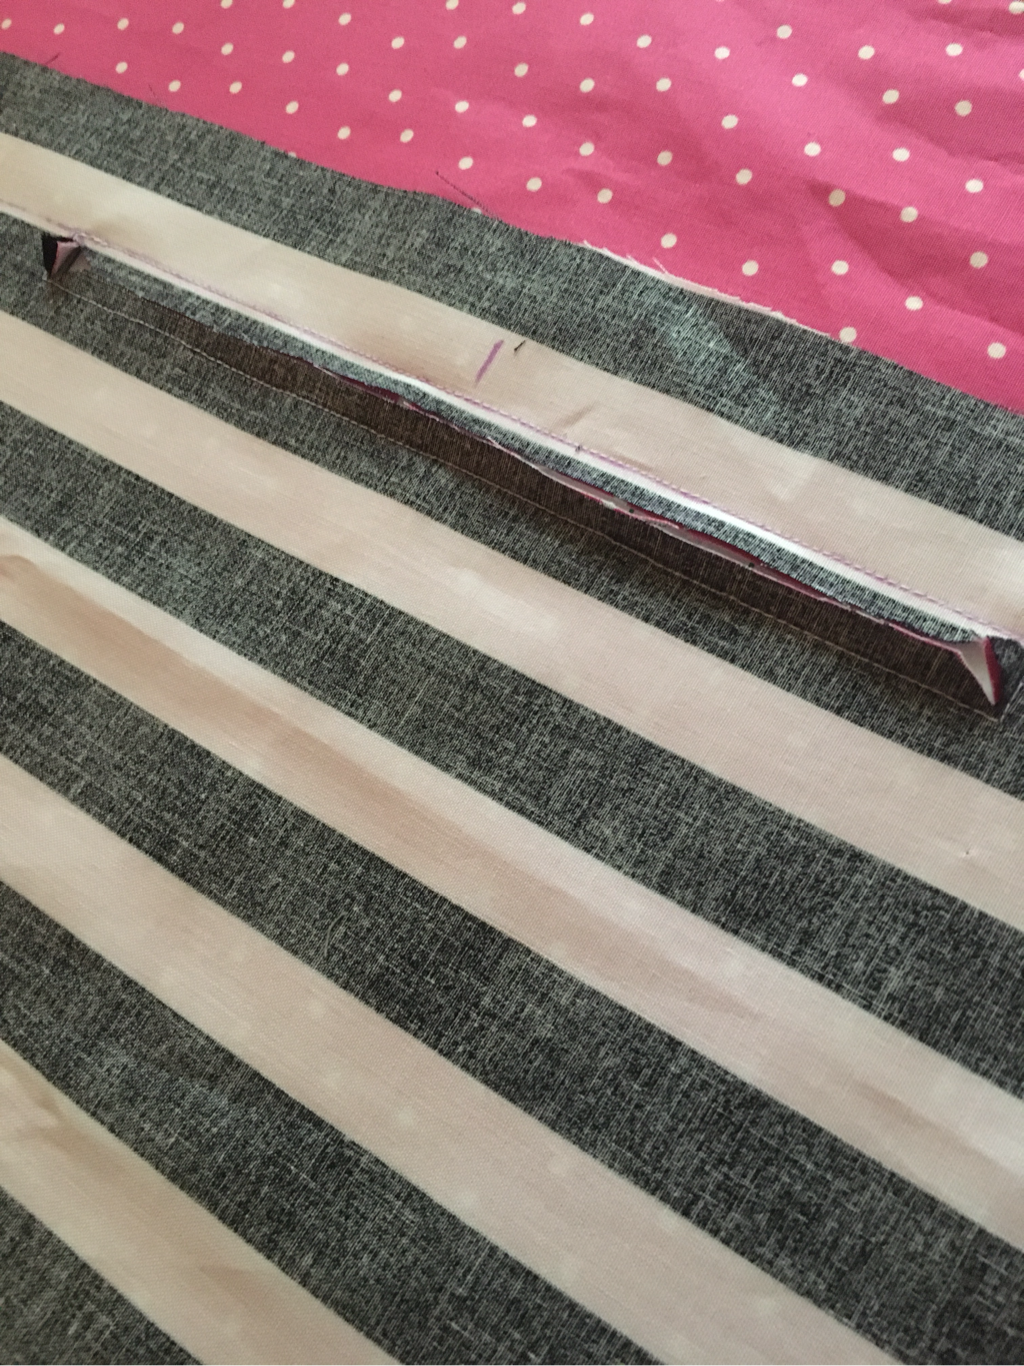 Pull your fabric through the opening and press. 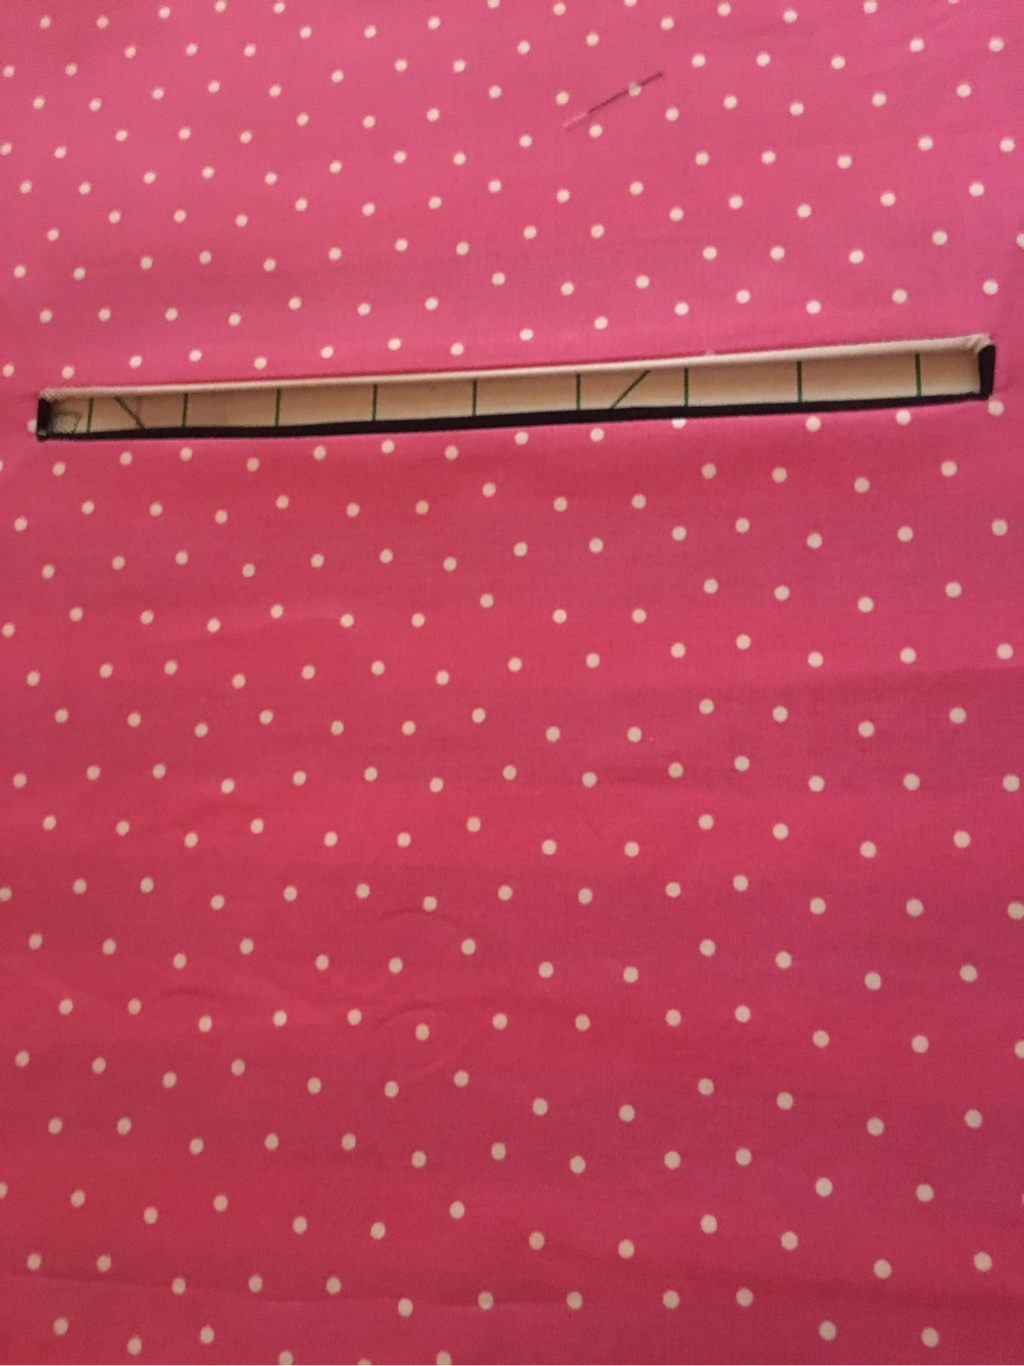 You are now ready to put on your zipper. Pinning a zipper can cause it to pucker so I prefer to tape it on using fabric tape (wonder tape is my favorite). Place fabric tape on the back side of the opening, then stick your zipper to the tape, centering your zipper and making sure the zipper pull is free to use. 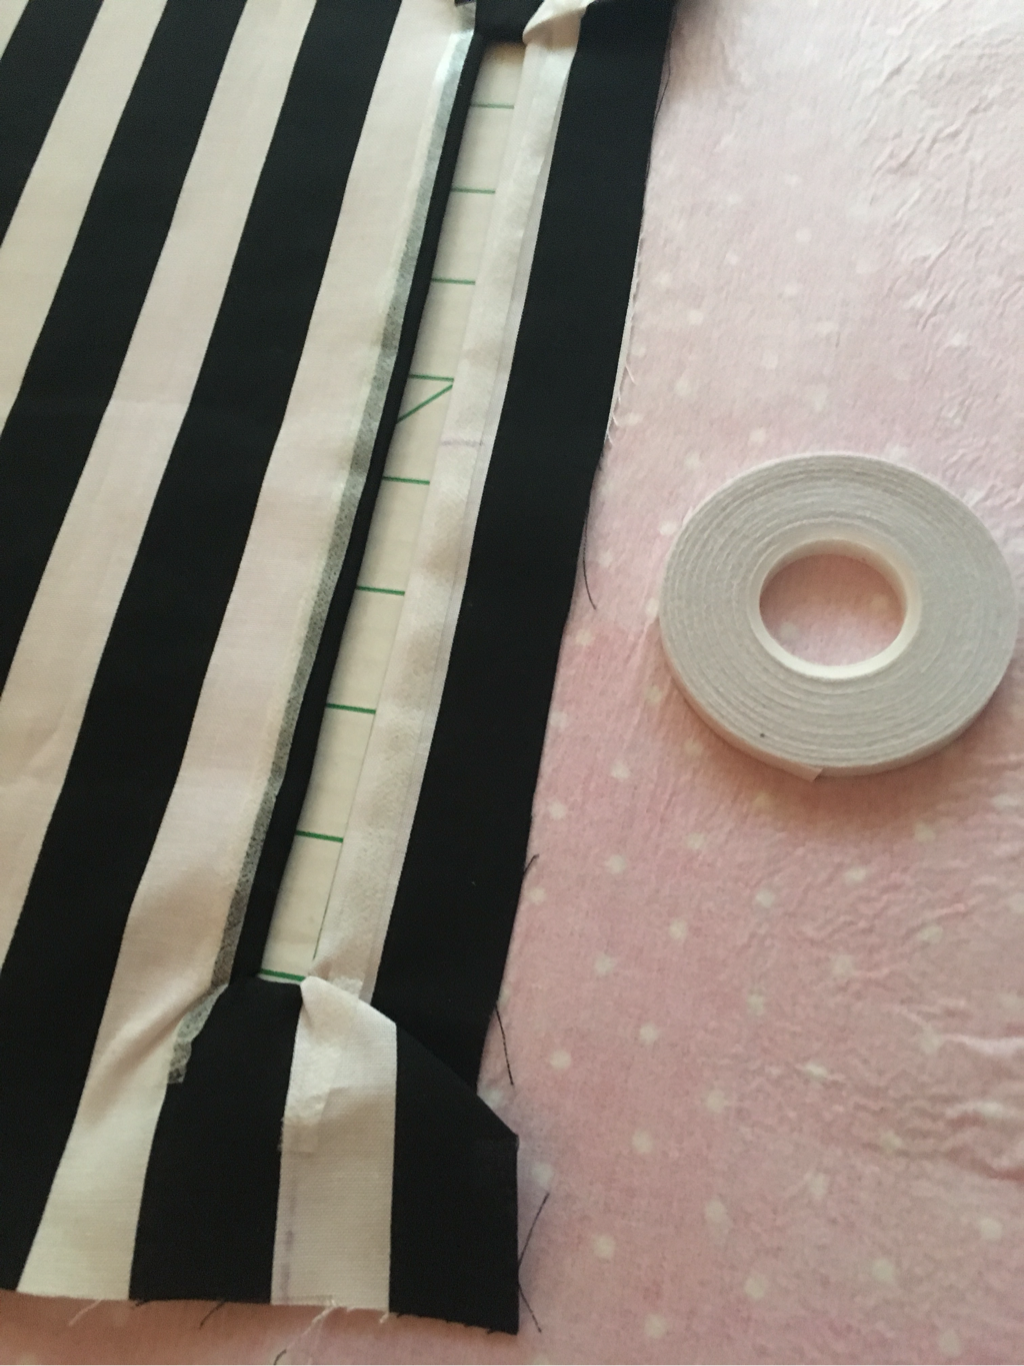 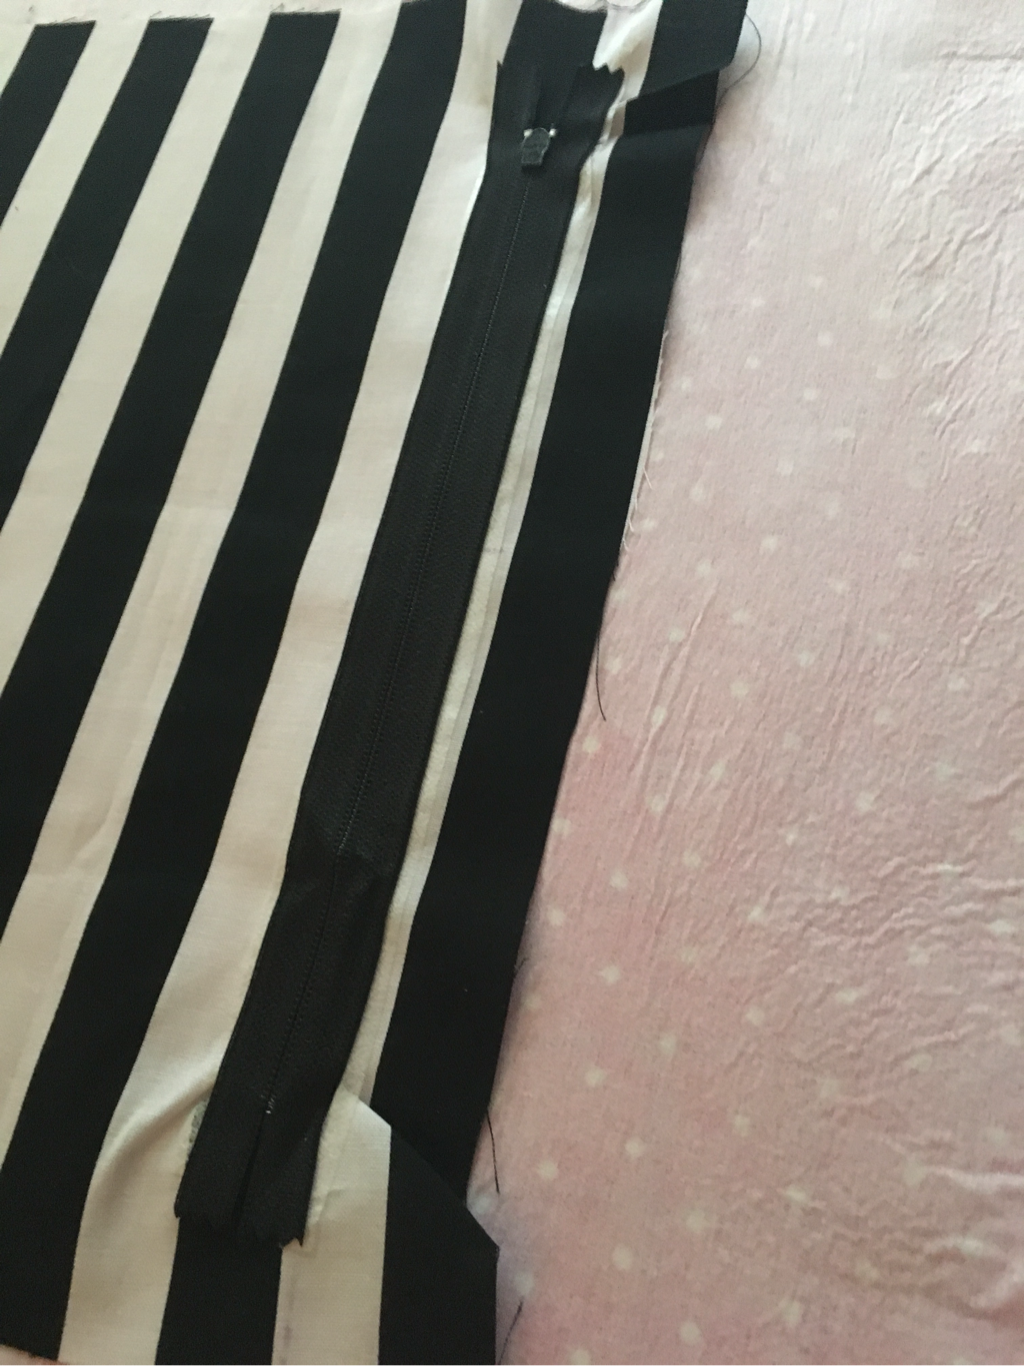 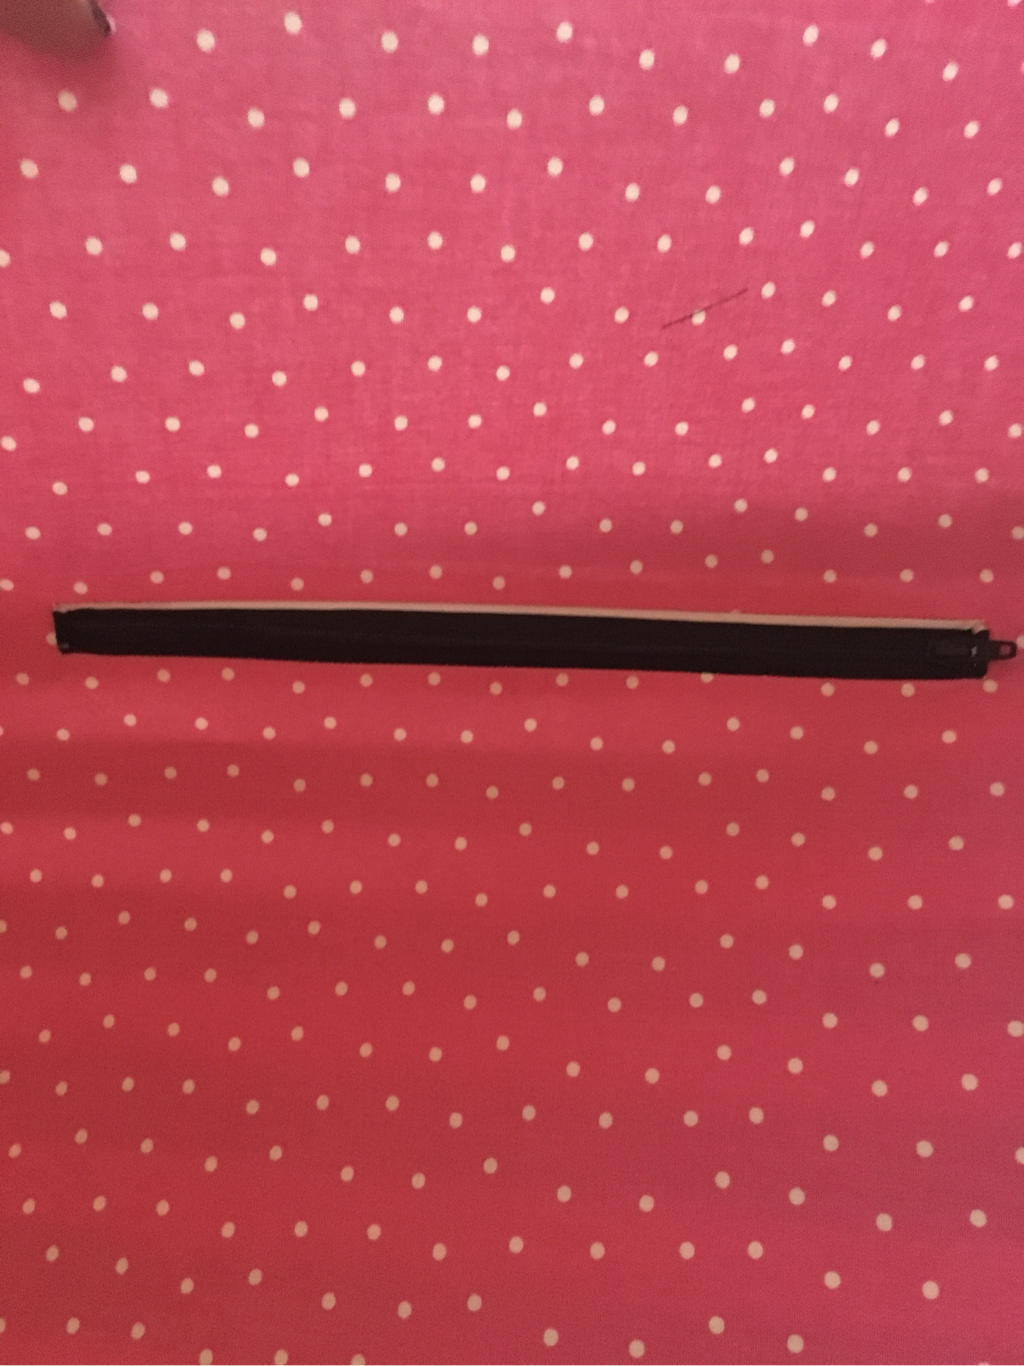 Now topstitch your zipper in place. I prefer to do this right side up so I can control the placement of my stitches. 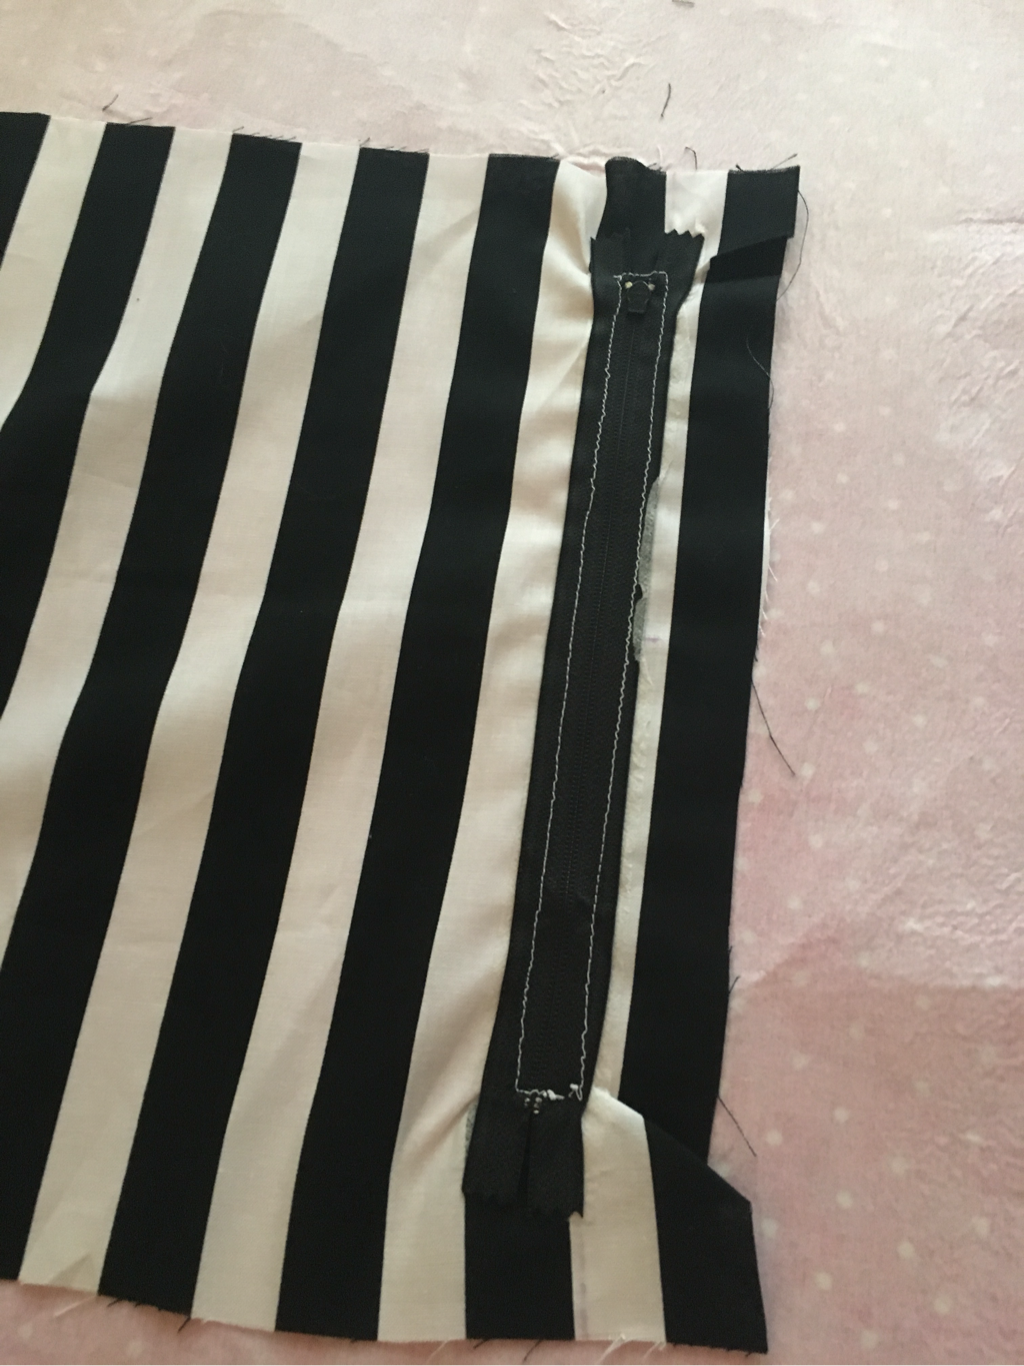 7. To enclose your zipper pocket, place remaining fabric right sides together, pin and stitch the 3 open sides being careful not to catch your lining in the process. Don't worry if your edges look bad, that part will be hidden between your lining and outer bag. You will now have a beautifully lined zipper pocket. 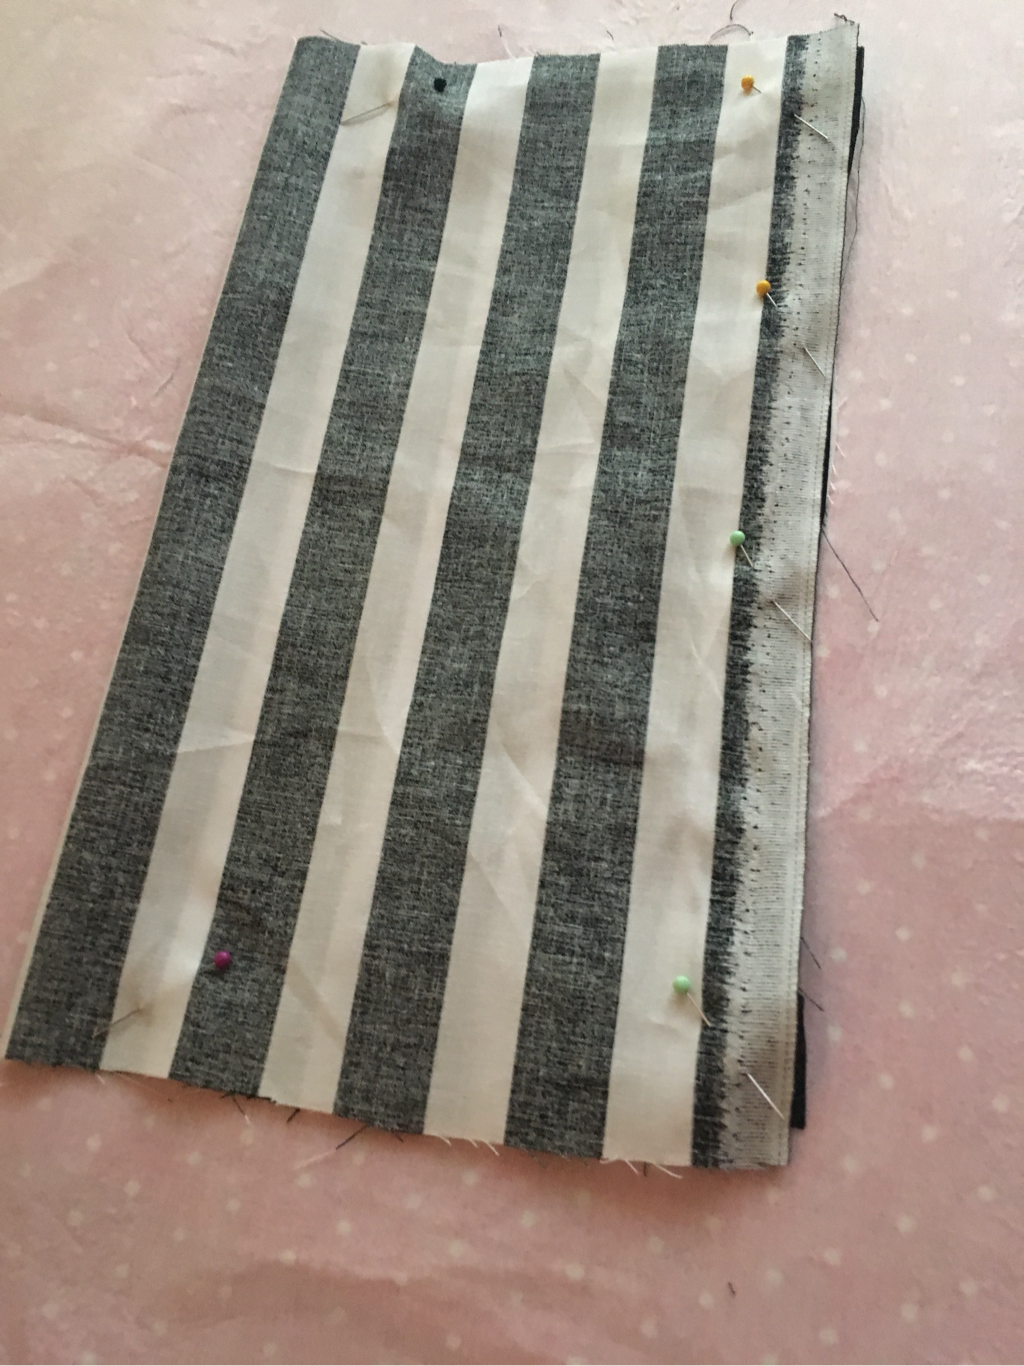 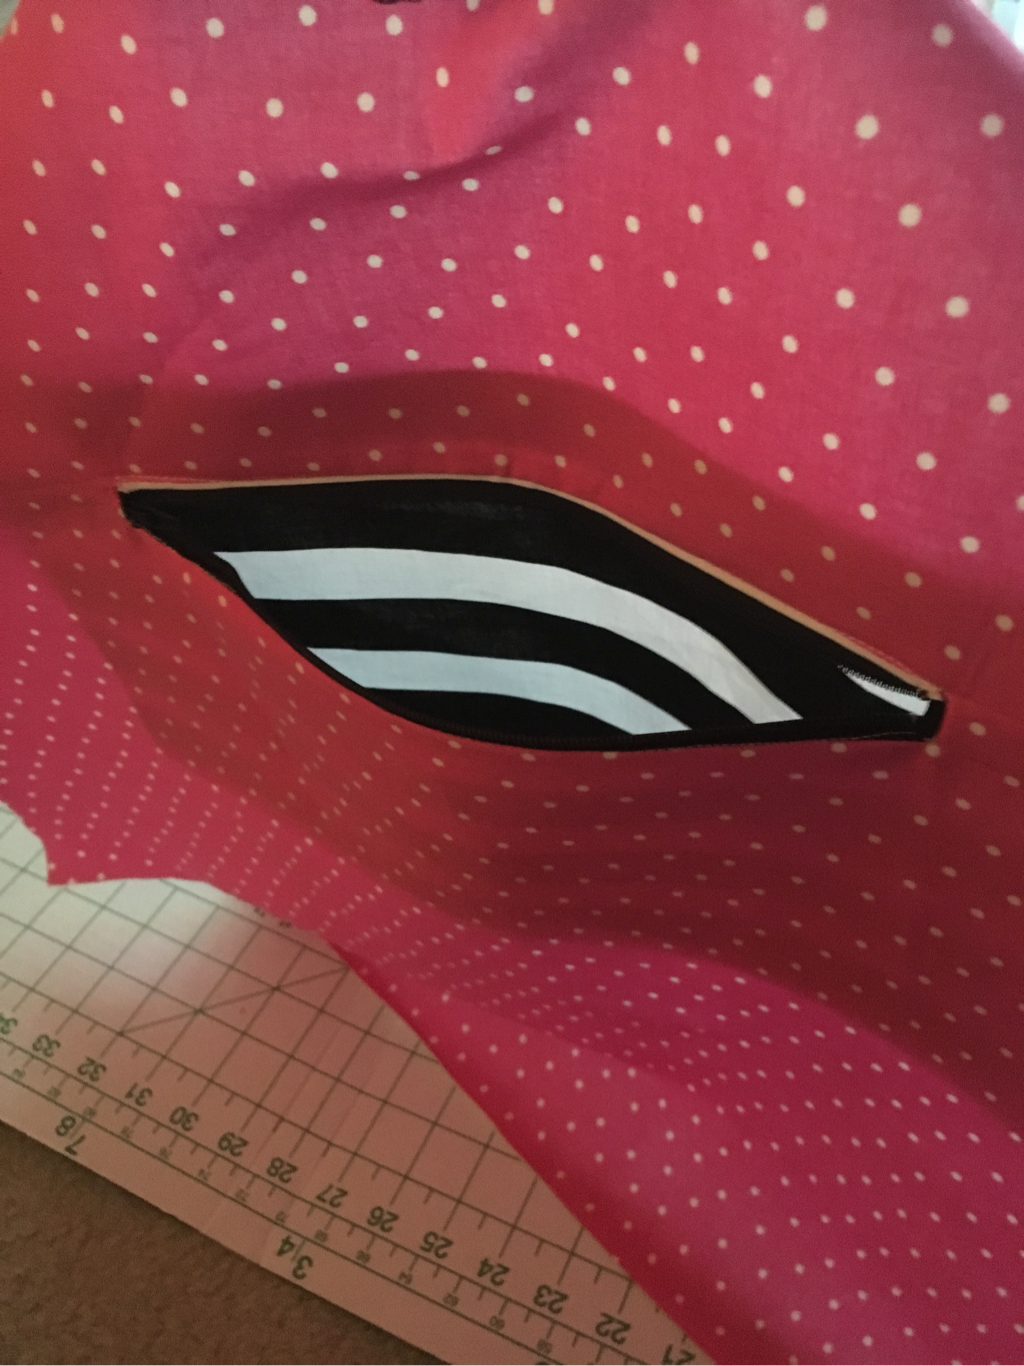 8. To put your bag together, place your outer pieces right sides together, pin, and stitch the sides and bottom edge. Press your seams open. Make sure to leave the top edge open as well as the 3 inch cut-outs in the bottom. 9. Repeat this process for the 2 lining pieces as well. On the lining piece only, leave an additional 4 inch gap in the bottom center (this will be used for turning) 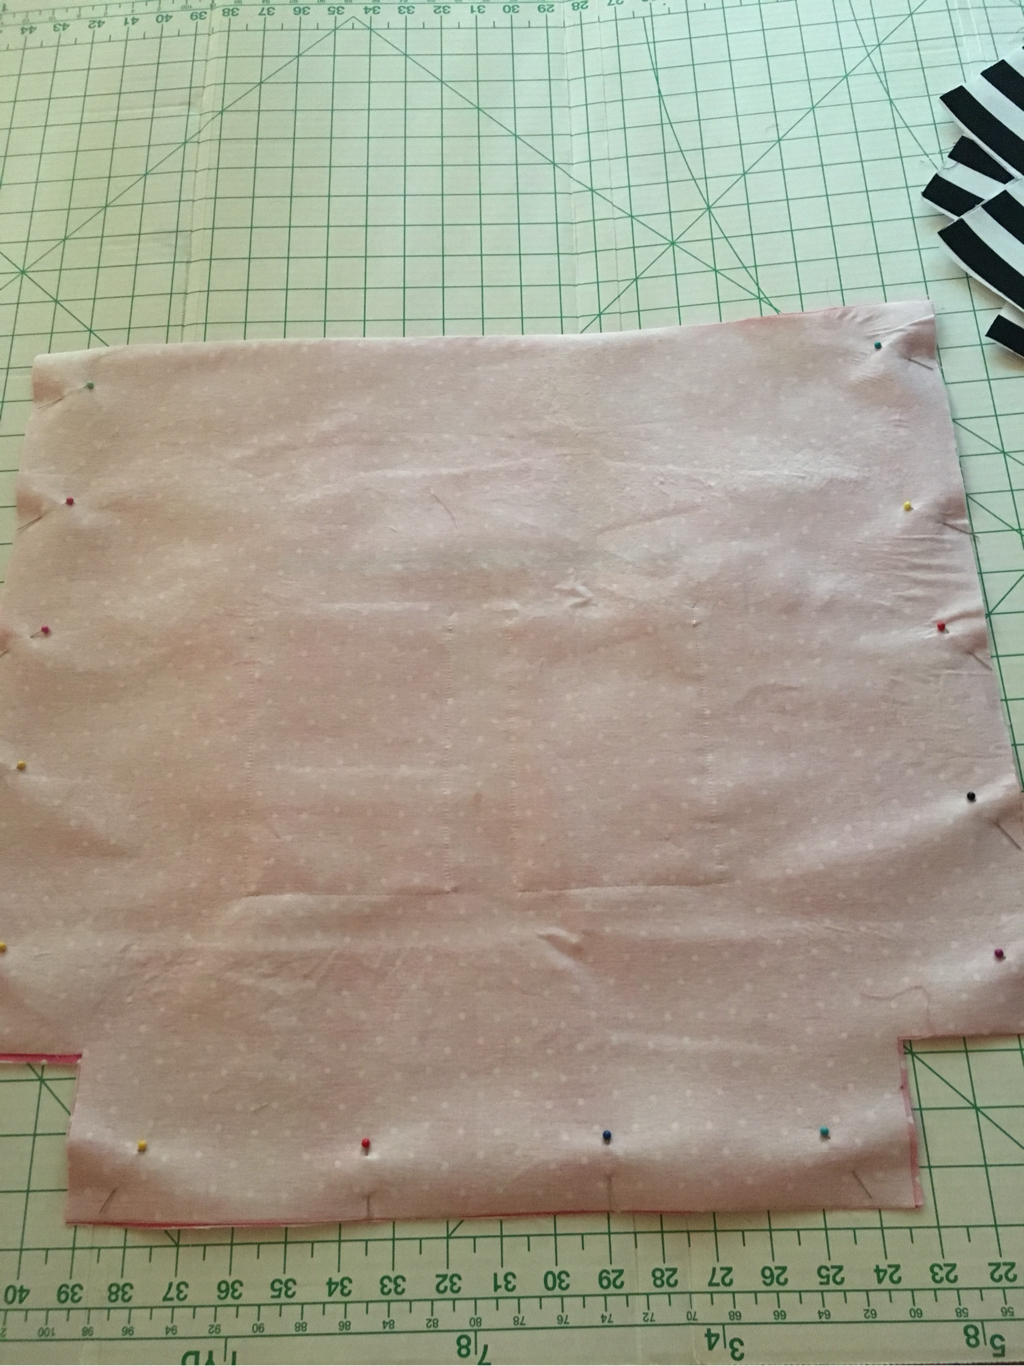 10. To create your box corner, pinch the seams together at the 3 inch opening, placing your seams right sides together. Pin in place and stitch across to close the opening. Repeat this process for all 4 openings (2 on the lining, 2 on the outer bag) 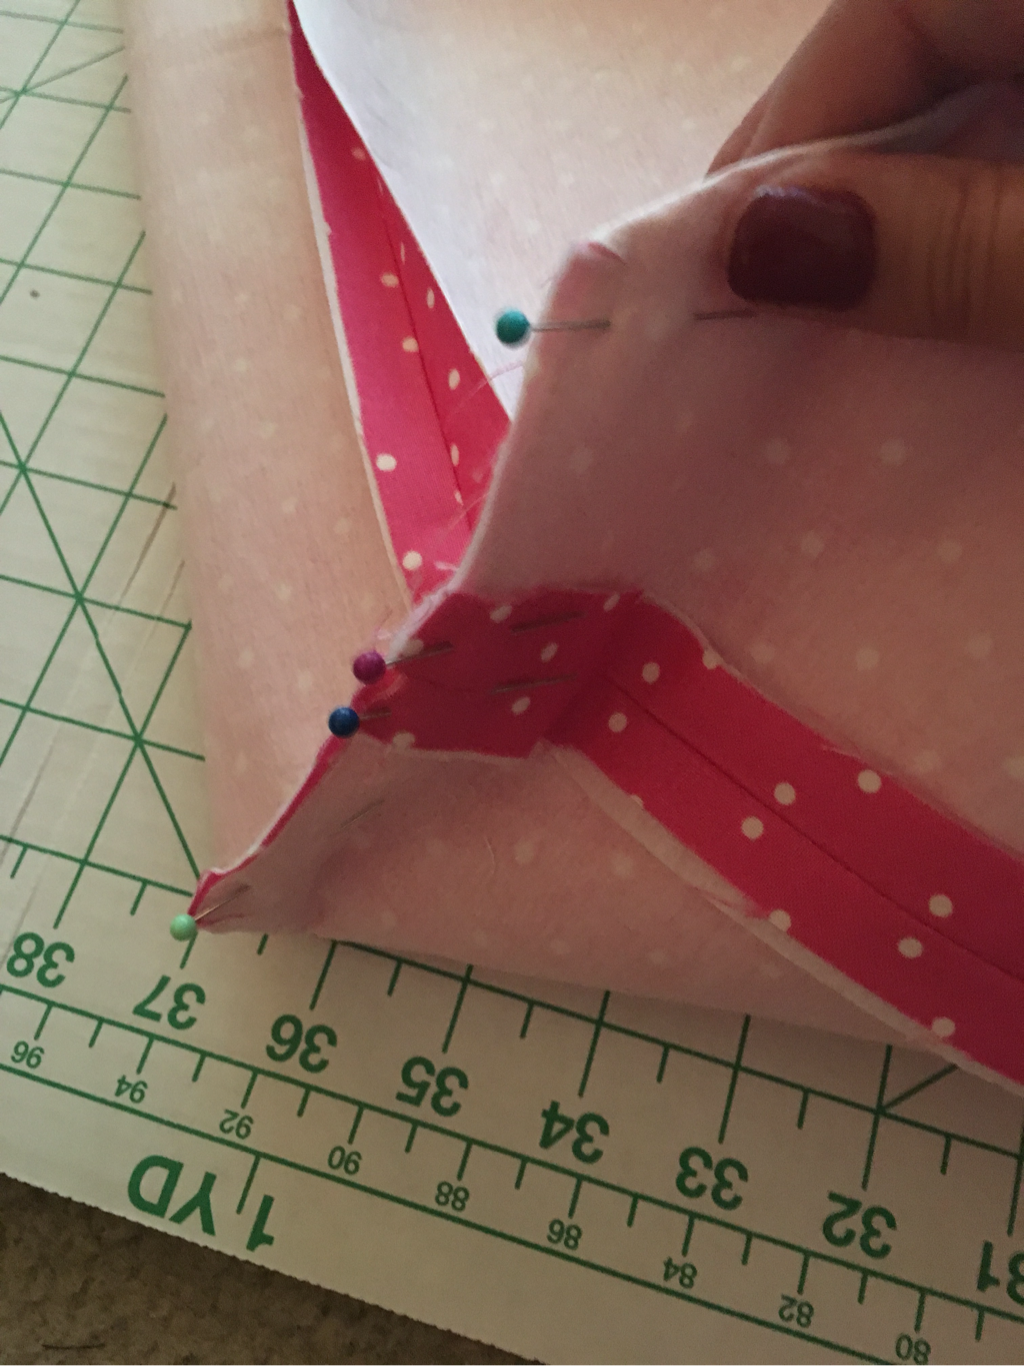 11. Attach your straps to your lining piece. Strap length can vary based on your personal preference. Place the ends of your strap on the right side of the lining piece. Stitch across several times to secure. Repeat this for both sets of straps. 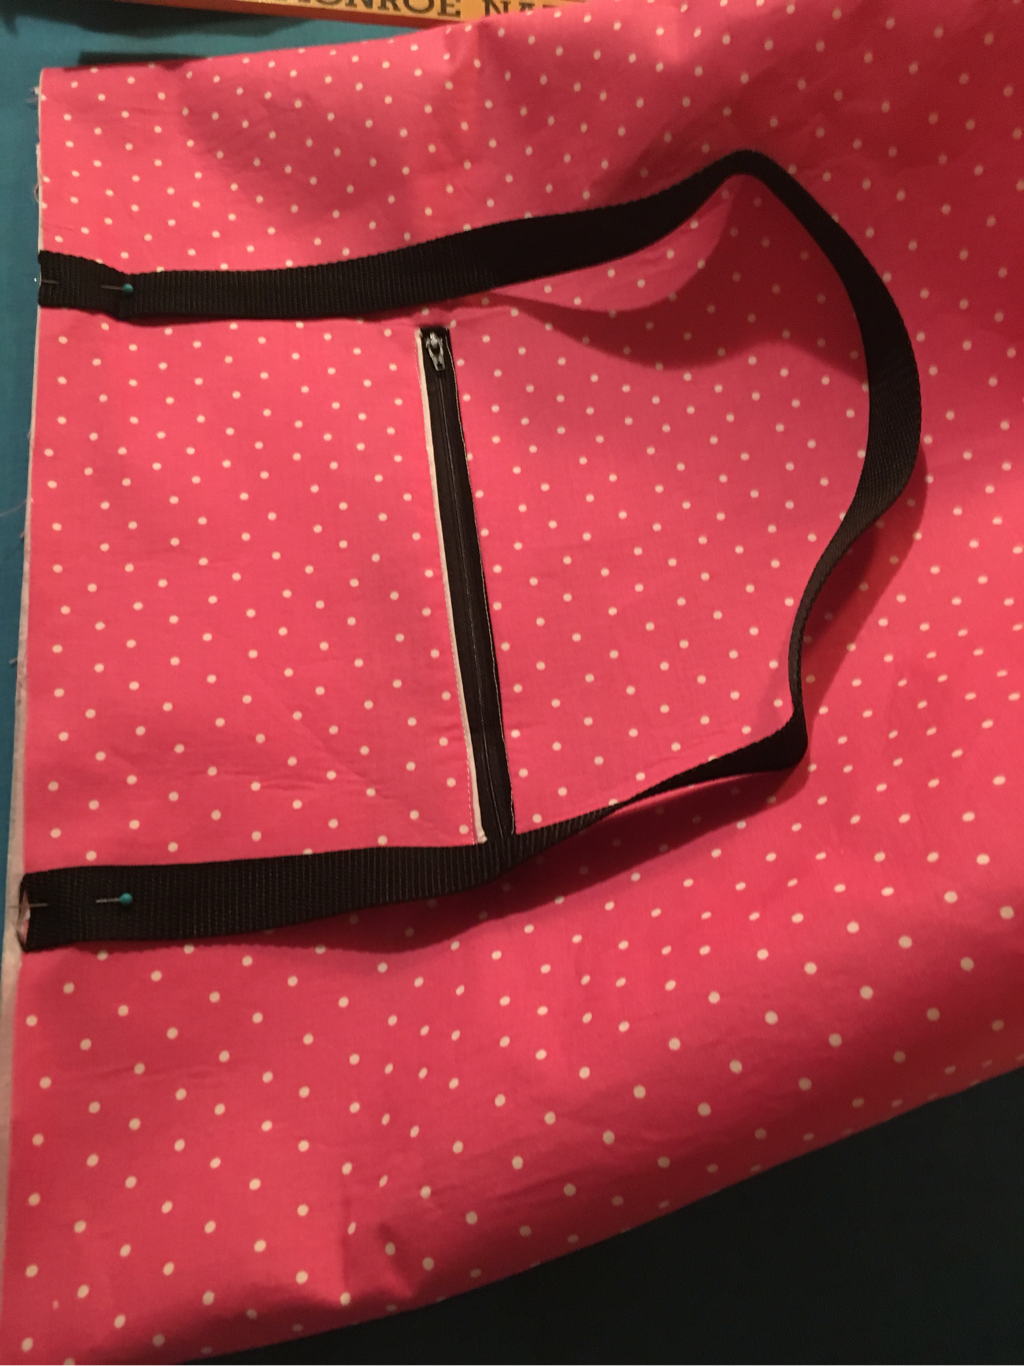 12. Turn outer bag right side out and inner bag wrong side out. Place the outer bag inside the inner so that right sides are together. Make sure straps are sandwiched between the 2 bags. 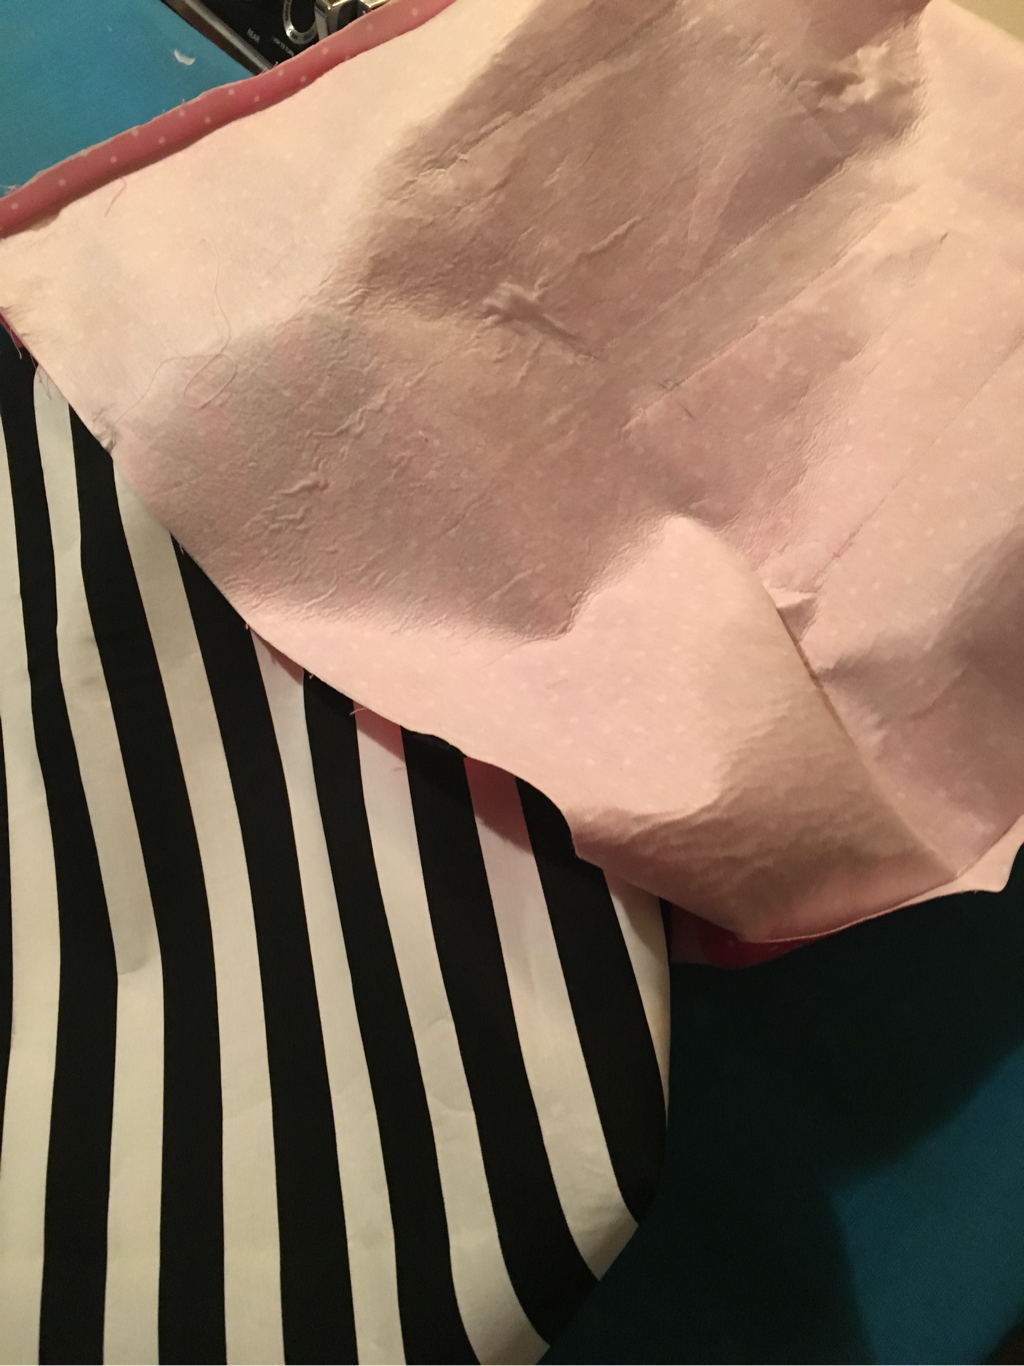 13. Stitch all around the top edge joining the 2 pieces together. 14. Use the opening in the lining to turn the entire bag back out. Press. 15. Topstitch the top edge only if you would like to create a finished look. I also used iron on letters on the side of my bag. Congrats! You're now finished with your brand new tote bag! 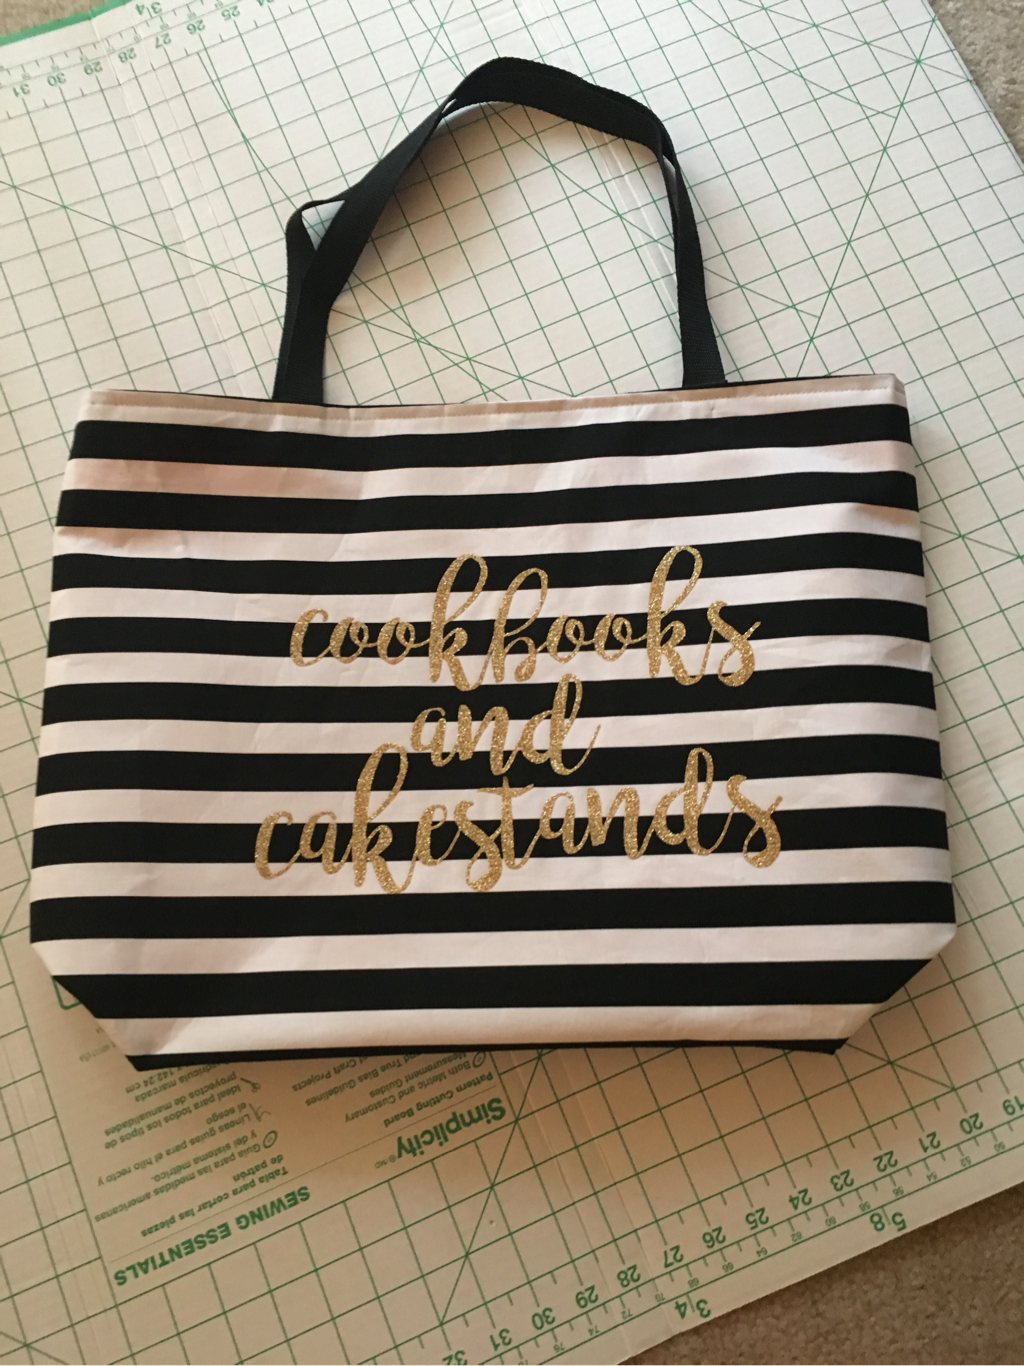 |
Archives
April 2020
Categories
All
|


 RSS Feed
