|
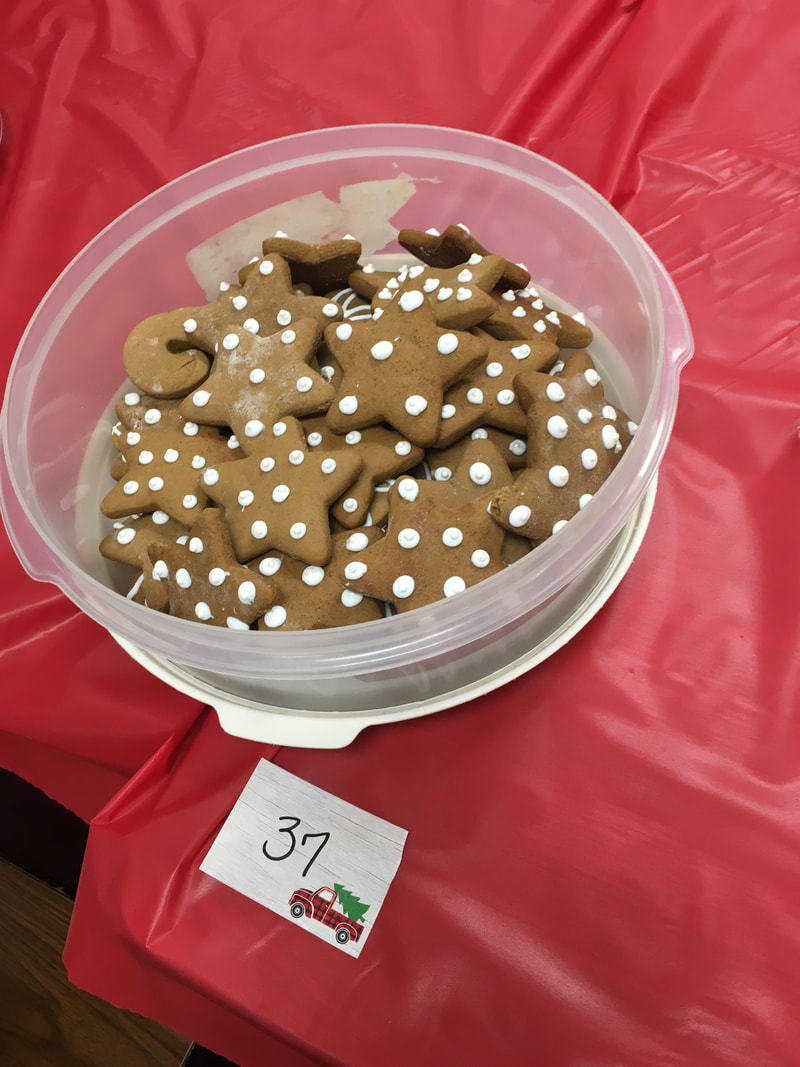
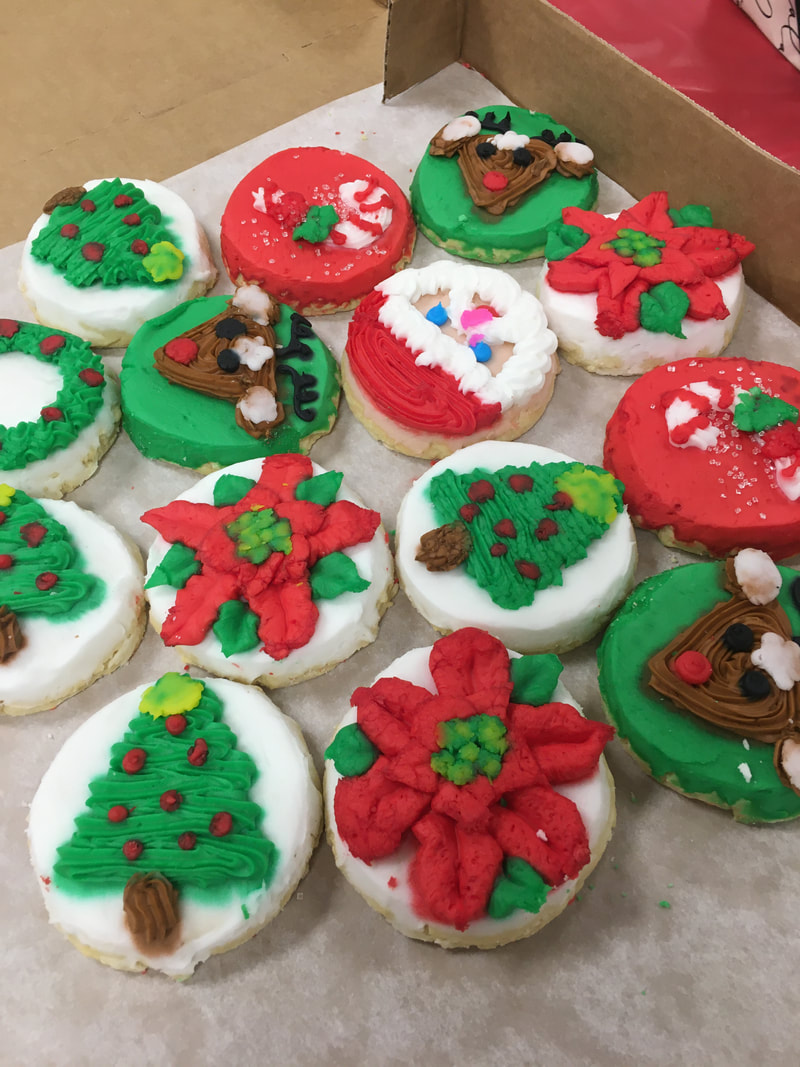
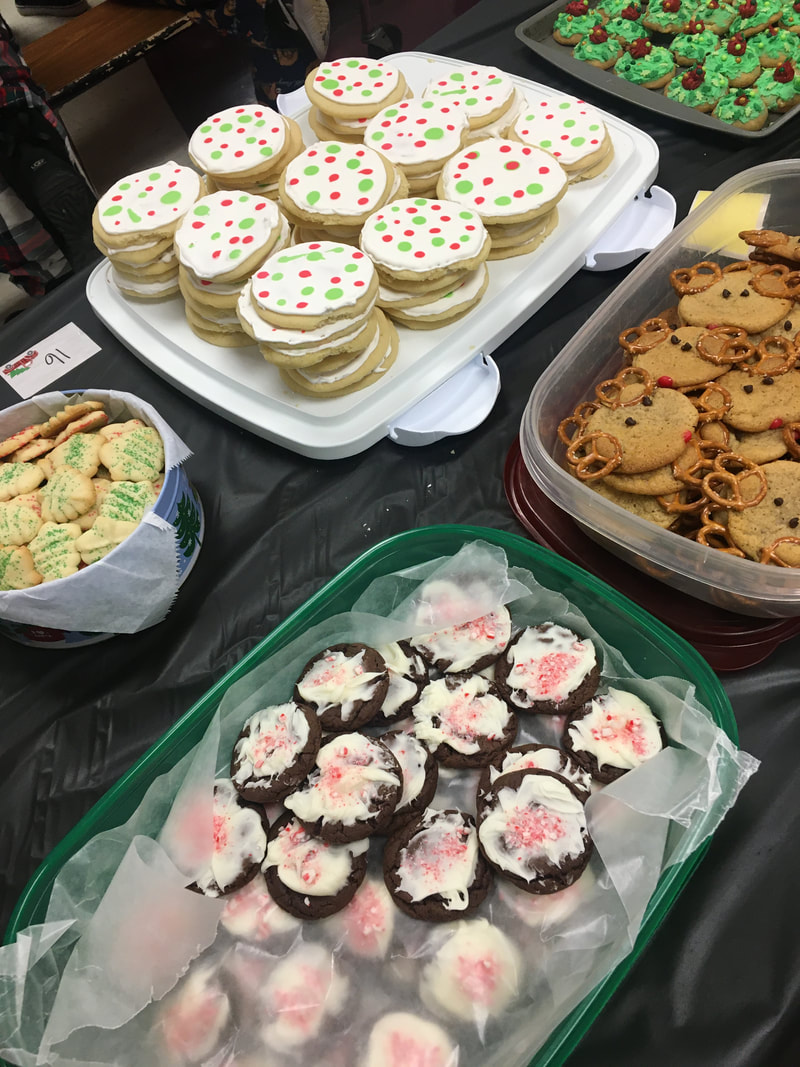
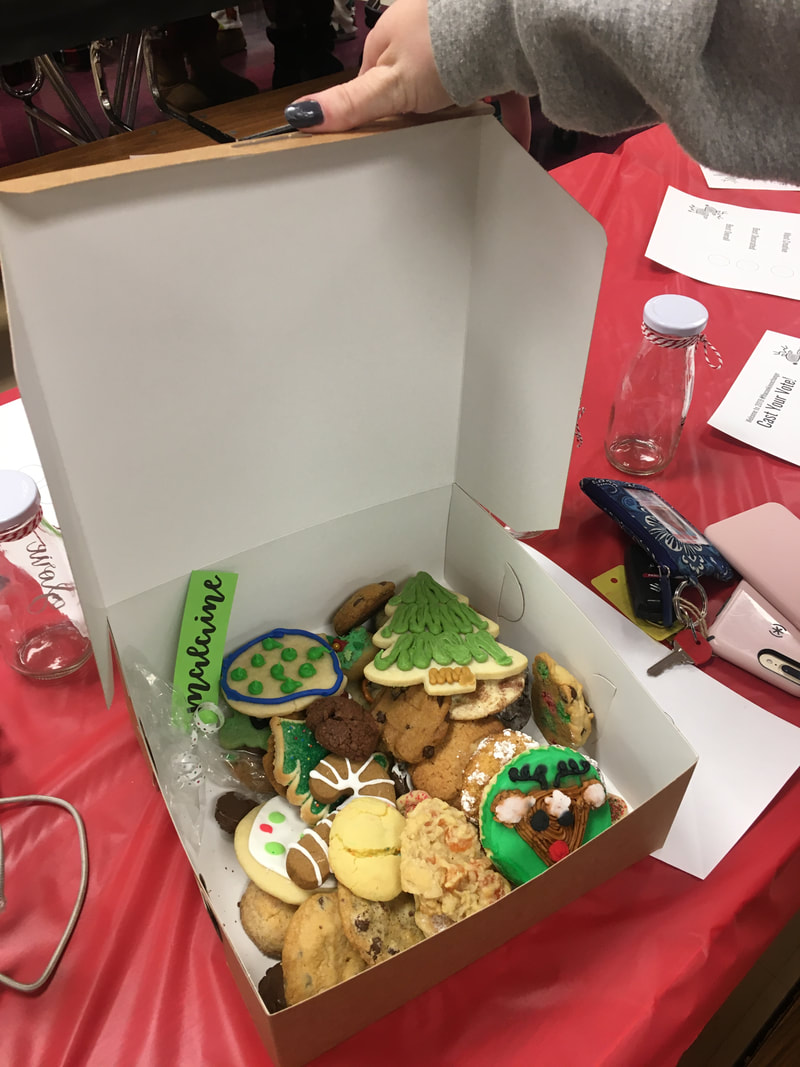
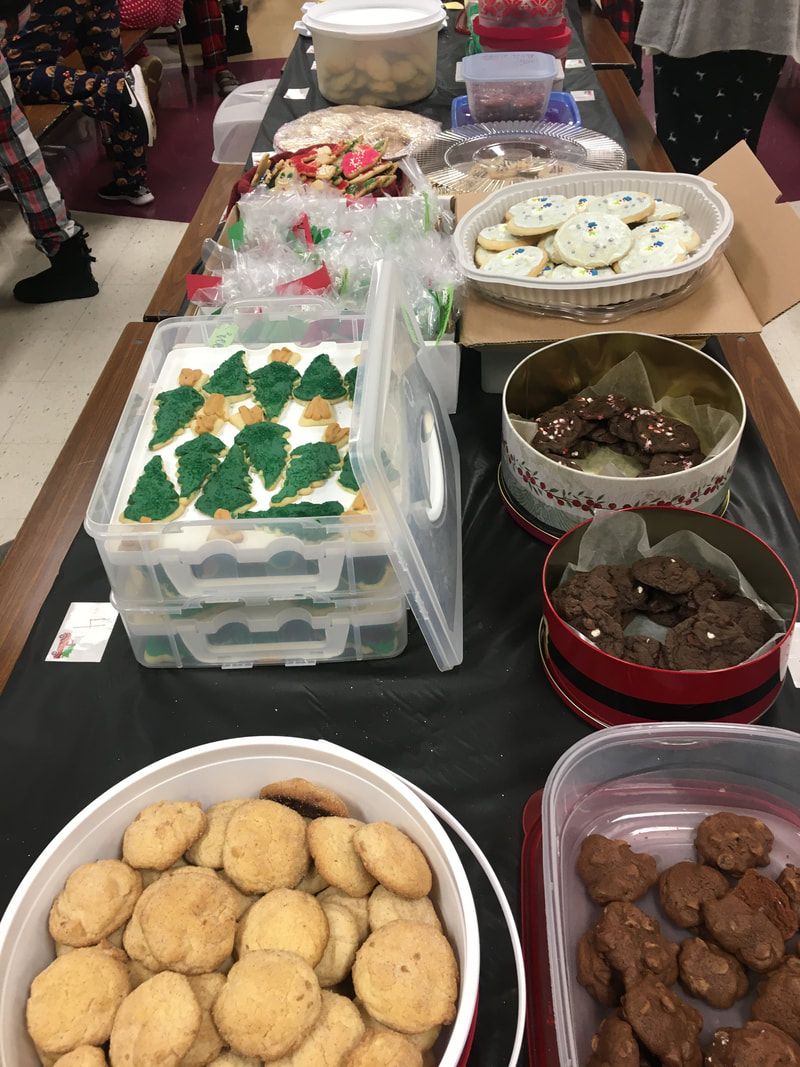
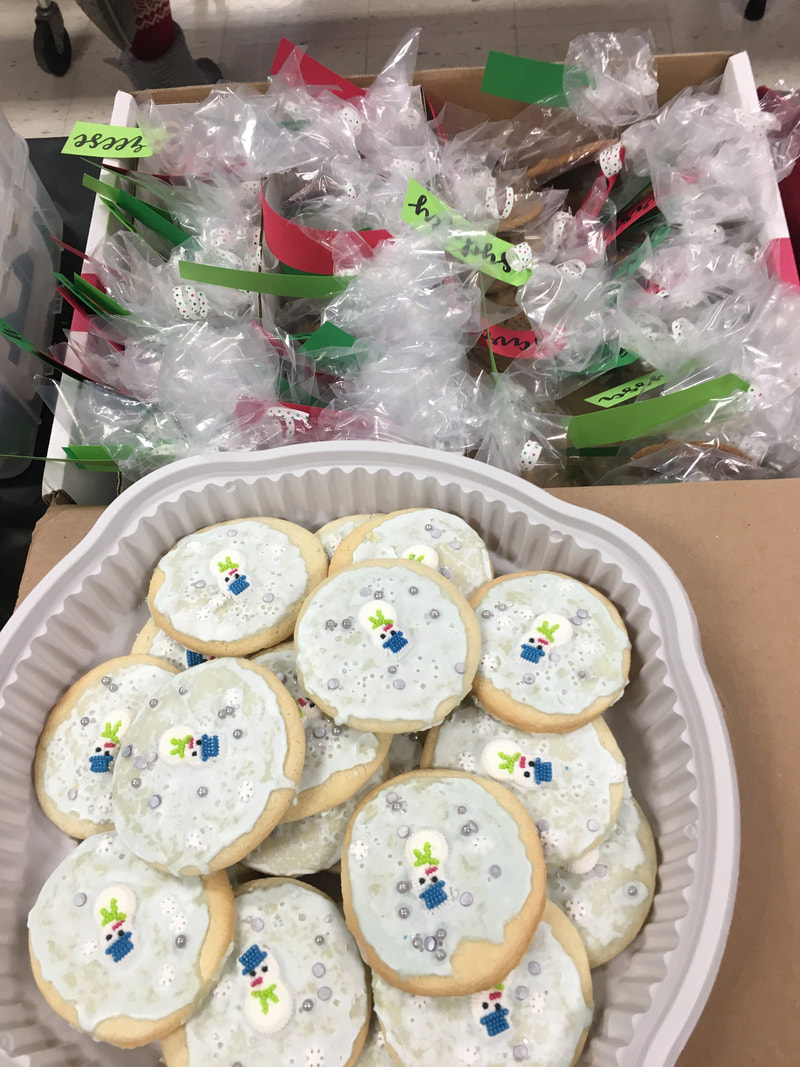
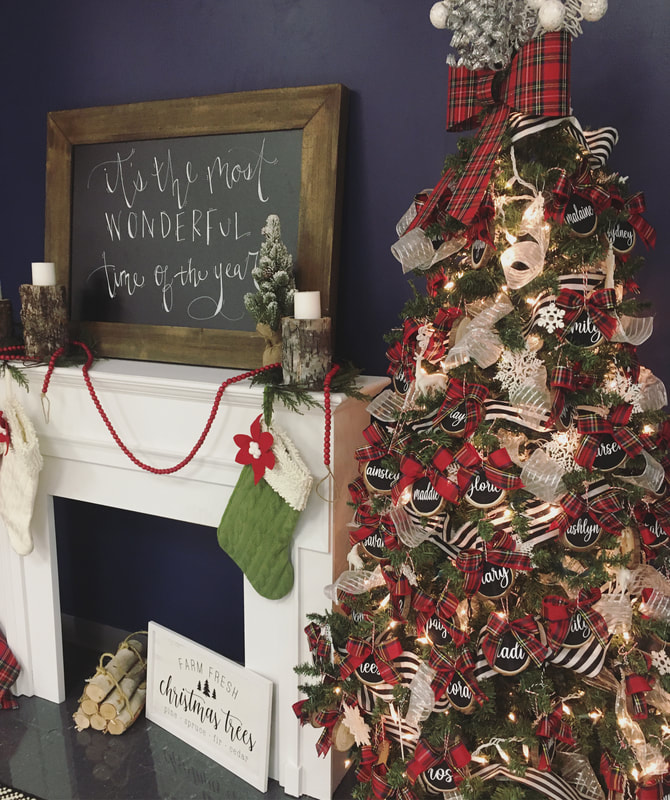
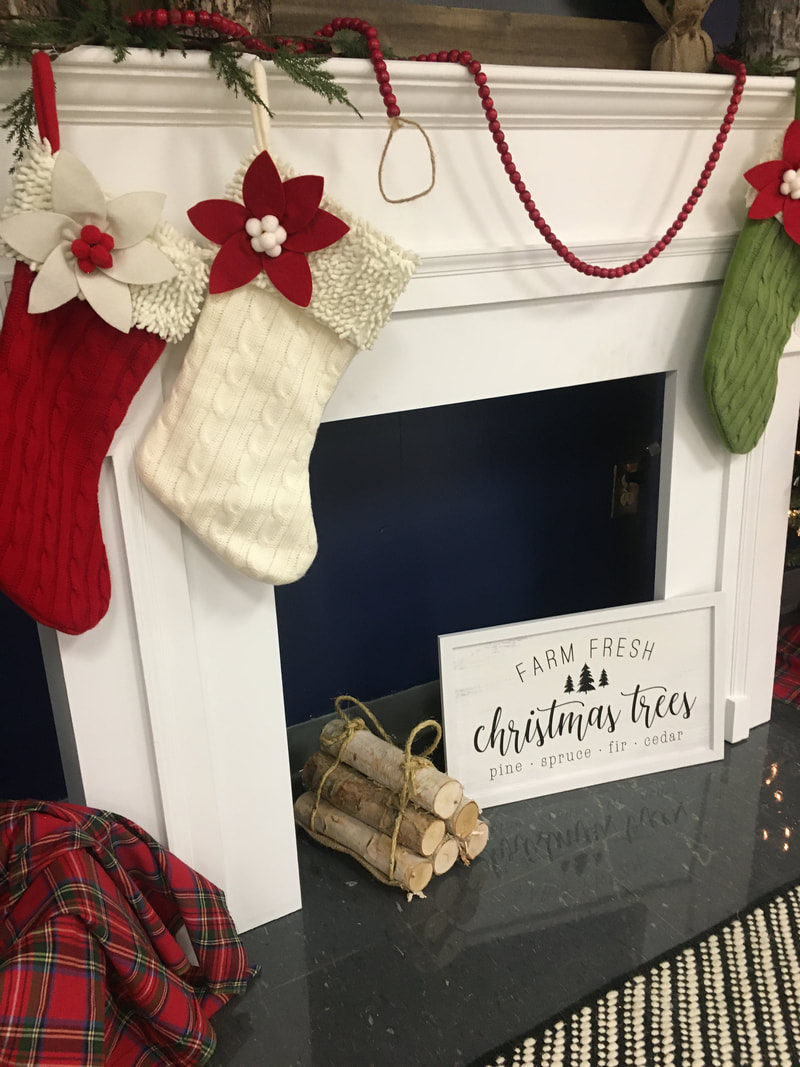
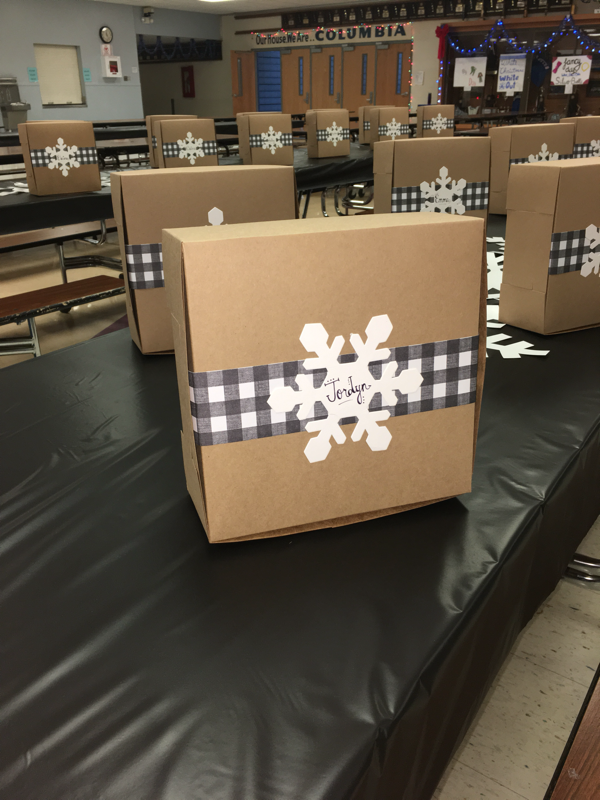
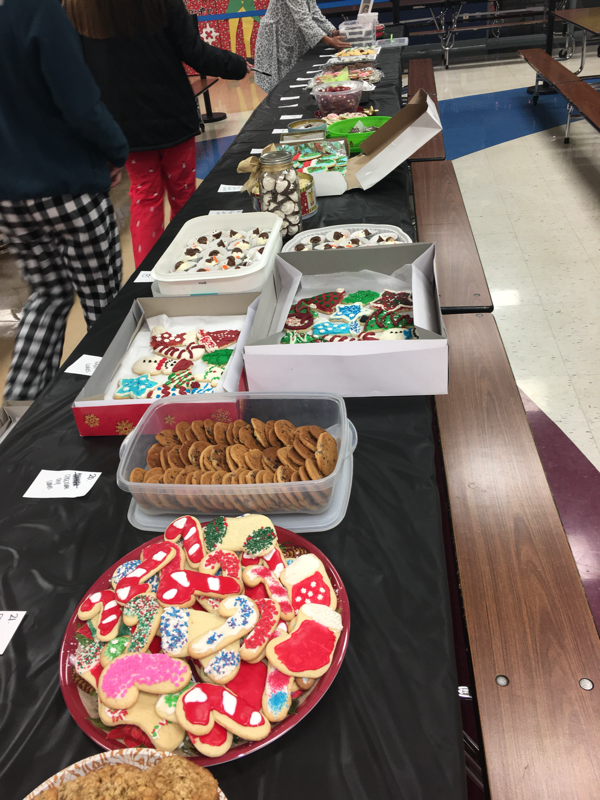
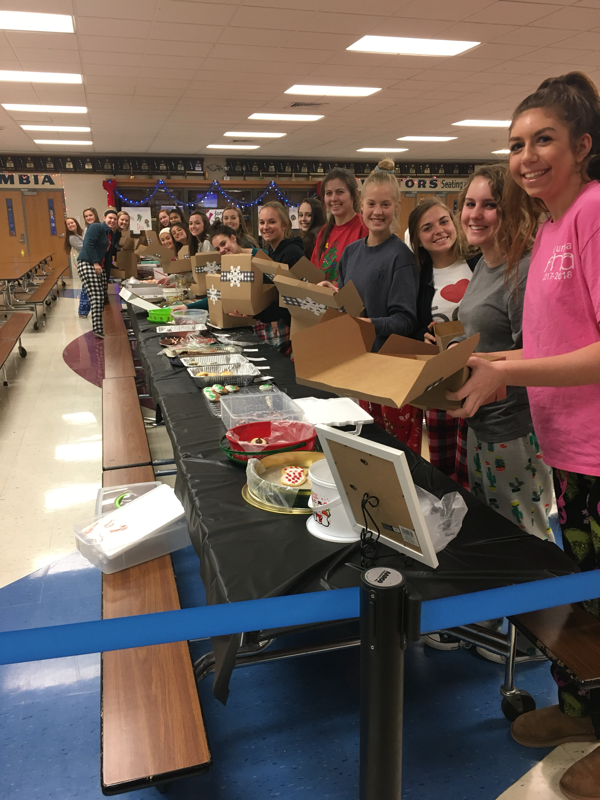
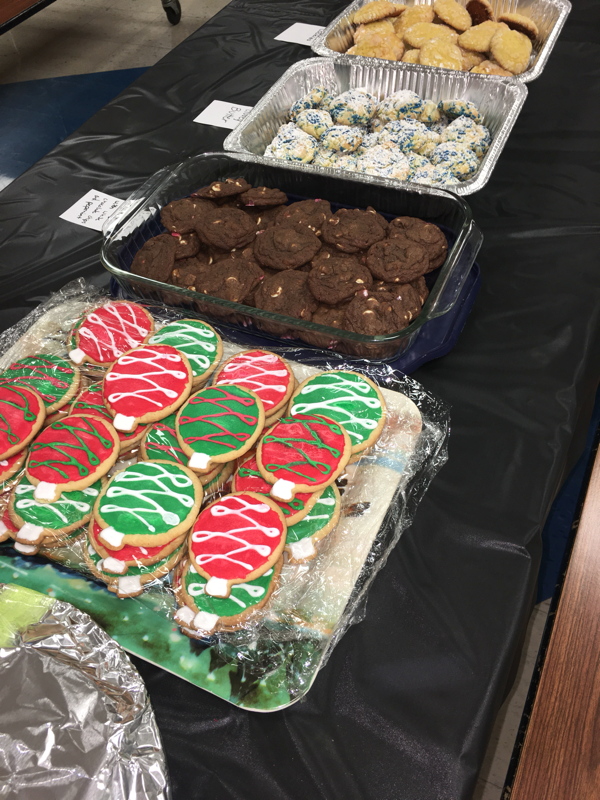
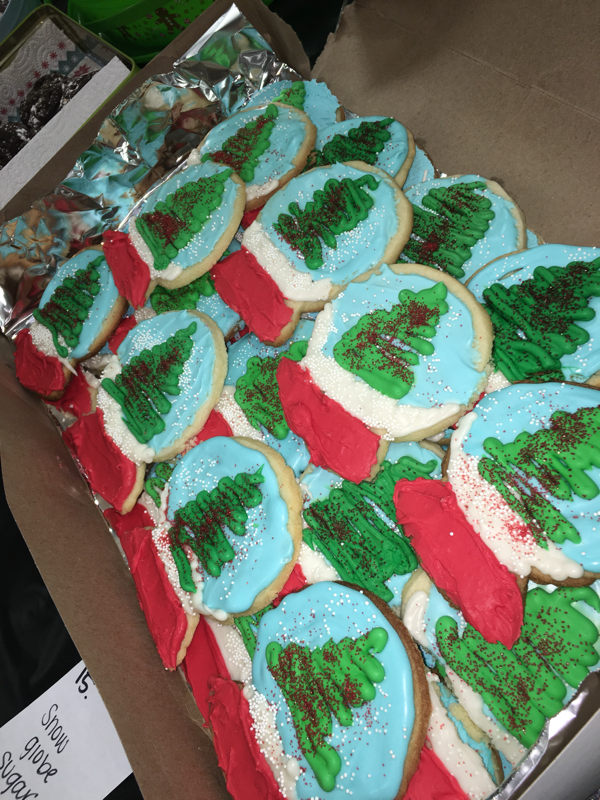
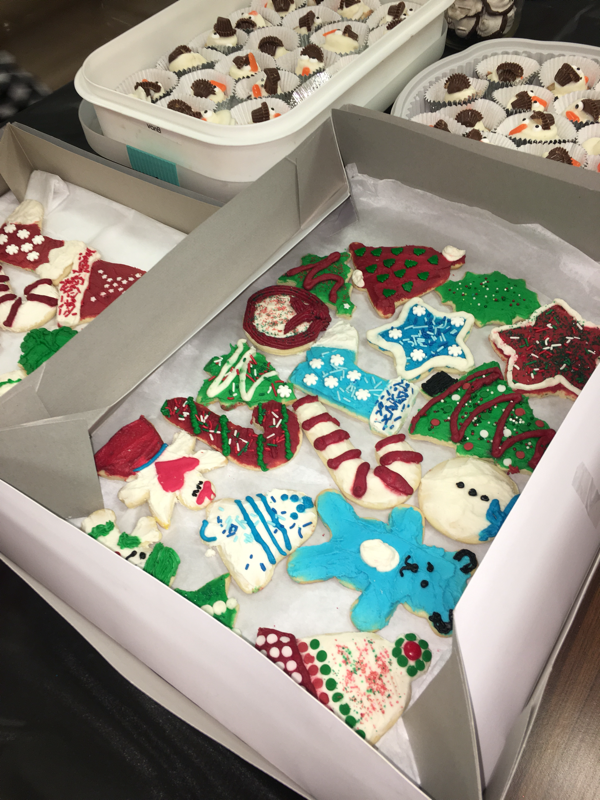
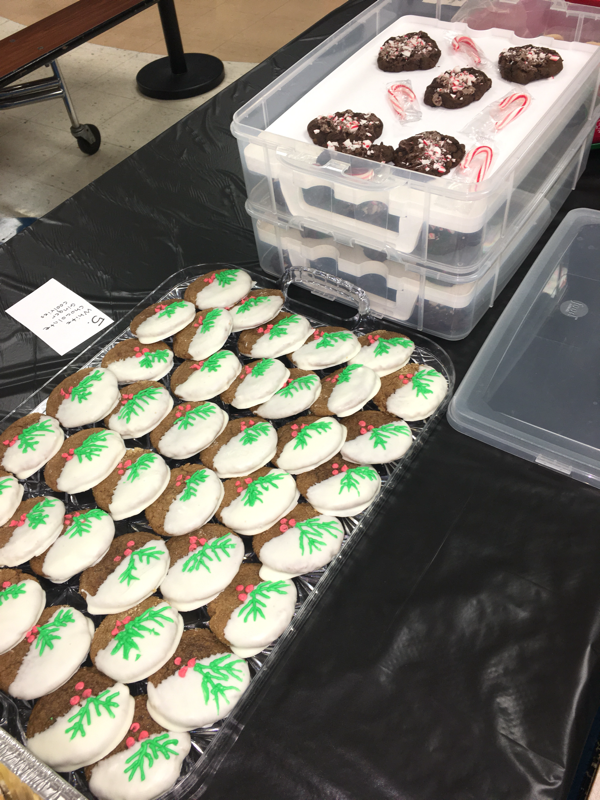
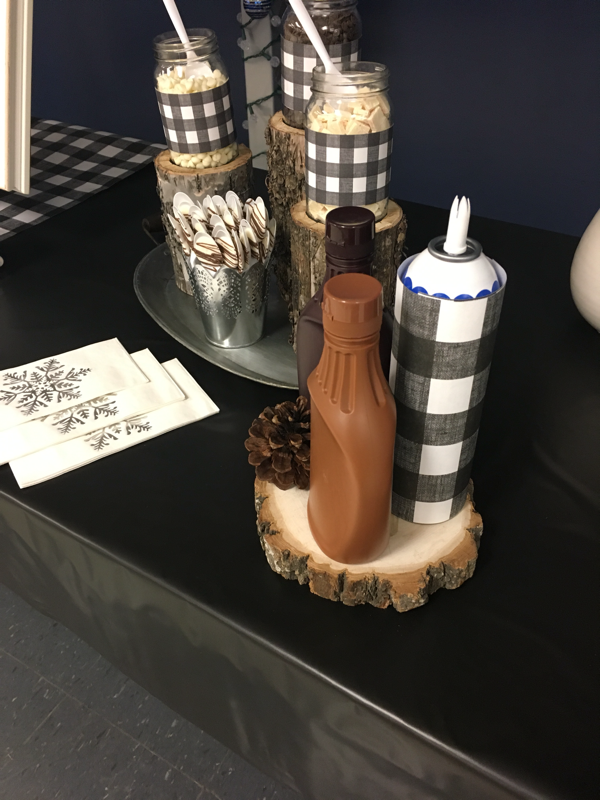
Happy holidays, sweet friends! It's my favorite time of the year and it's time for some details on my favorite holiday event! A few weeks ago I hosted our annual cookie exchange for my FHA club members; if you know me, you know I prepare for this party all year. I have so much fun planning the menu, making decorations, and setting up for our event. Our theme for this years cookie exchange was merry and cozy. Our guests were encouraged to wear their favorite cozy Christmas pajamas and were treated to warm soups with all the toppings for dinner. For dinner, I made large batches of potato soup and taco chili - the potato soup is a recipe I teach in class and is always a favorite and the taco chili is one of my favorite winter dinners to make at home. Details on both of those recipes are coming soon! I decided to make a soup toppings board so everyone could dress up their individual bowls. I picked up a variety of crackers at Aldi - they have such a big selection and are so reasonable in price. I also added chopped green onions, bacon bits, sour cream, and a lot of shredded cheese to top our soups. I arranged our toppings on my large serving tray that I made over the summer. Details on that can be found here. 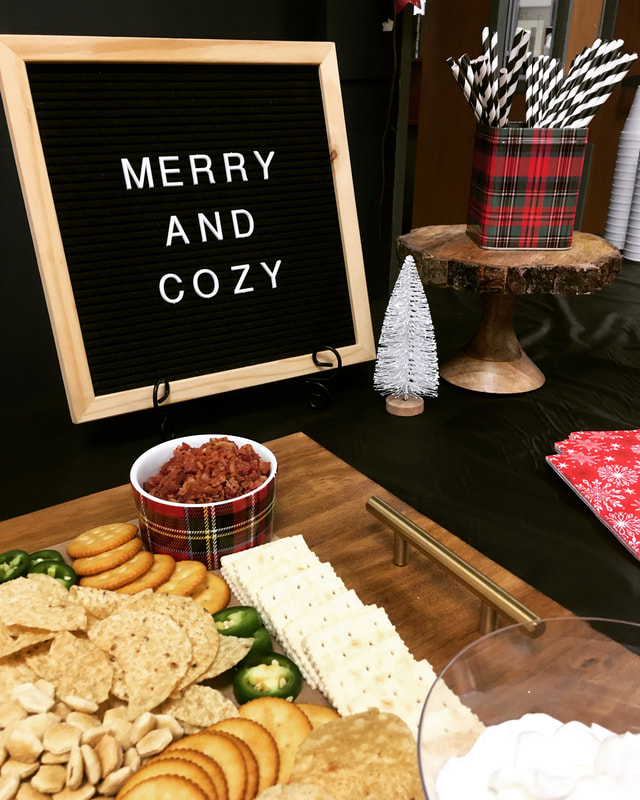 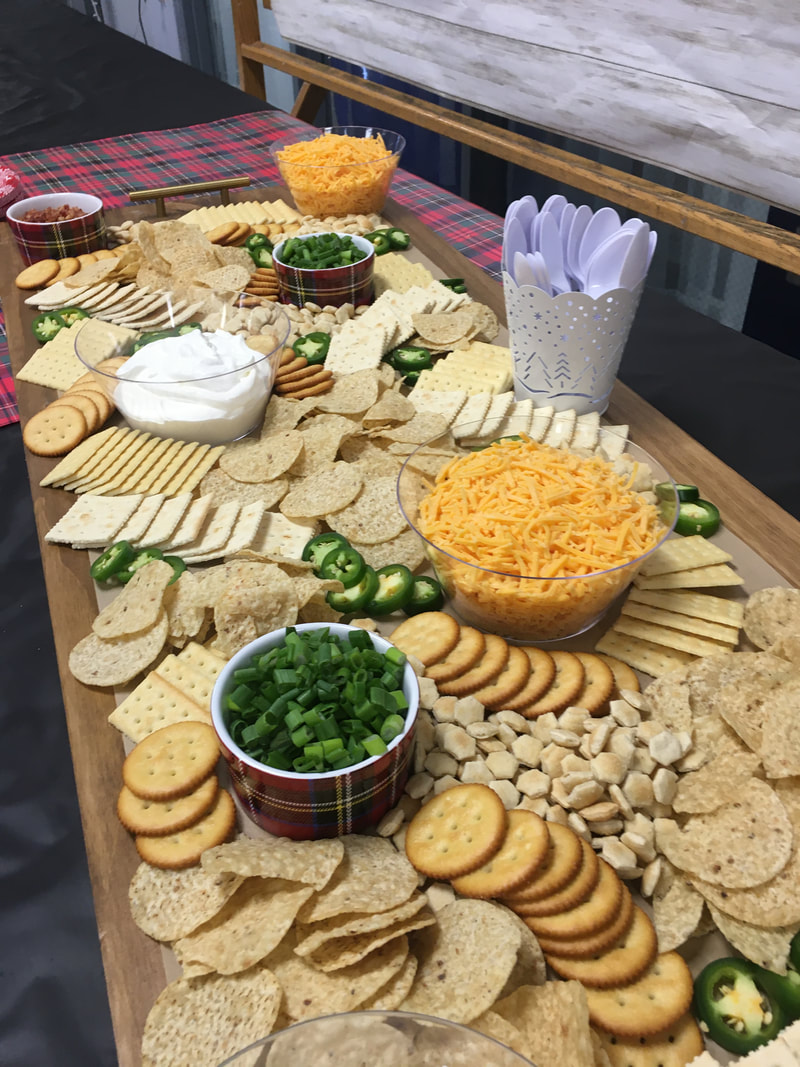 For our serving table backdrop, I covered a large dry erase board in my favorite shiplap bulletin board paper which you can find at Hobby Lobby. I also cut some large letters on the silhouette and draped the top with cookie cutters. Such an easy project and it covered the bare walls of our cafeteria perfectly! 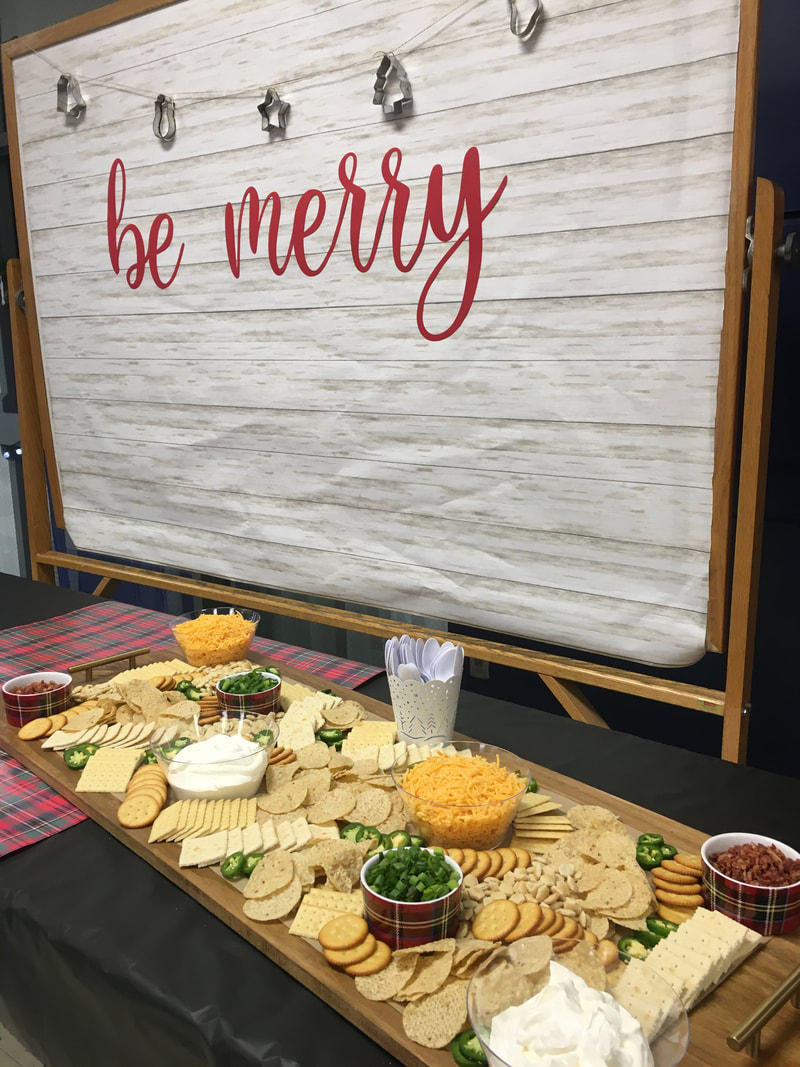 For the cookie exchange portion of our party, each student brings 50 cookies of their choice (one for each person). We have a sign-up sheet so that we don't repeat the same cookie multiple times. I would also suggest having something for your guests to carry their cookies home in. I use these bakery boxes but depending on the size of your party, small treat bags or boxes would also work well. For a little extra fun I always decorate the boxes. This year I used a strip of plaid wrapping paper and a small Christmas tree labeled with each guests' name. 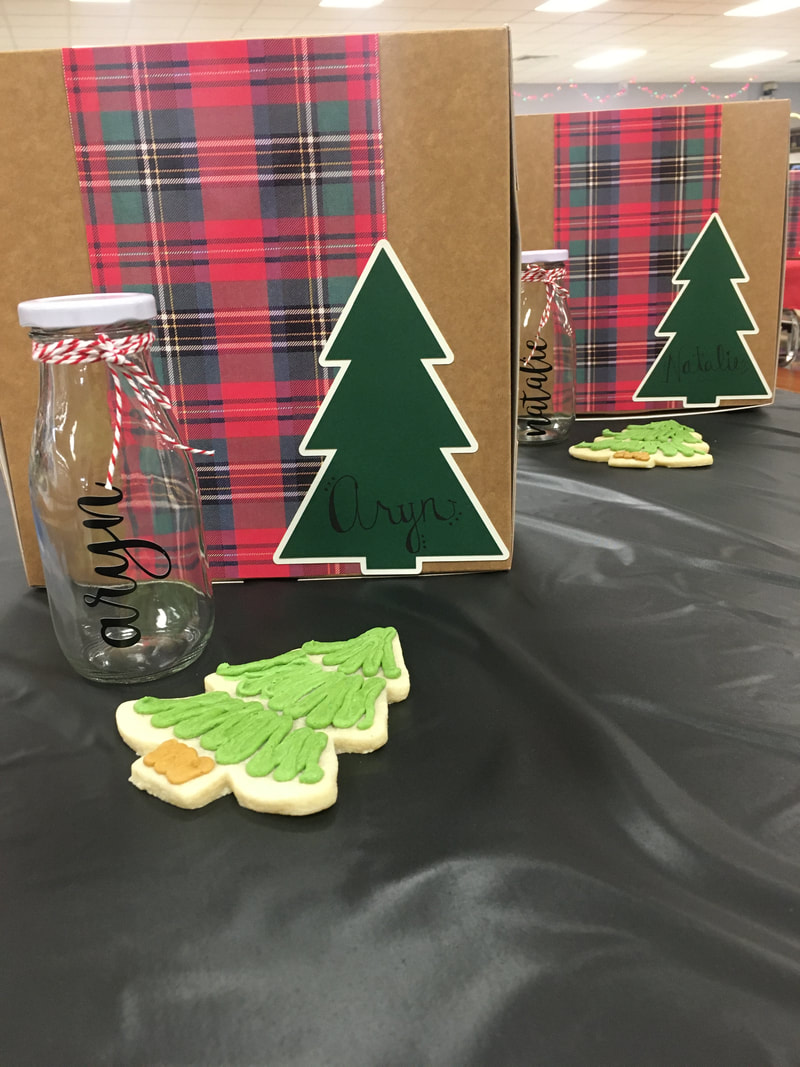 The bakery boxes make it so easy for each person to go through the line and pick up one of each cookie. We also number each cookie to make voting for our prizes much easier. Our winners this year each went home with a movie night basket full of popcorn, candies, and a gift card for movie rentals. Check out how delicious our cookies turned out! And what holiday cookie exchange is complete without a photo backdrop? This year I created this cozy winter scene using a mantle that I purchased second-hand and refinished. Our Christmas tree was decorated with ornaments that I made for each guest. The wood slices were purchased on Amazon. I painted them black, added names using adhesive vinyl, and a big bow on top using ribbon from Hobby Lobby. Didn't it turn out wonderful? 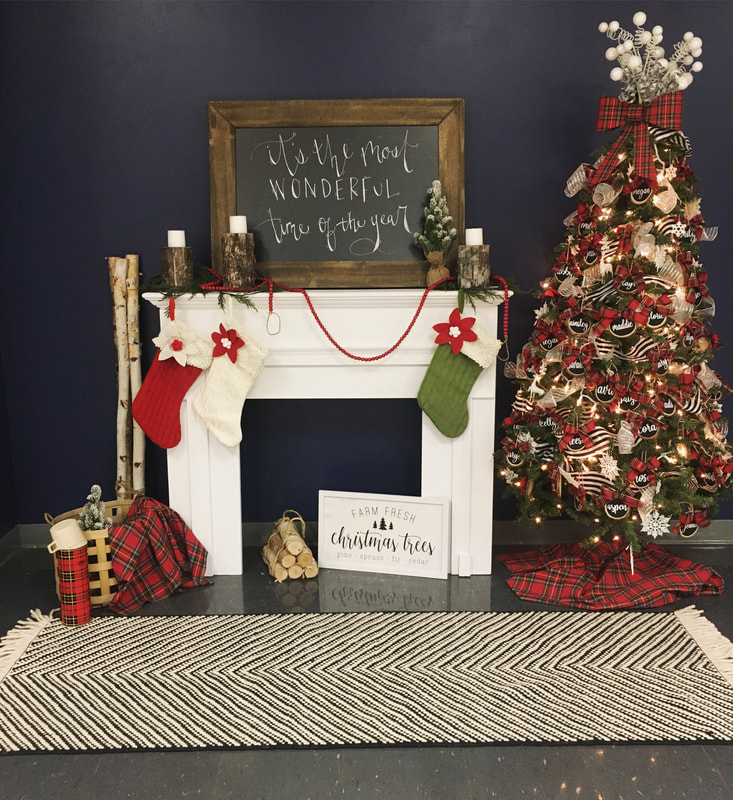 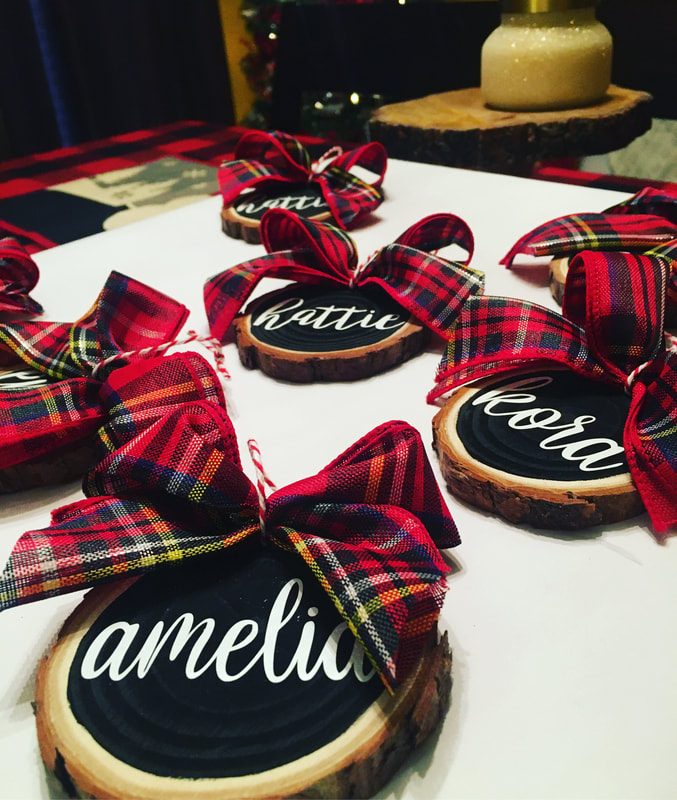 Happy holidays from our little family of friends to yours! 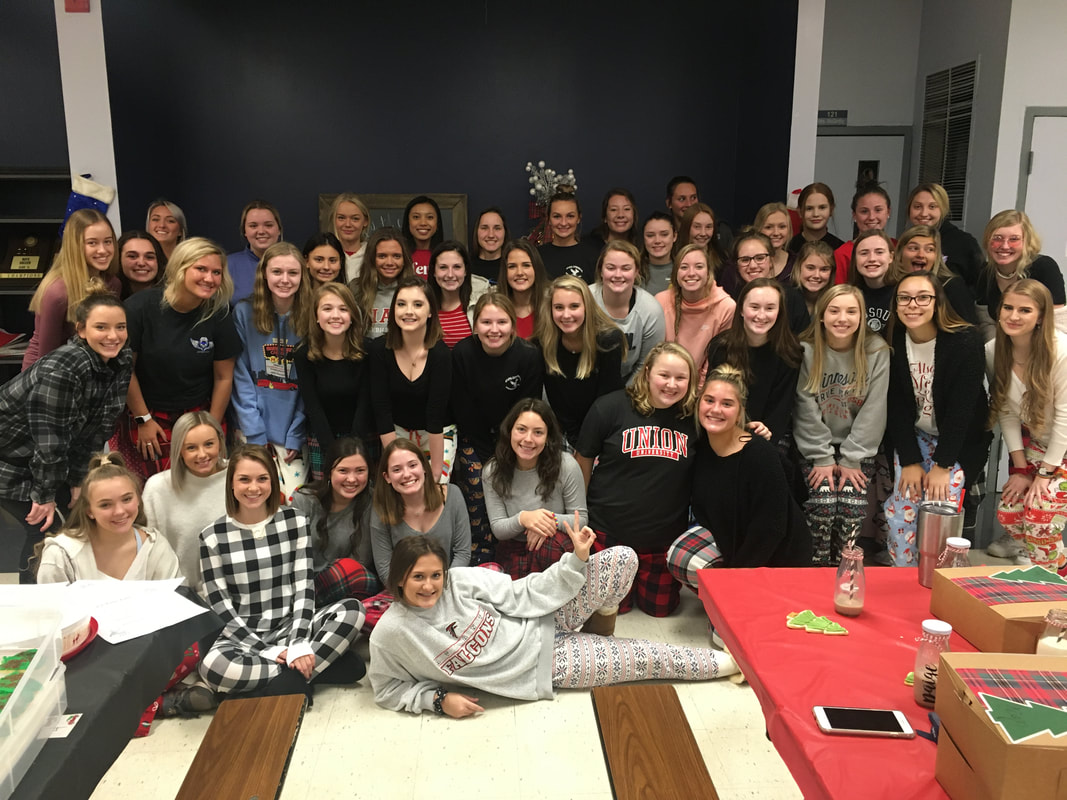
0 Comments
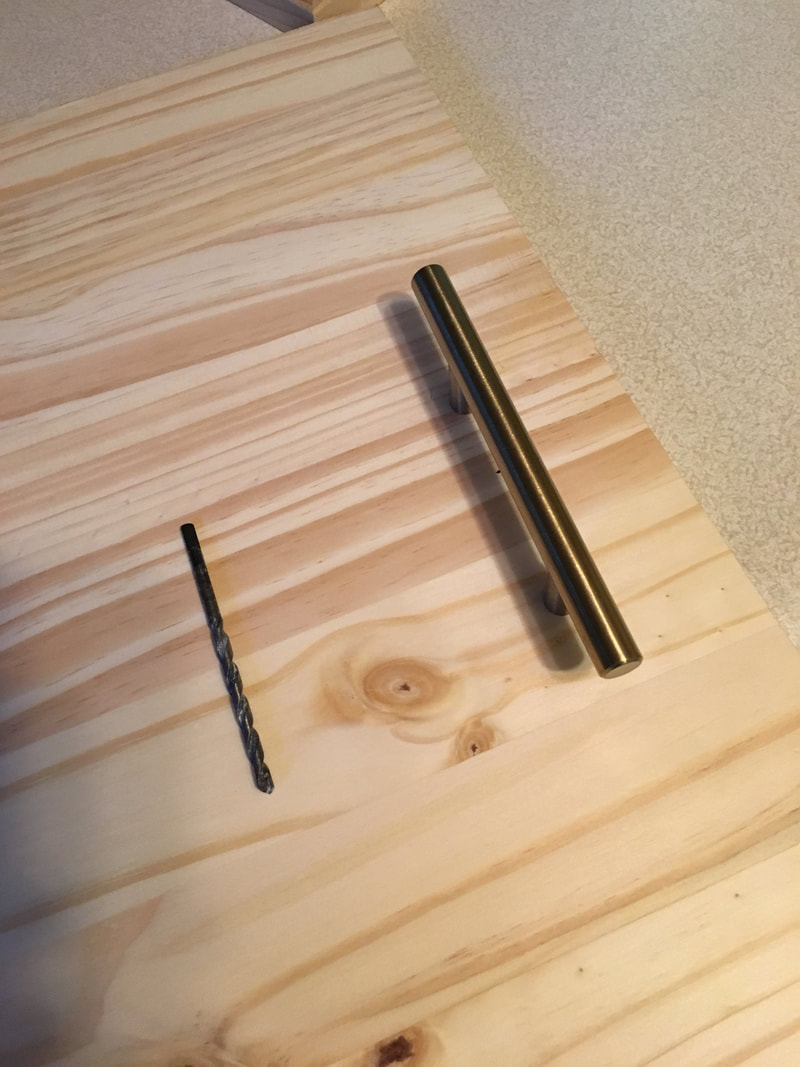
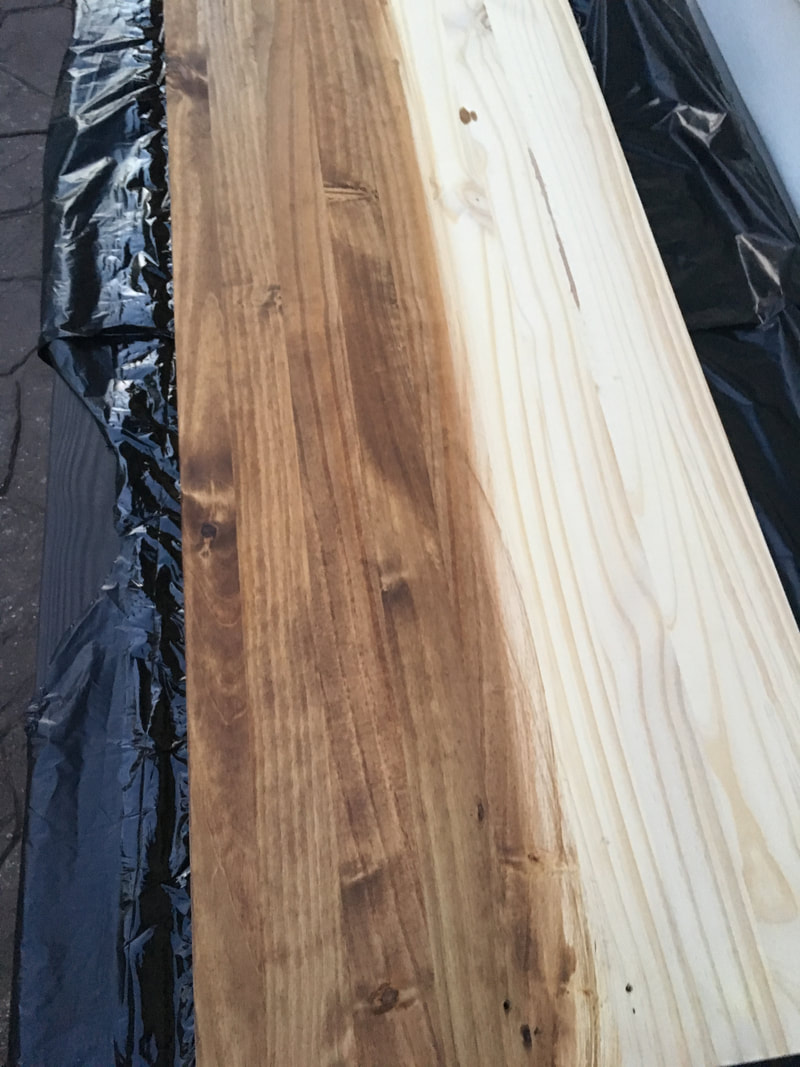
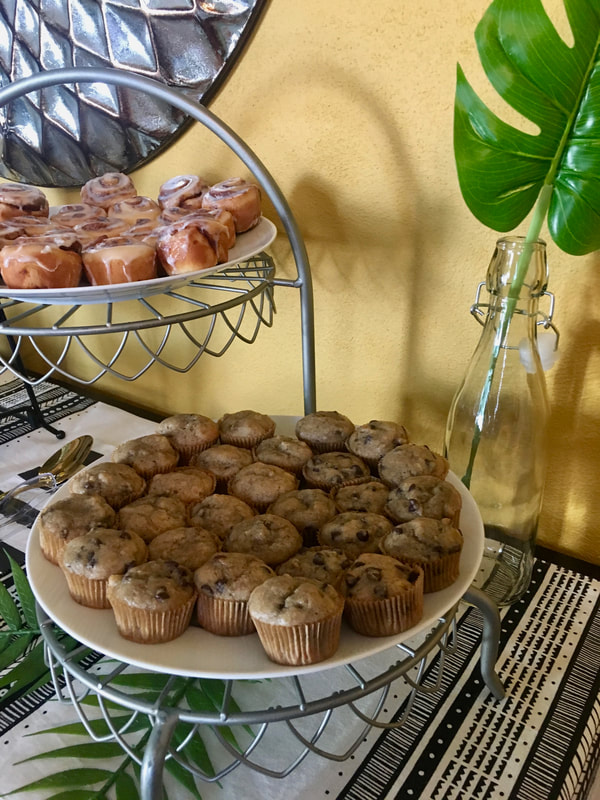
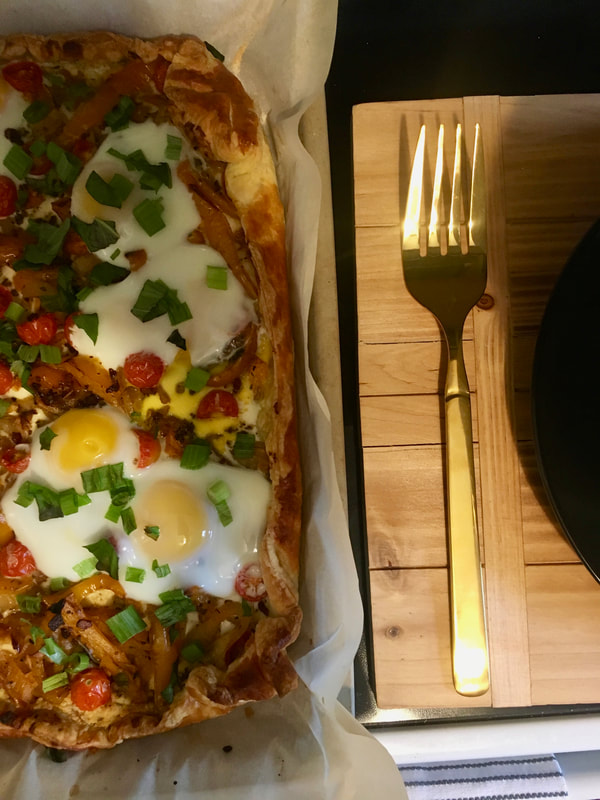
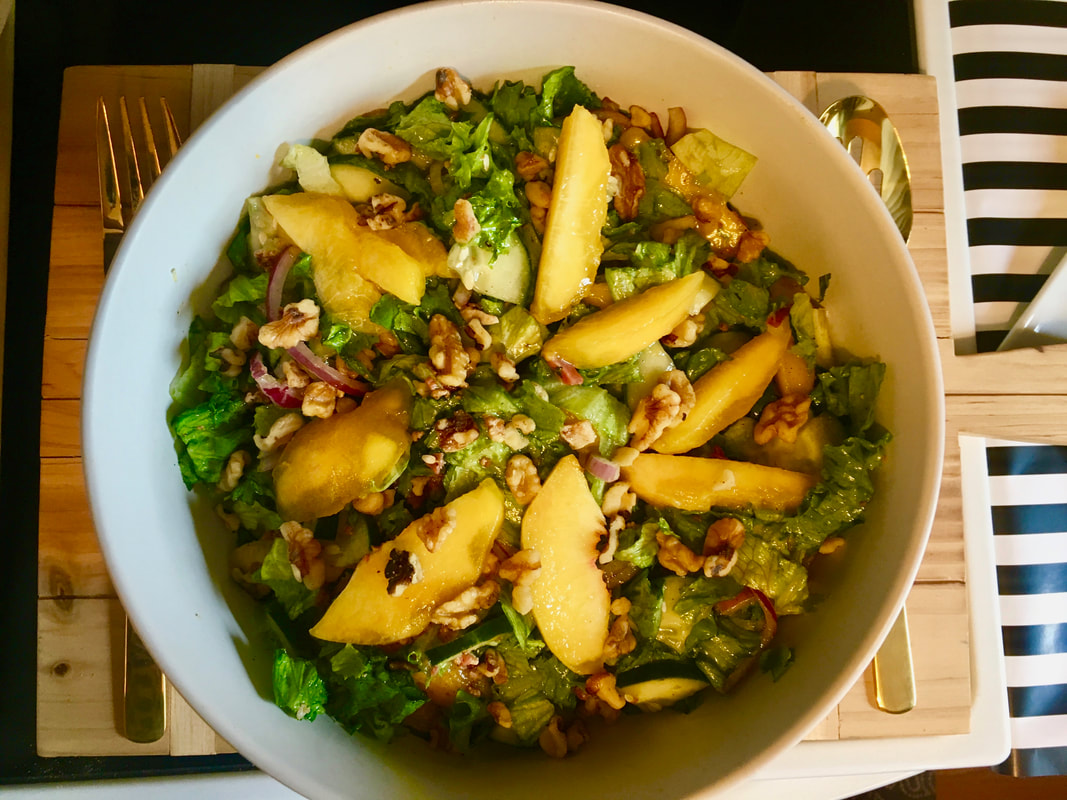
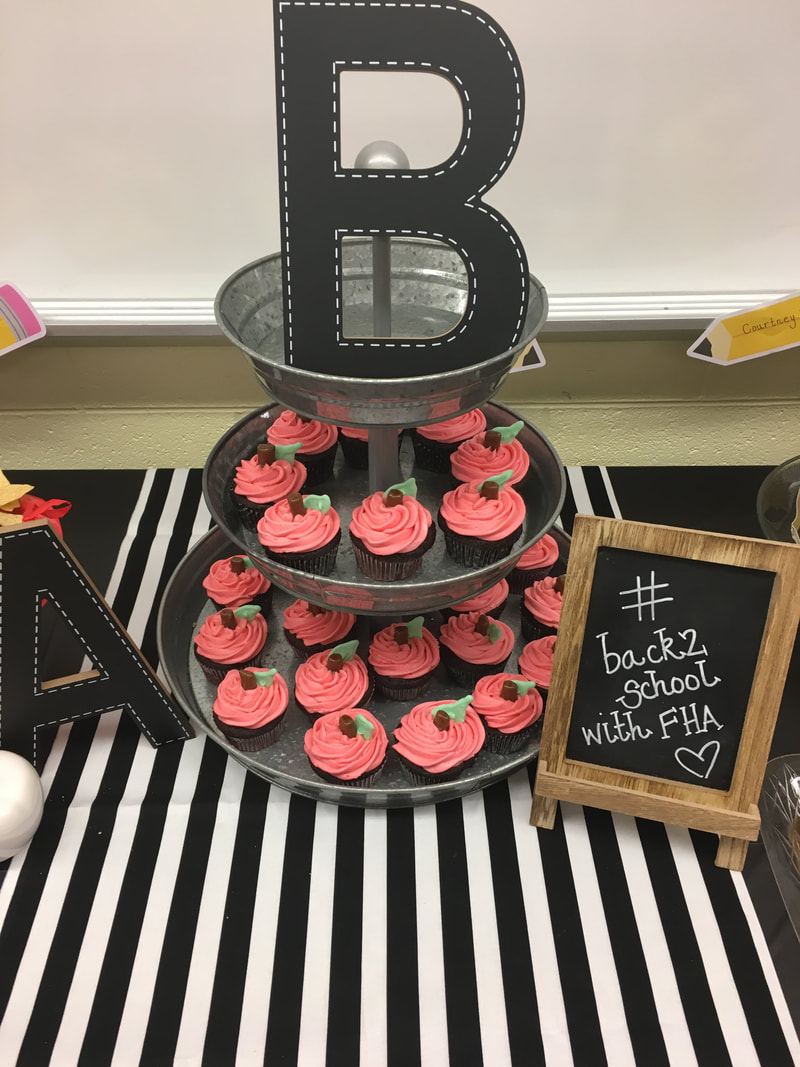
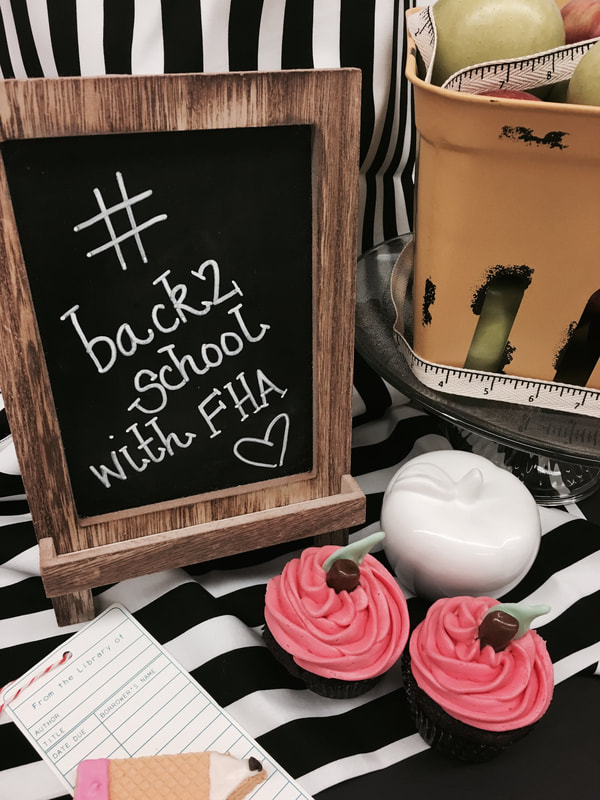
I don't know about you but I am 100% obsessed with wooden serving trays right now. I'm embarrassed to tell you how many I currently own. I think a wooden tray is a perfect styling piece - you can layer them, use them for height and contrast, and most importantly, they add so much warmth to your design. A couple months ago when I hosted brunch for my friends, I wanted to create a bar/drink area for my guests to serve themselves. After some other recent crafty projects, I discovered a section of edge-glued wood boards at Menards - they're inexpensive and come in a variety of sizes that are great for craft projects. I picked another one up and decided to make a wood serving piece for my drink station. Check out below how to make this quick project. Supplies needed: 1 edge-glued board (I selected pine in the 4 foot length) Stain or paint of your choice (I used Minwax in the color Early American) Polyurethane seal (if you plan on using water on the surface) Hardware for decoration Equipment: Brushes or rags for staining Electric drill for creating openings/installing hardware Drop-cloths or trash bags to cover your work surface  Let's get started! 1. Cover your workspace and make sure your area is well ventilated. 2. Lightly sand your board if necessary. Wipe clean. Mark and drill holes for your hardware if you are using any. 3. Stain your board using a staining cloth. Allow to dry. Flip, and stain opposite side. Let dry completely. 4. Lightly brush polyurethane seal on both sides (allowing to dry between sides). 5. Once dried and cured (at least 24 hours), place hardware on and enjoy your new serving piece! I loved using mine as the drink station for brunch and most recently, on my dining table as a fall centerpiece! I love quick and easy projects that fit my vision perfectly! 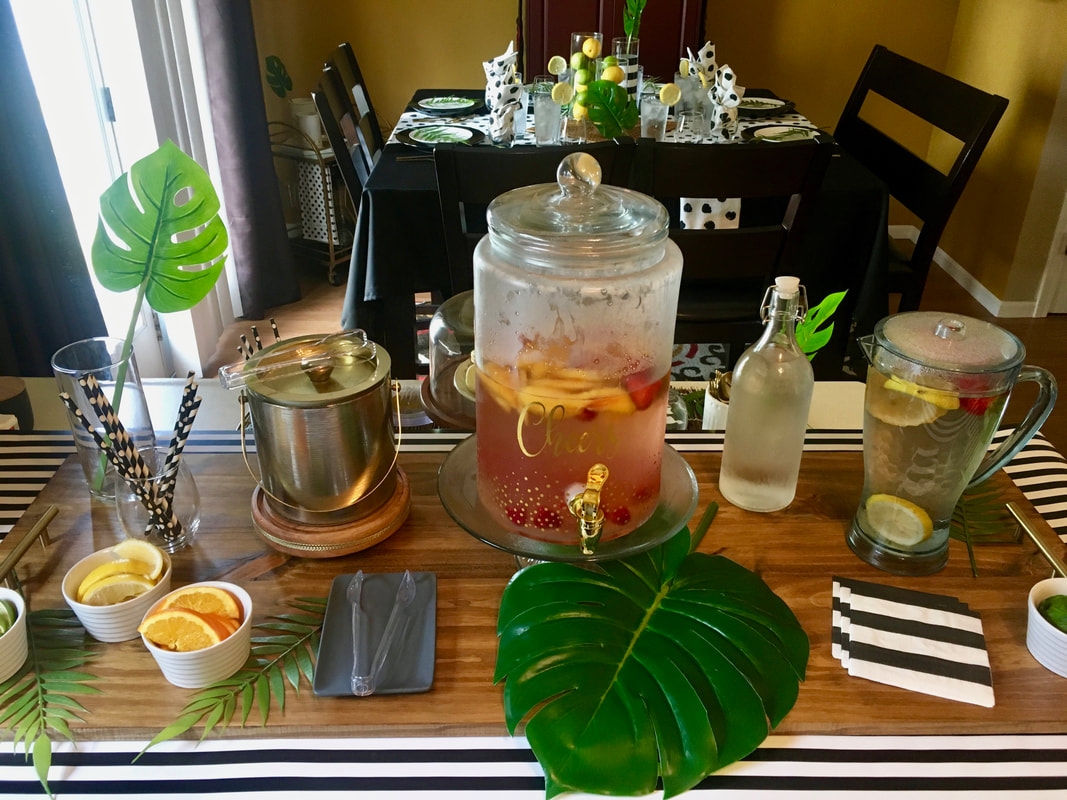 If you know me, you already know that brunch is one of my favorite things in life. I think it's the most wonderful excuse to spend time with good people and enjoy great food. I recently hosted a small brunch to celebrate one of my dearest work friends. She is having a sweet baby boy in the fall and brunch seemed like the perfect opportunity to sprinkle her with some love. Are you searching for some brunch inspiration? I've got some delicious menu ideas and beautiful table settings for you! Let's talk about table settings first. For this brunch I decided to use elements of black and white with accents of bright green. I purchased a black tablecloth at Home Goods that I cut in half and stitched a fabric runner down the center to make the tablecloth fit my table better. I used the same fabric to make some cloth napkins for my guests to use. Black and white plates were layered and topped with a simple faux green stem. The look was clean and simple but still elegant. For centerpieces, fresh florals are always a win in my book - they're effortless and always beautiful. If flowers don't fit your style or budget, fresh fruits and vegetables also make a wonderful centerpiece and they can be used later. I really like using citrus fruits as vase filler - they're bright and cheery and generally inexpensive.  I used elements of black and white as well as green in other locations in my kitchen to make the theme consistent. Monstera leaves are so on-trend right now and you can find the giant faux ones everywhere! Hobby Lobby, Target, and Wal-mart all have a great selection of them in store. 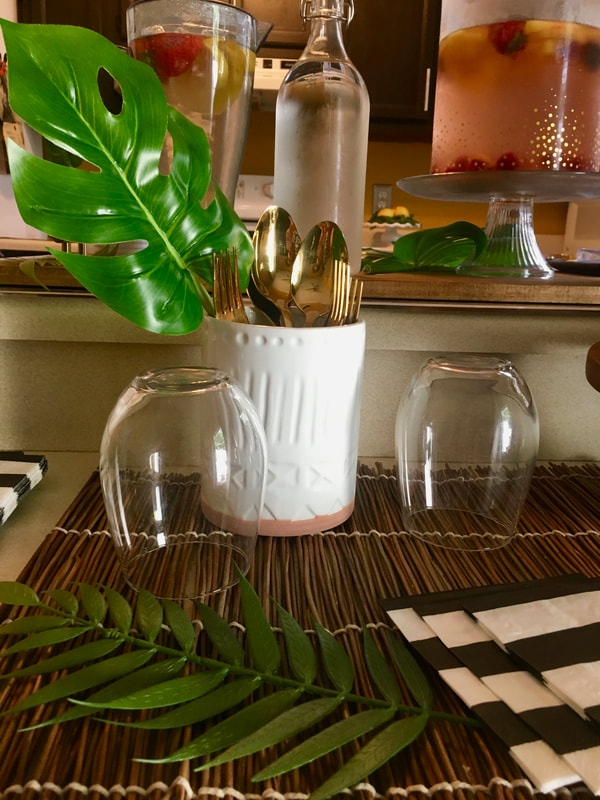 Need some menu ideas for your next brunch? I kept it simple and included a lot of items that could be prepped ahead of time: A yogurt bar - vanilla yogurt with lots of different toppings including fresh fruit, granola, shredded coconut, and sliced almonds. Mini muffins and mini cinnamon rolls - both could be made ahead or purchased from a local bakery. Savory vegetable tart - There is so much opportunity to make it fit your taste preferences and most of this dish can be prepped ahead. More recipe details can be found here. Summer salad - Use what it in season! I prepared a peach and walnut salad and the recipe can be found here. Prep everything ahead and save the dressing for last! Guacamole BLT's - one of my absolute favorite dishes. I prepped the sandwiches the morning of the event and served them at room temperature - they were delicious! More details on guacamole BLT's can be found here. 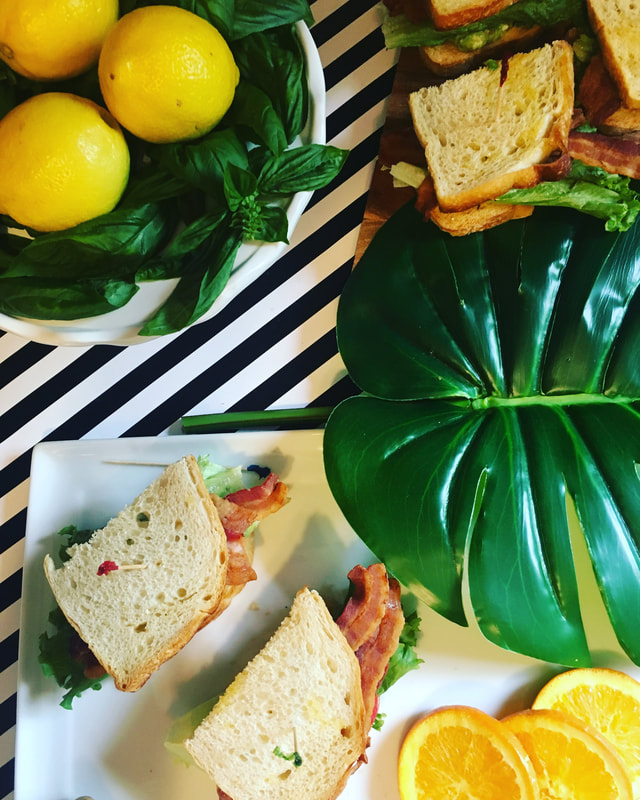 What's brunch without cocktails? I served up some white peach sangria for my guests. For the guests that prefer something non-alcoholic, serve sparkling water with lemons and strawberries. The fruit adds delicious extra flavor! I like to make a drink service area with extra napkins, glassware and straws, and some flavorful garnishes. Citrus fruits and fresh herbs like mint and basil make great drink garnishes. 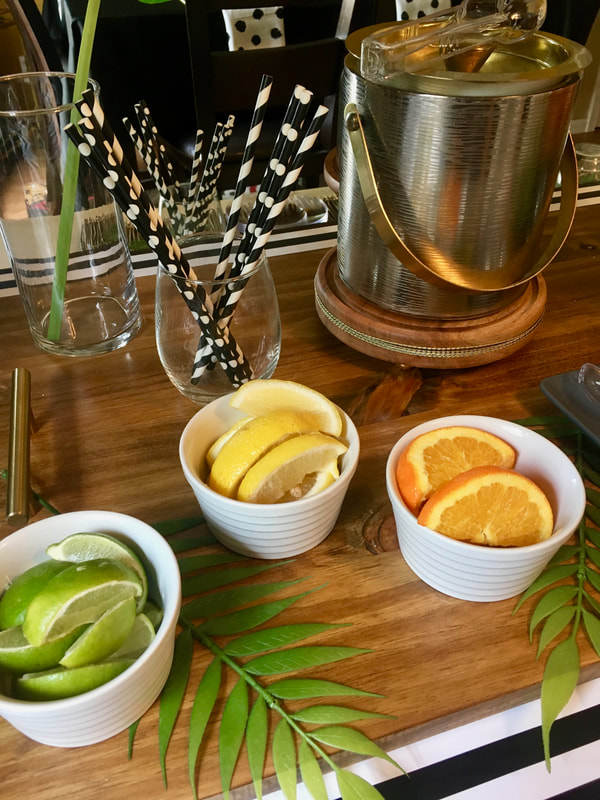 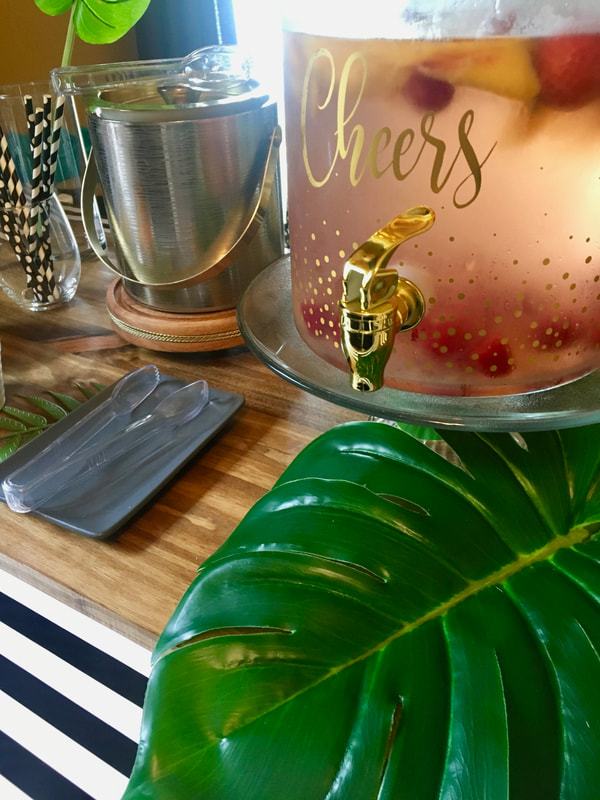 I hope you get to brunch and enjoy some time with your favorite people very soon! I know some people have mixed feelings about heading back to school but if the end of summer has to arrive, what better way to celebrate than with bright yellow pencils and brand new lunchboxes? If the mood should strike you and you decide to throw a back to school bash, I've got some quick and easy ideas for you! How fun would it be to have a back to school themed breakfast or dinner for your family? Or you could always surprise your fellow teachers with a back to school lunch in the lounge! Let's get started with some ideas! First up, paper goods. I love paper plates from the Dollar Tree; they're so affordable and come in a variety of great colors. I picked up the red plates and added some construction paper for the leaf and stem. The cute black and white napkins are also from Dollar Tree! 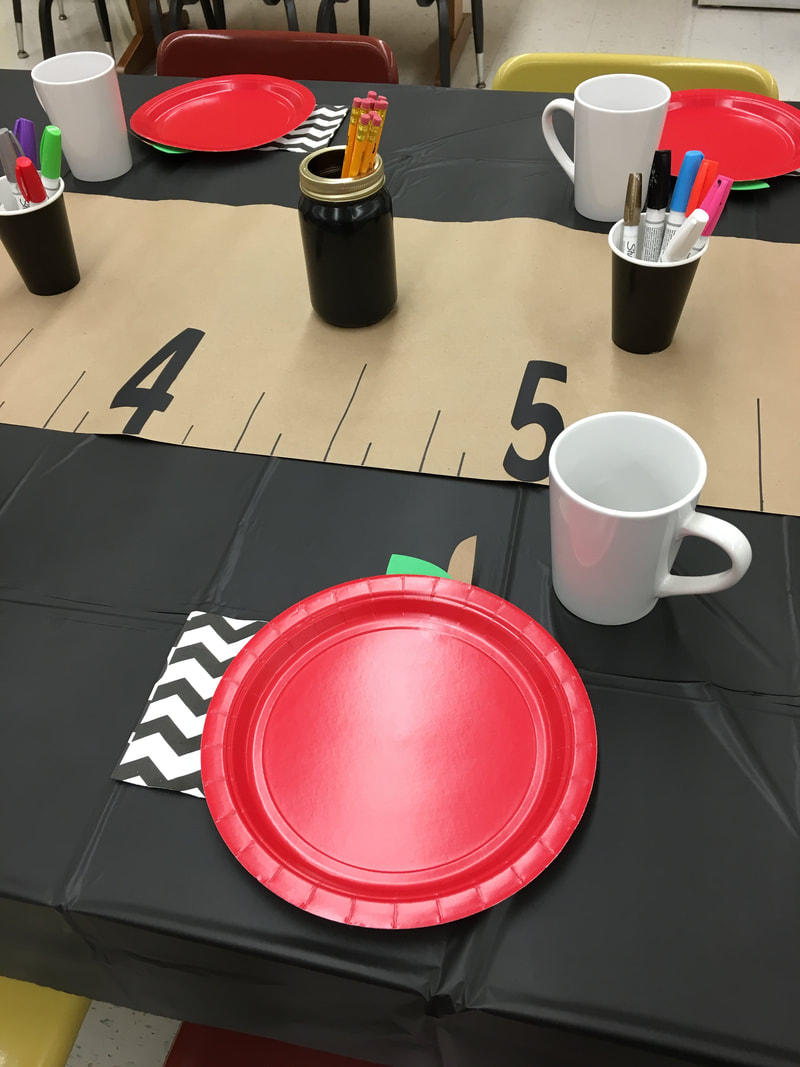 I created the table runners using brown kraft paper rolls from Dollar Tree. I love that stuff! You get so much paper for only $1 and it makes the best table runners! The mason jars are also from Dollar Tree - they were clear and I used inexpensive black spray paint to cover them. Throw some pencils in there and you have the perfect back to school centerpiece. Bonus points! It's a centerpiece that doesn't go to waste. Move that cute jar to your desk or homework area when your celebration is over and use it throughout the school year. 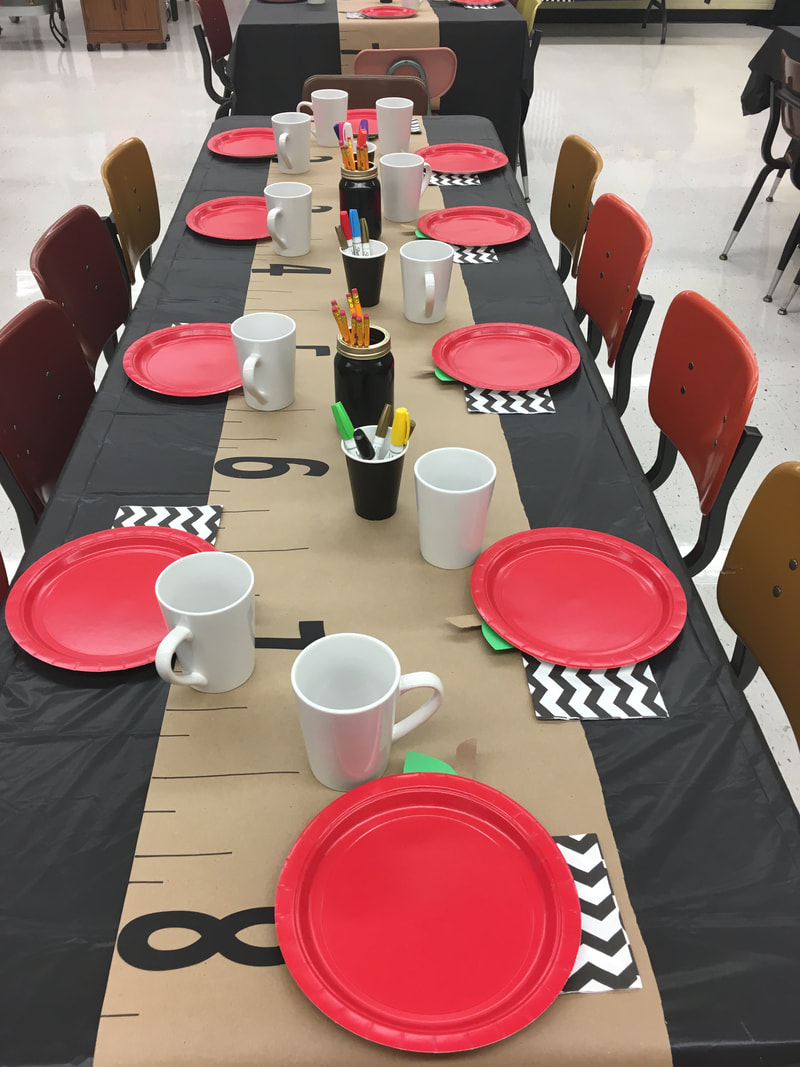 I think that black and white stripes is just the cutest pattern for a back to school party! Grab some black and white wrapping paper or fabric next time you're at the store and use it to decorate your snack table. The back to school banner was made with my silhouette machine and the sweet pencils are from the Target dollar spot. The oversized ABC letters and apple baskets are also from Target. Target always has a great back to school section. I spotted some adorable mason jars this year that are painted to resemble apples and pencils. Check Target early and often for some great deals! Tissue paper poms are still one of my favorite party decorating moves. The red ones below have construction paper stapled to the back to resemble apples. So simple and cheap and so cute! 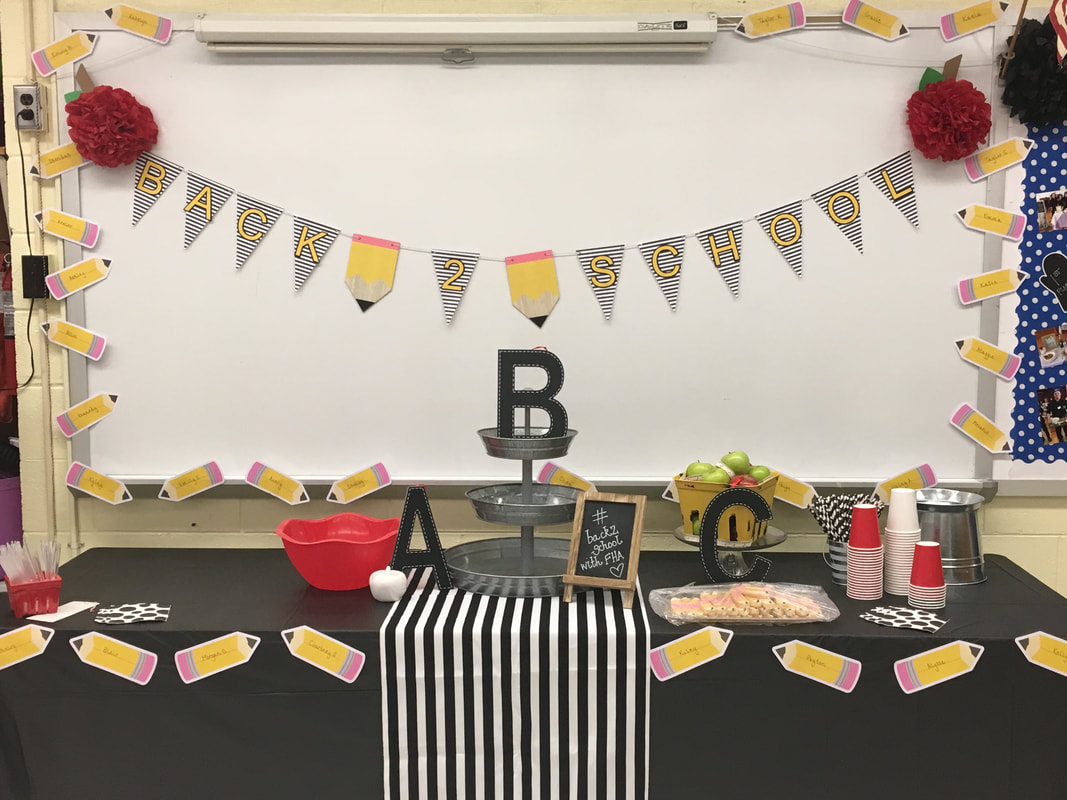 If you are in search of a treat, these "apple" cupcakes scream back to school. Grab a bag of tootsie rolls for the stems and green fondant for the leaves. Most cake decorating supply stores carry green fondant ready made but you could also purchase white and color it. Don't have time for that? The green sour straws in the candy aisle also work great! One of the best things about a back to school party is you may already have a lot of the "decorations" you need. Use school-themed items from around your house. Crayons, glue sticks, and rulers all make great vase fillers. Composition books and notebook paper look great stacked under serving trays and flash cards make perfect banners. Get creative and use those items you already have! If your school supply stash at home is looking a little depleted, head to Dollar Tree to stock up! 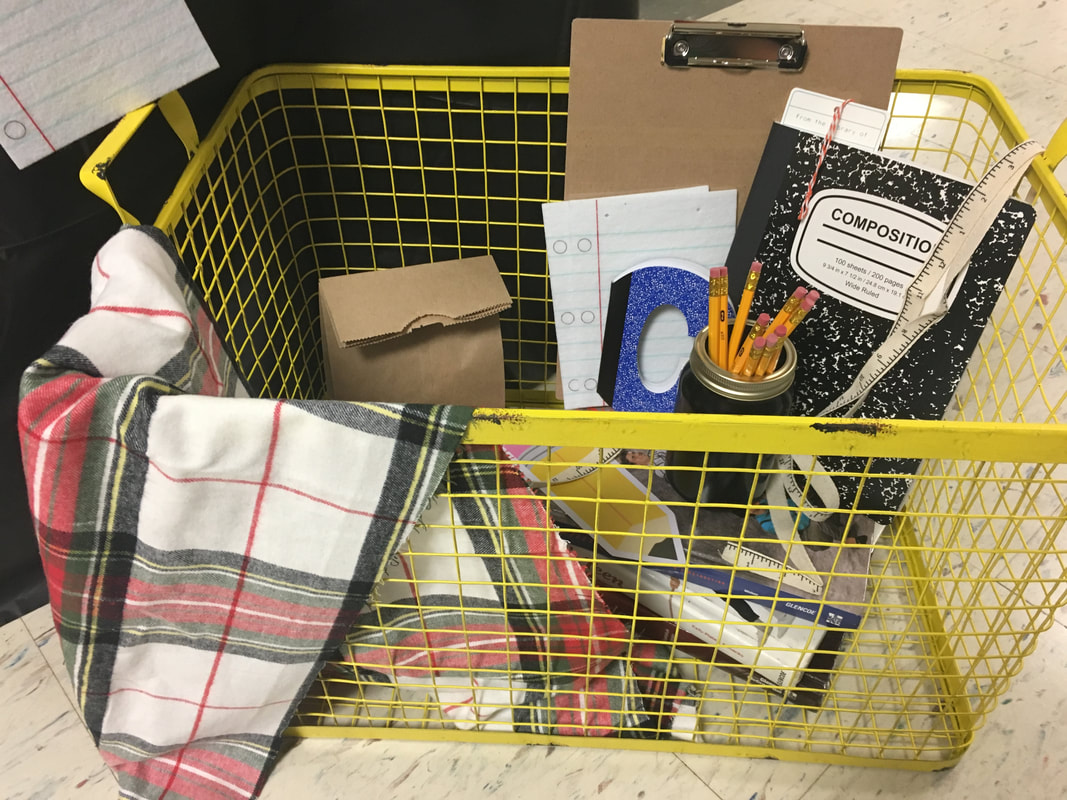 Last but not least, create a photo memory of the day! Whether it's the first day of kindergarten or high school, a photo booth is always a fun idea! I created this "school bus" using a a few cardboard boxes, some duck tape, and a lot of school bus yellow paint! I never imagined my high school students would have so much fun with it! 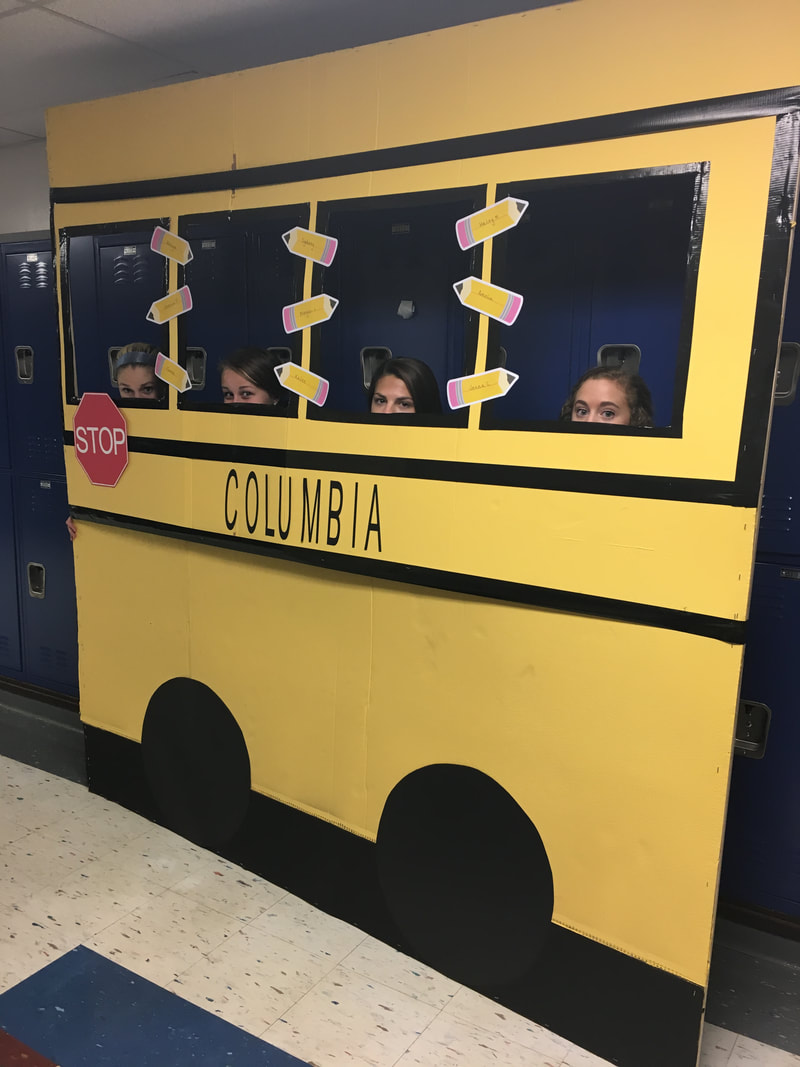 Whether we like it or not, school is on it's way so embrace it and have some fun with your people! A new school year is a great opportunity to make friends, learn something new, and most importantly start fresh. Wishing you the best year ever!
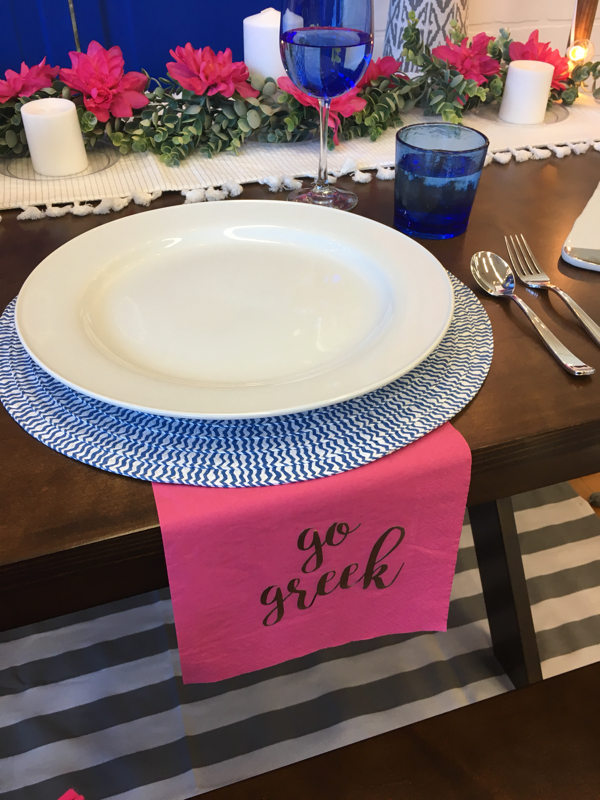
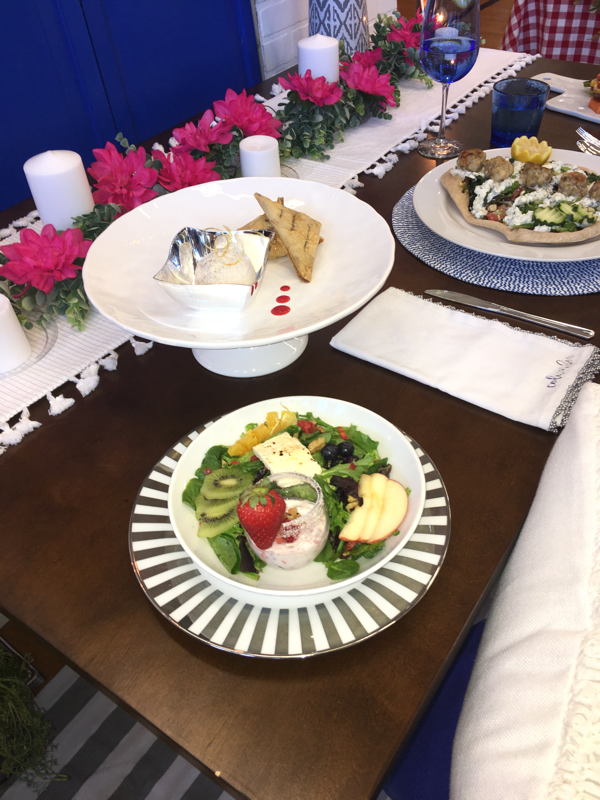
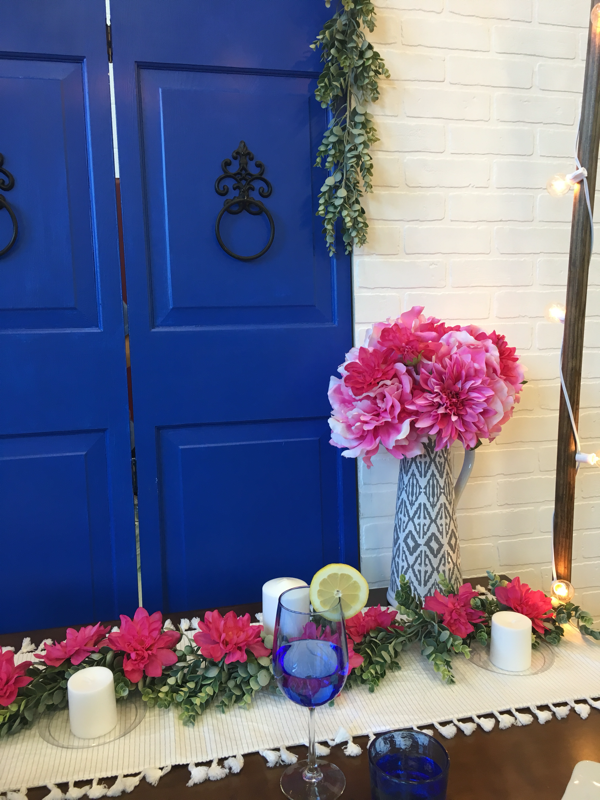
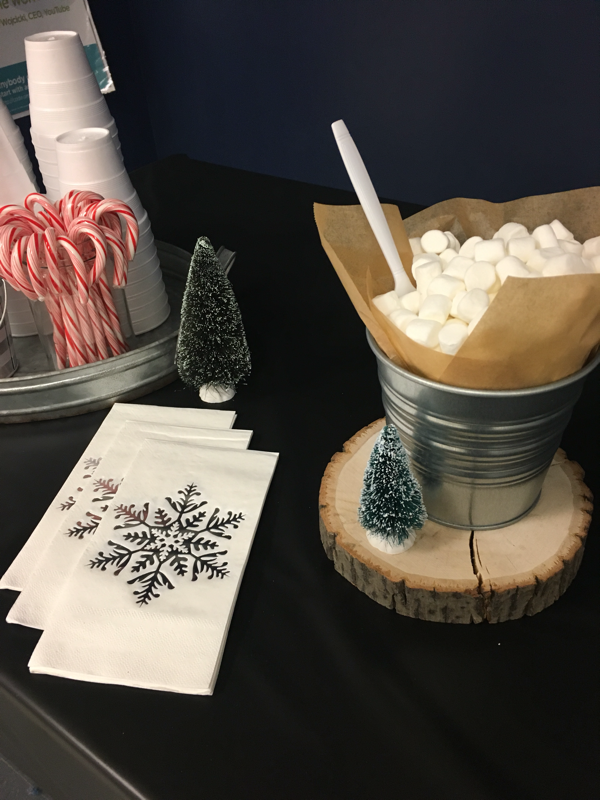
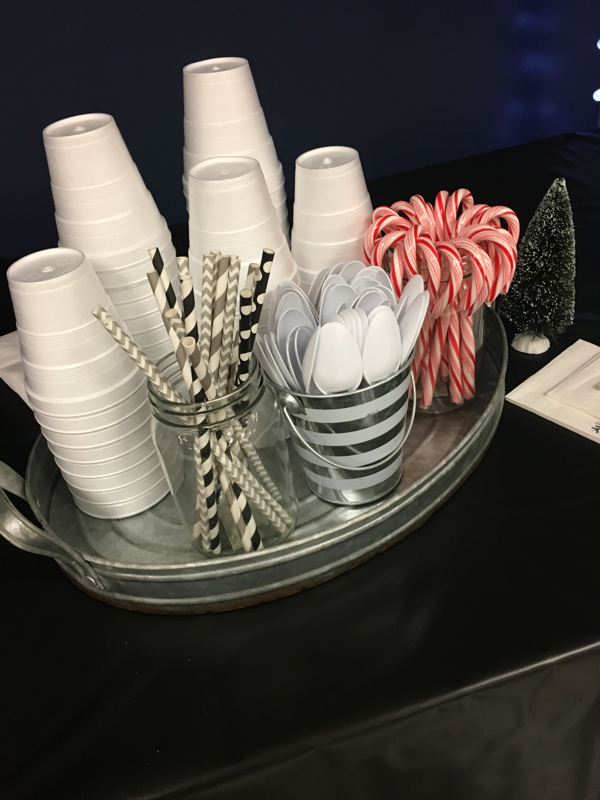
How do you plan on celebrating the new school year?? Platinum Chef season has wrapped up once again and I am proud to announce that it was yet again a very successful year for my team of high school students! The inspiration for this years theme came from a photo on Pinterest of Santorini, Greece. I couldn't get over the beautiful, bright white against the shades of ocean blue. That picture stayed in my mind and with that, a Greek outdoor dinner party was born! All of my table styling secrets are below. I started with this old closet door I purchased from ReStore for only $10. The door was painted with two coats of Behr Beacon Blue in a satin finish. I found the amazing door knockers for $6 a piece at hobby lobby. Once the paint was finished, my students assembled a frame to make to door stand alone.  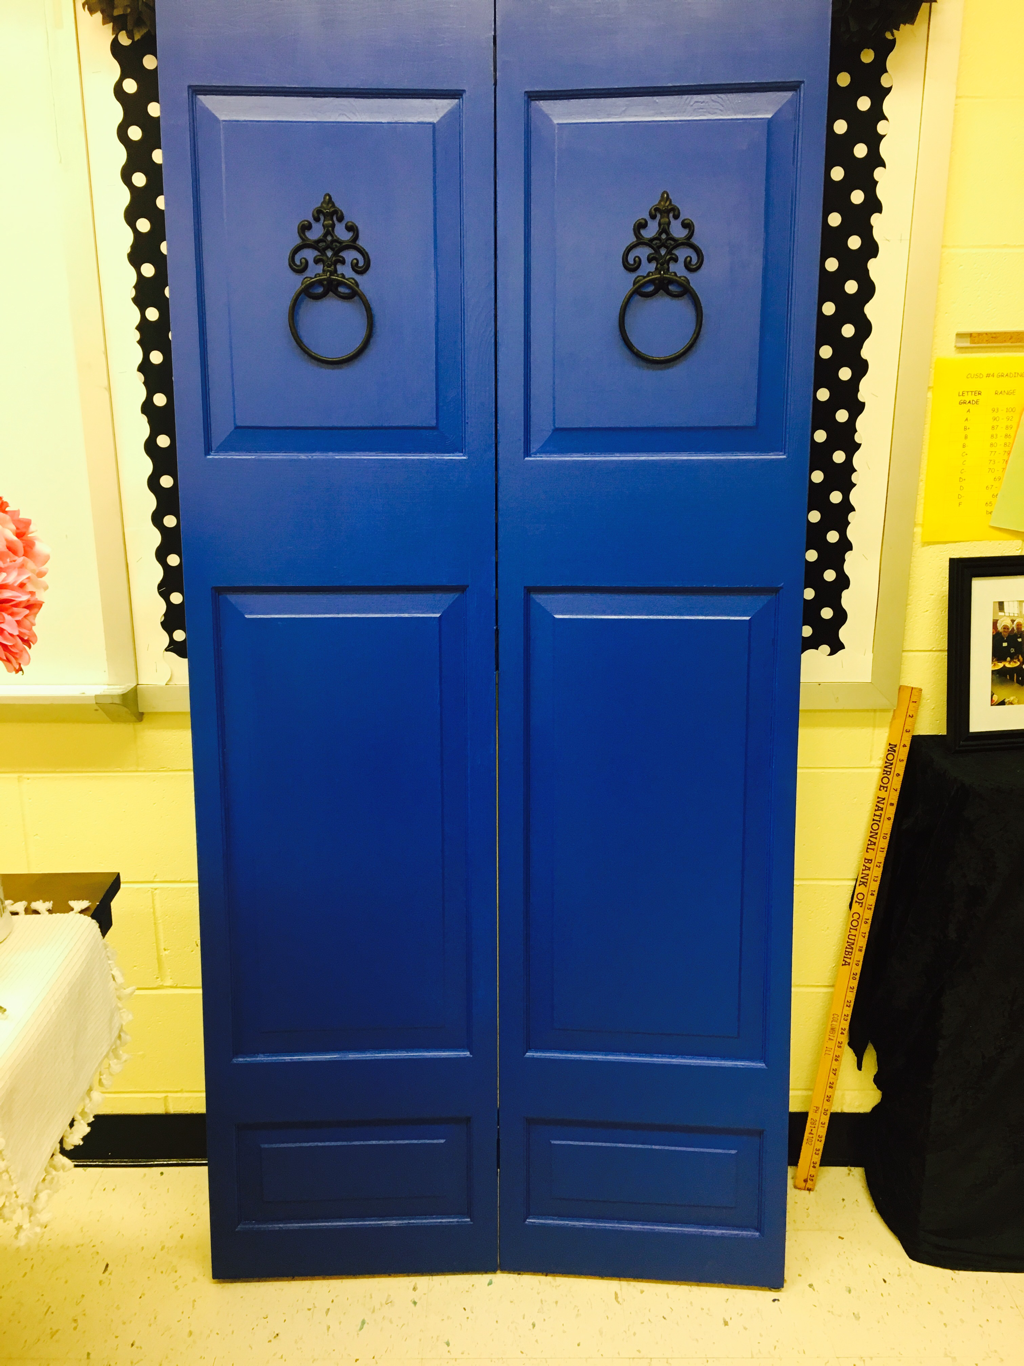 I was inspired by a farmhouse-style dining table I found at Pottery Barn, however Pottery Barn furniture isn't exactly in this teachers budget. I lucked out when I found a similar style at my local Kmart. They were going out of business and the table was only $100! To complete our backdrop, I purchased a large piece of white "brick" wall paneling which we cut into 3 smaller pieces to frame the door. Bright pink became my accent color and things quickly started to fall into place. White dinnerware, pops of blue, and a touch of grey helped pull the entire display together. Varying heights helped draw the eye in while still making all pieces visible. The bar bar cart on the side gave extra room to decorate without overpowering the food. If this were a real party, I would totally style the cheese plate the same way- various textures, heights, and colors make for an appetizing display. I searched everywhere for an area rug to place under the table and was unsuccessful. Instead, a large piece of fabric was trimmed with handmade yarn tassels. Total cost for that project was $20 - way less than a real rug and it was exactly the look I wanted! Last year I ordered custom napkins that were gorgeous but a little expensive. This year I cut chrome vinyl on my silhouette machine and adhered it to hot pink napkins from IKEA - they looked great for a fraction of last years cost! Scroll down to see the finished project!  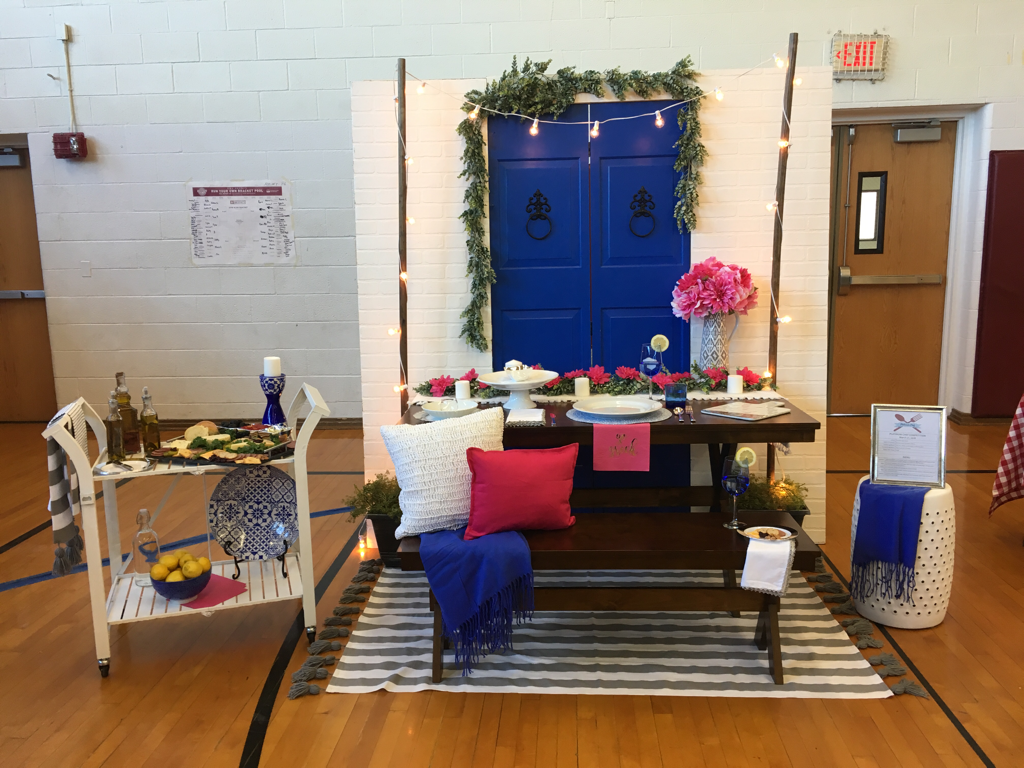 It just makes my heart squeal! Lots of shopping went into this fun project; locations of all the table items are listed below. Greenery, grey/white vase, and fabric for the "rug" - Hobby Lobby Table and bench - Kendall dining collection from Kmart Pink pillow and pink party napkins - IKEA White bar cart, silver picture frame, white/chrome cheese plate, white/chrome striped salad plate, white cake stand - Home Goods Olive oil bottles, blue wine glasses, chrome ice cream bowl and flatware - Dollar Tree Blue blankets, blue candlestick, white pillow, large blue platter, pink florals - At Home White linen napkins - Pier 1 Large dinner plates, small blue tumbler - Pottery Barn Salad Bowls - World Market White and blue charger - Sur la Table White stool and "brick" wall - Menards Party lights - Target It was so fun to see our vision finally come together. My students knocked it out of the park with their food as well! Their teamwork was incredible and they brought home Best Presentation Table, Best Dishwashing/Support Team, Competition MVP, and 1st Place Overall! I am so proud of them!  Happy Holidays, Friends! Life has been busy lately now that the holiday season is here. Last week, FHA met to exchange cookies for the 5th year in a row! Cookie exchange is always such a fun and delicious event. It's also pretty simple to host! Here are some tips to help with hosting your own: 1. Create an invitation detailing your event for guests. Make sure to include date, time, and how many cookies each guest should bring. Include any other special instructions (ex: wear your favorite Christmas pajamas). 2. Create a cookie sign-up so you don't have multiples of the same type of cookie. We use a sign-up sheet in my classroom but a shared file/email or group text message would also work great. 3. Provide labels for your guests to number and title their cookies. 4. What will your guests take their cookies home in? I purchased these bakery boxes for our event and they were the perfect size! https://www.webstaurantstore.com/southern-champion-977-10-x-10-x-5-12-white-cake-bakery-box-100-bundle/24510105CB.html 5. Is your cookie exchange competitive? Ours sure is! Provide voting ballots for your guests and prizes for your winners. We vote on Best Taste, Best Decorated, Most Creative, and Best Overall. Each of our winners received a hot cocoa kit! 6. Speaking of hot cocoa...your guests will need something to wash all those cookies down with. Hot chocolate is always a favorite of my students so the hot cocoa bar is an obvious choice for us! 7. Most importantly, have fun! A cookie exchange is all about enjoying some treats with the ones you love! I dressed up our bakery boxes with simple snowflake cutouts and strips of scrapbook paper from Hobby Lobby. It was an easy make-ahead project that has a big impact! Didn't the cookies look delicious?? Our winners took home a hot cocoa kit that included everything needed to warm up your chilly winter days!  Our hot cocoa kit included:
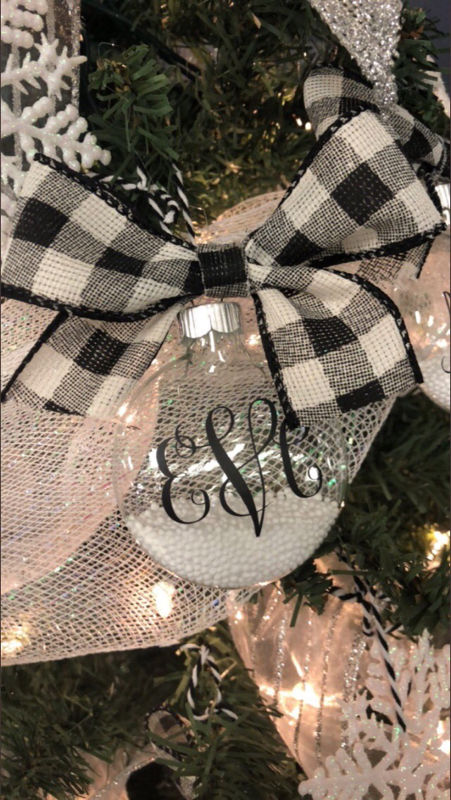
To make things a little more fun, I put the hot cocoa mix and crushed peppermint in plastic ornaments I purchased at Dollar Tree. The kit was packaged together in a decorative tray from Hobby Lobby. 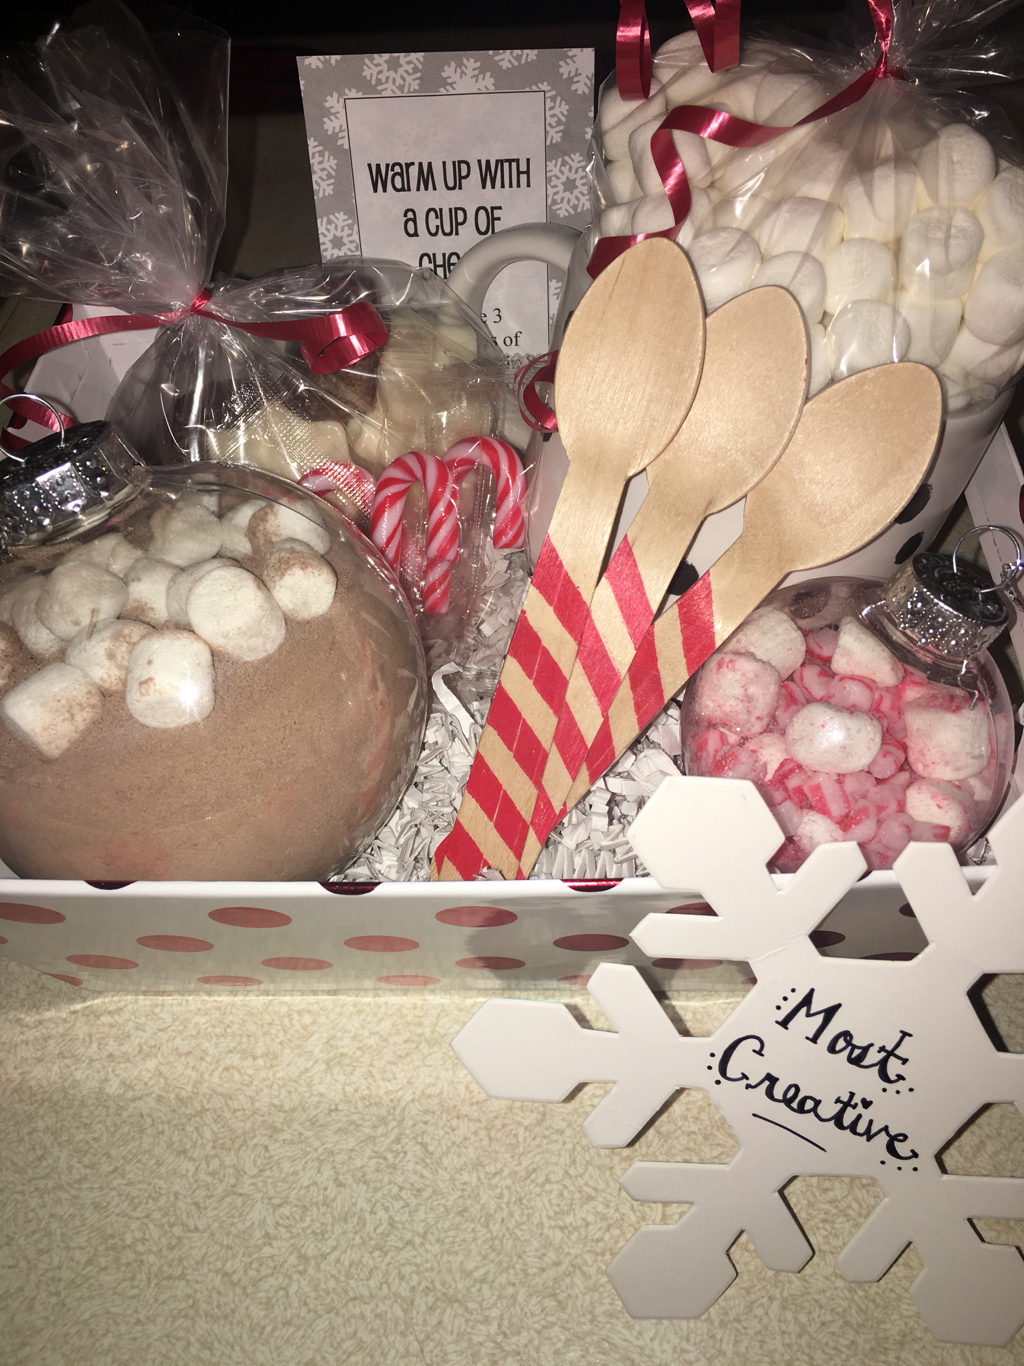 The hot cocoa bar is an easy thing to put together as well! Piping hot cocoa served with all your favorite toppings. Our toppings included: white and milk chocolate chips, peppermint bark, whipped cream, caramel and chocolate syrup, and of course, marshmallows! My students love to pick all their favorite flavors and sip their fancy hot chocolate. 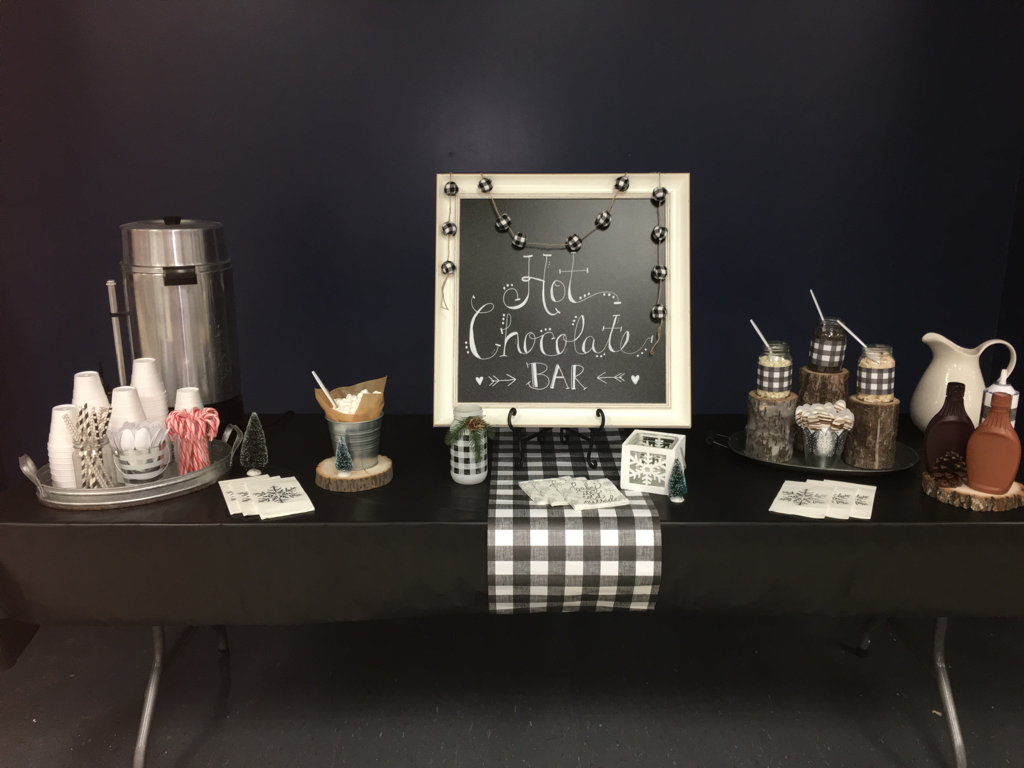 For a little extra holiday fun, each student received a monogrammed ornament. I used the ornaments to decorate my classroom Christmas tree to complete this fun winter scene that my students could use for photos. 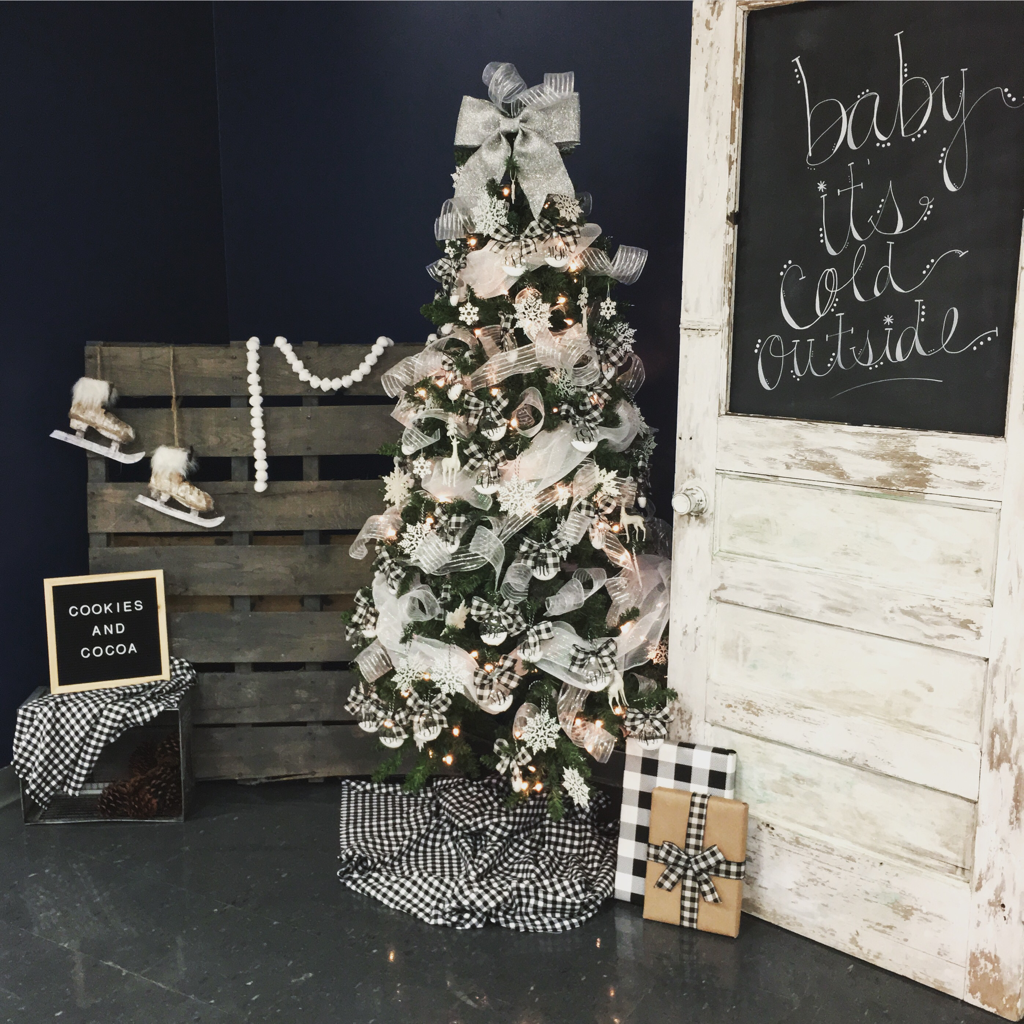 Happy holidays from our sweet family of friends to yours! 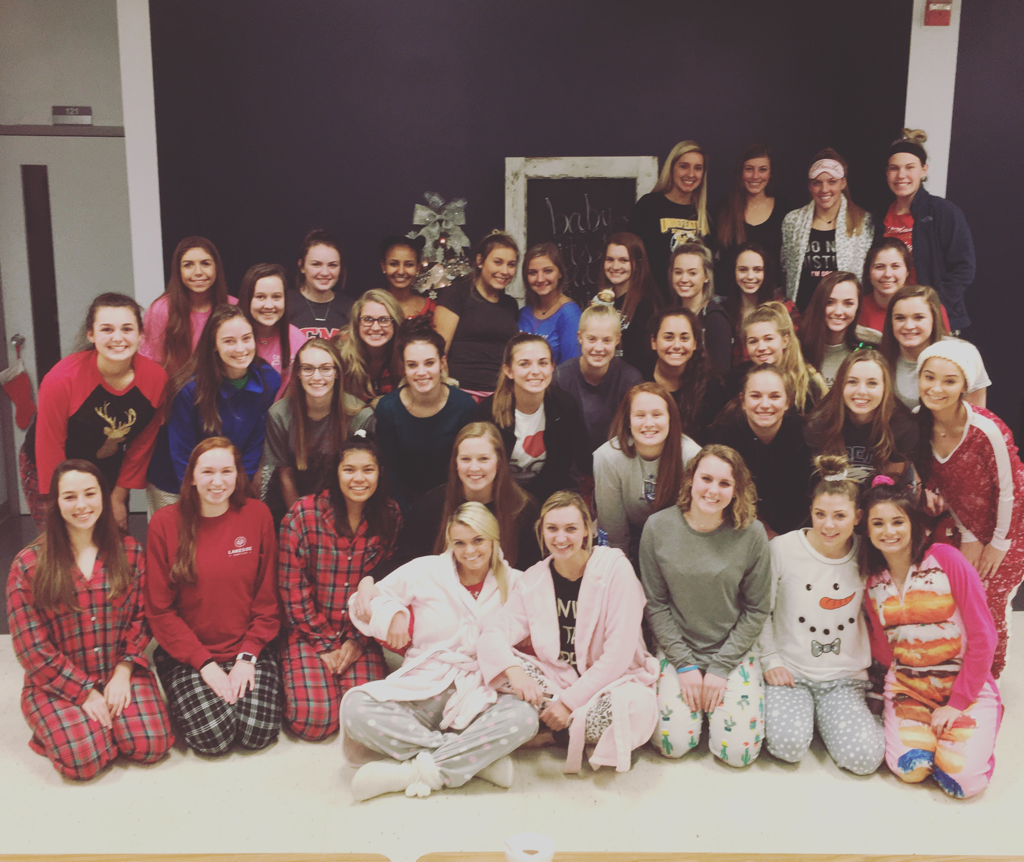 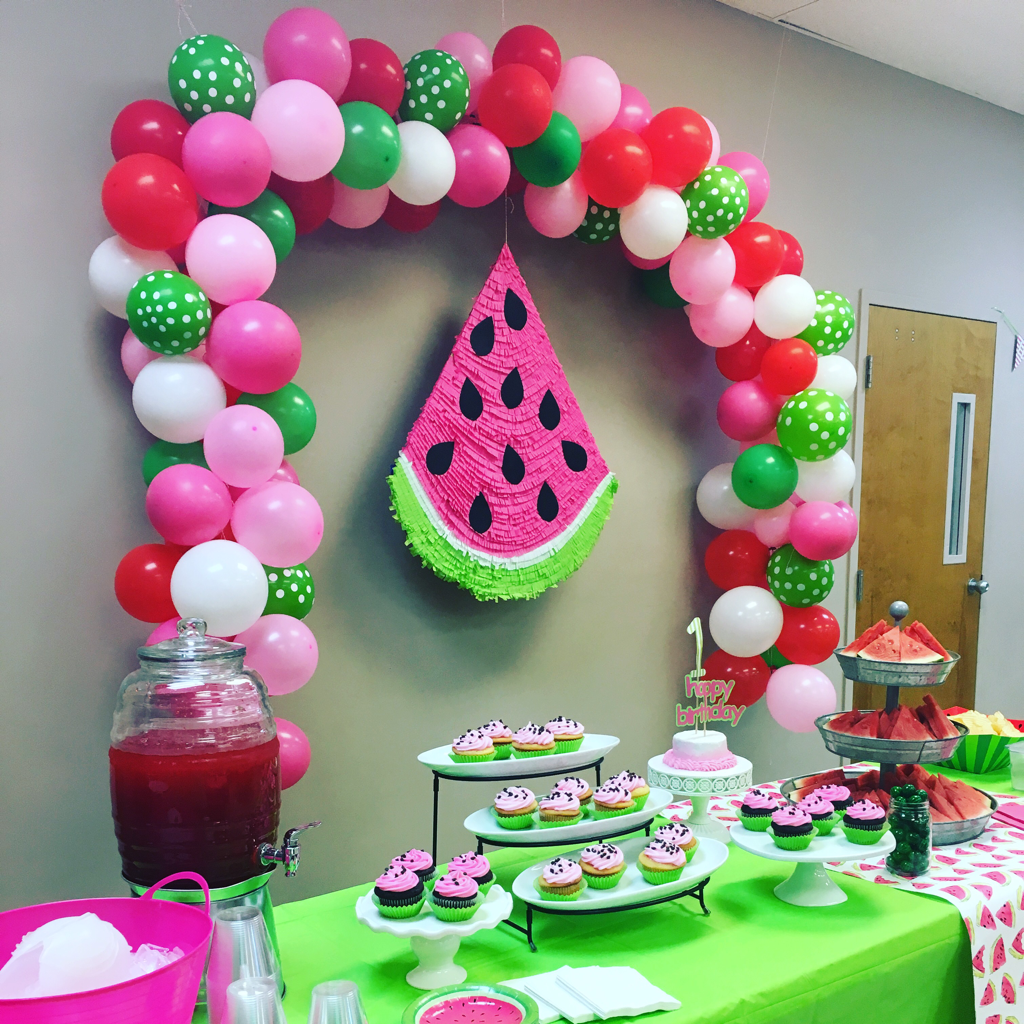
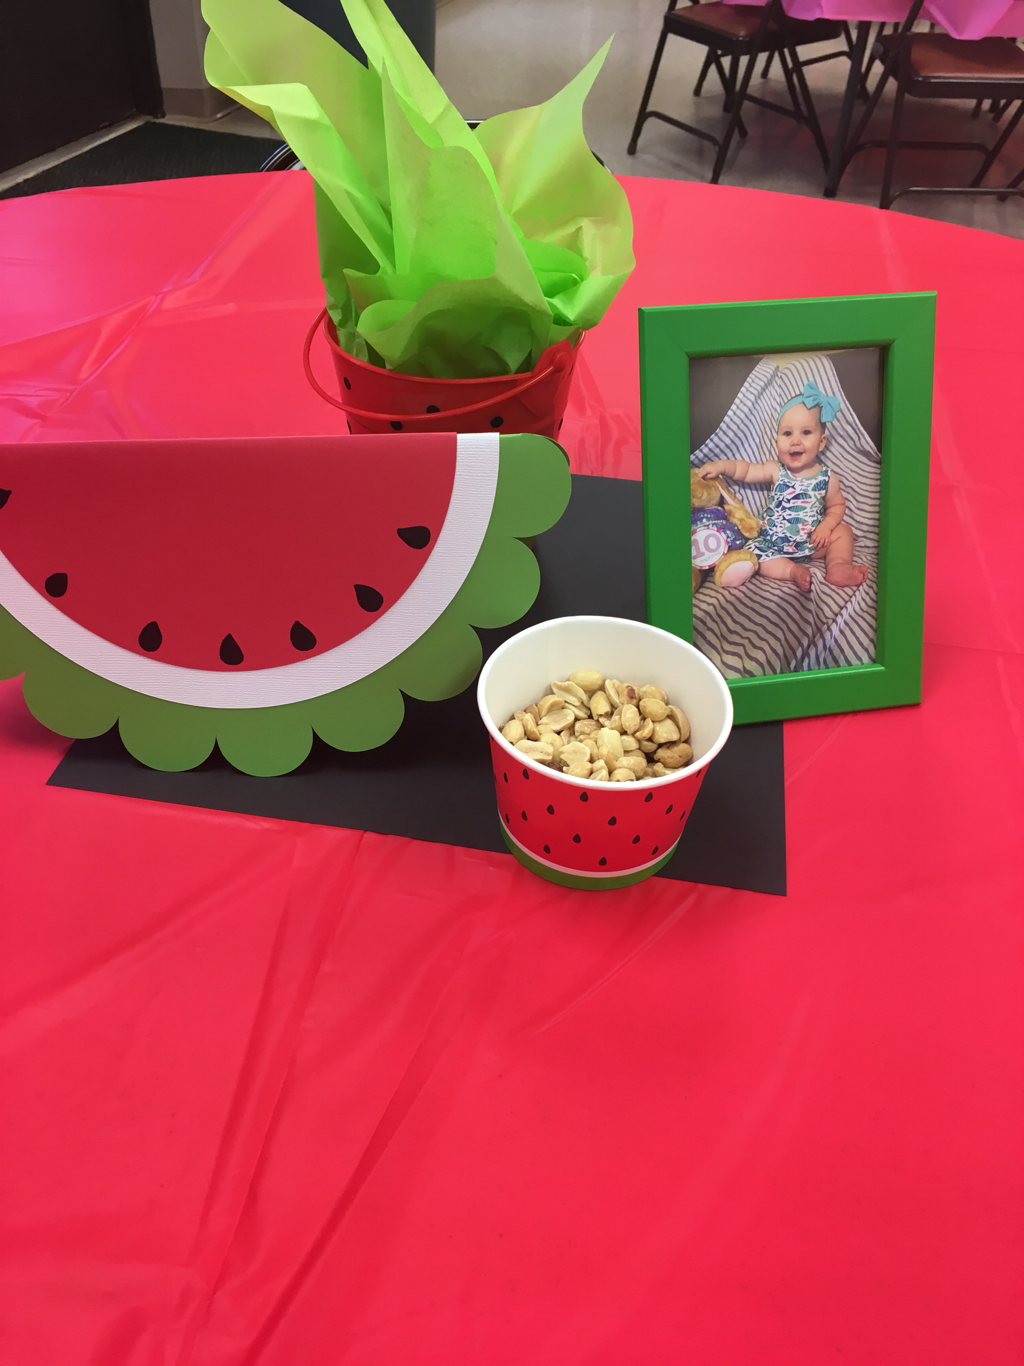
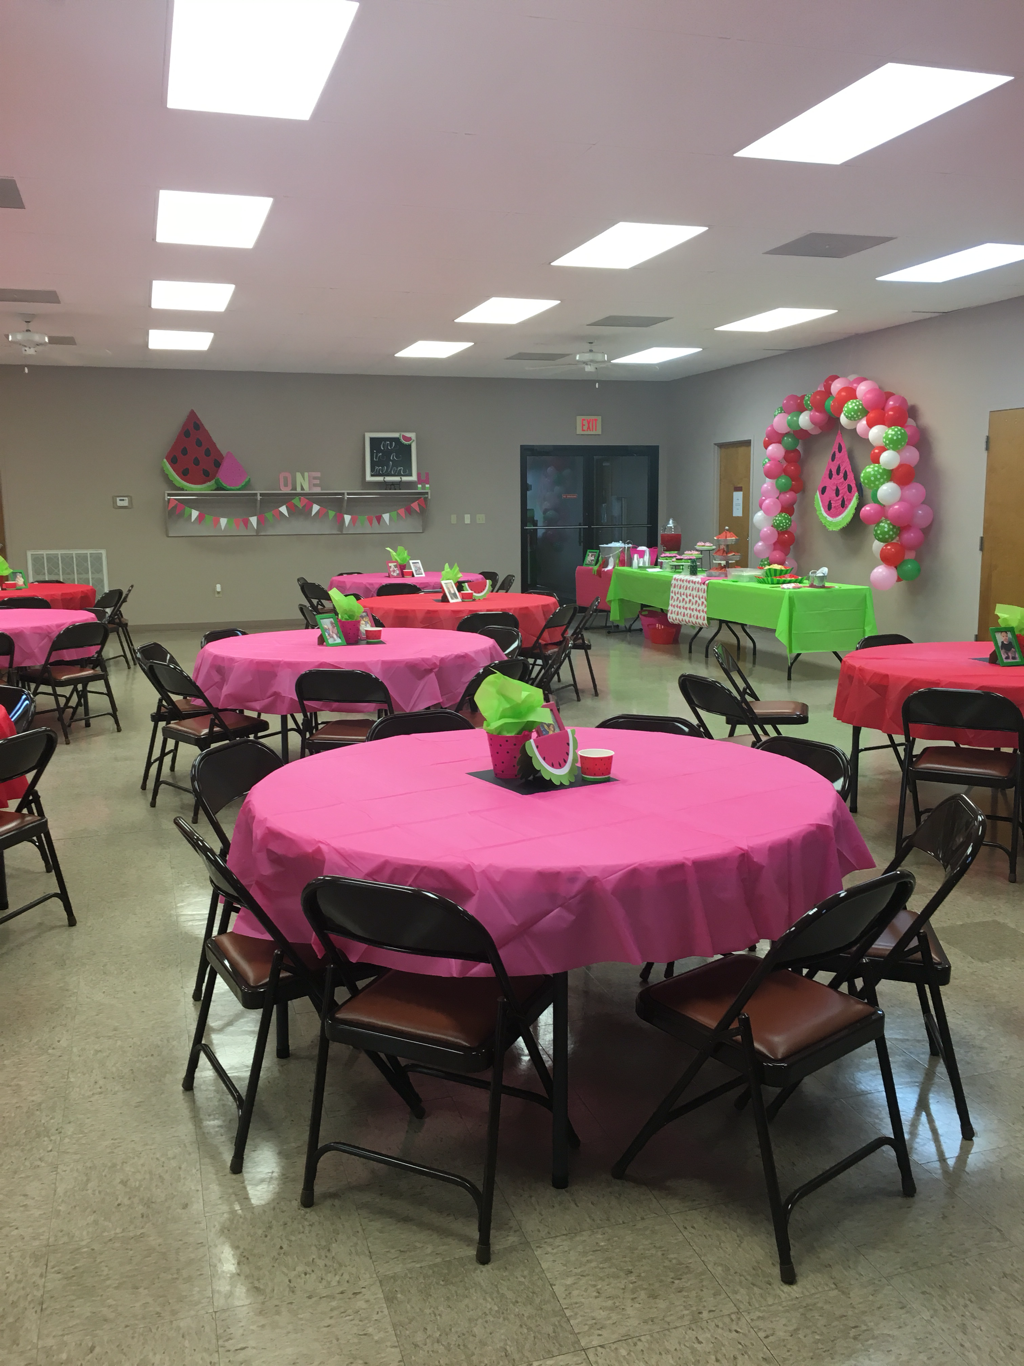
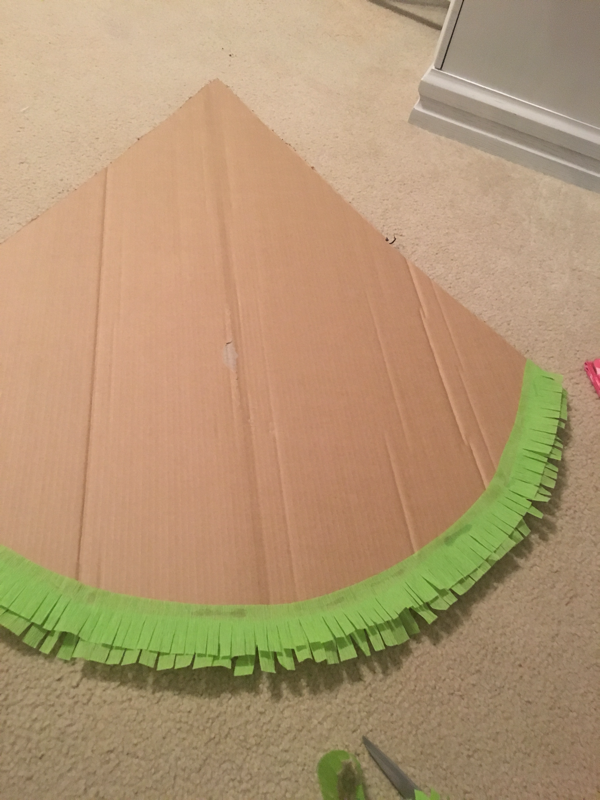
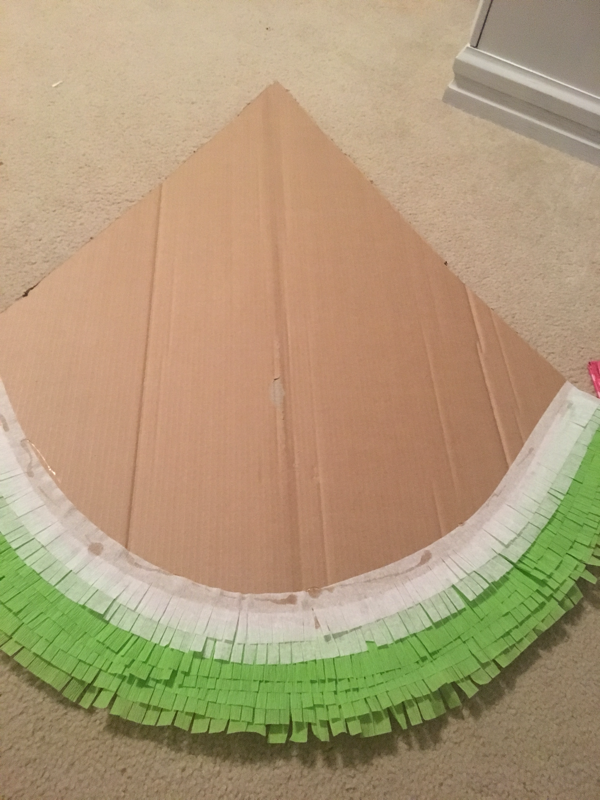
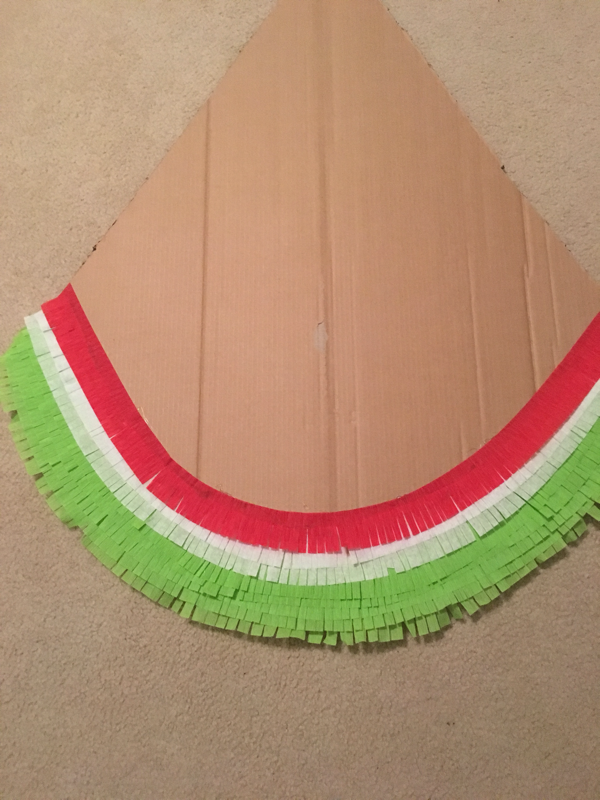
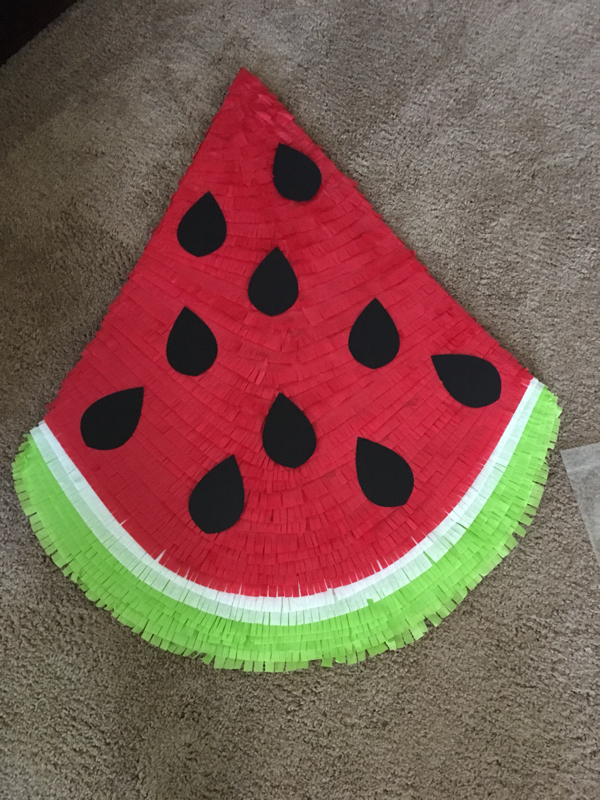
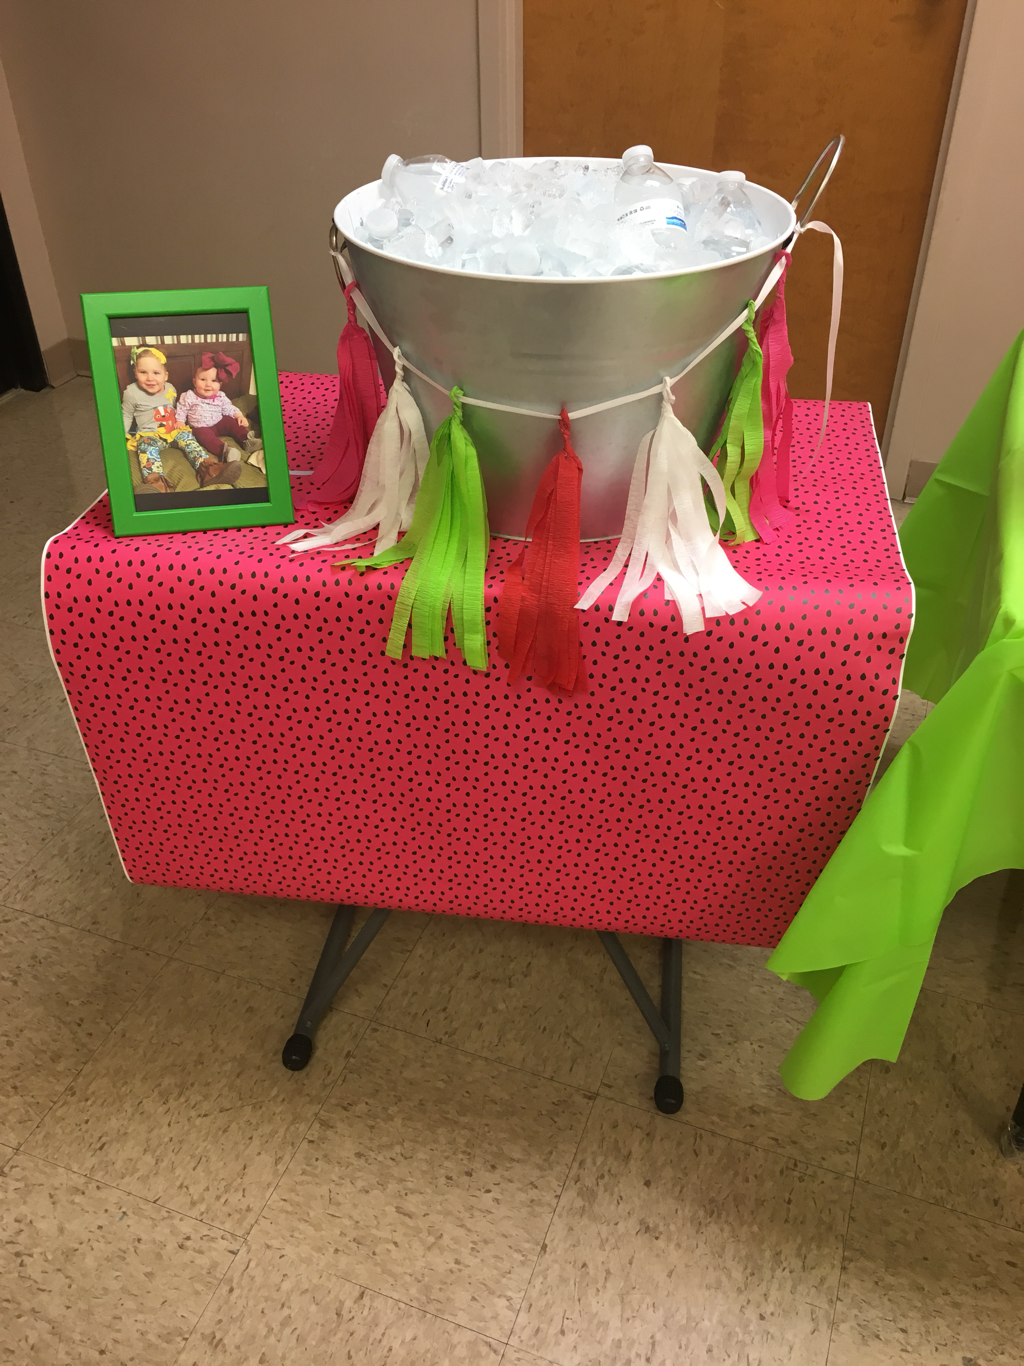
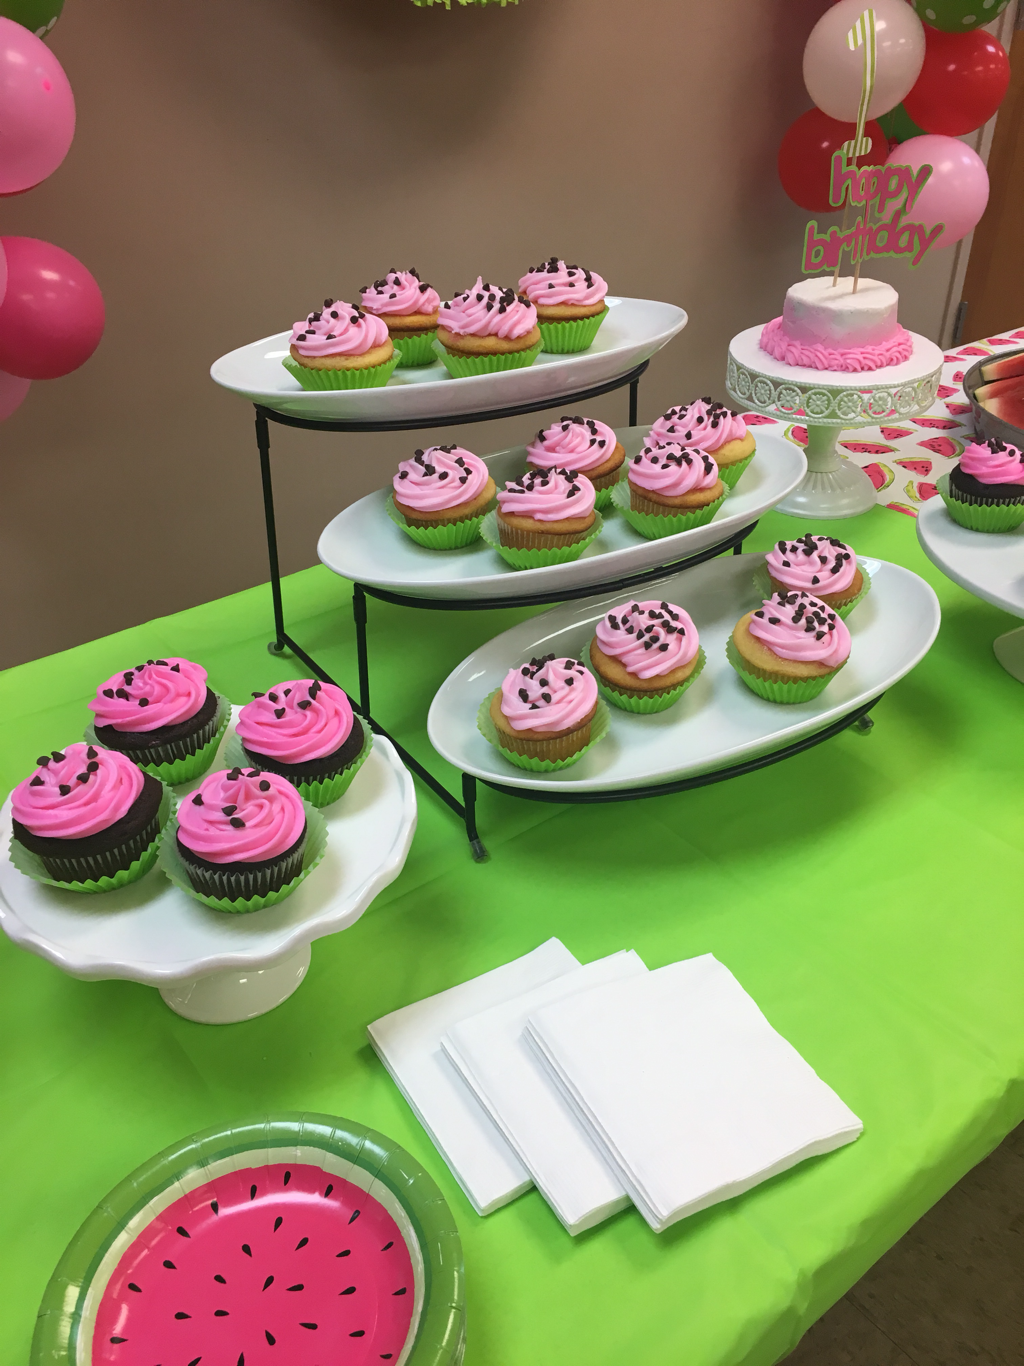
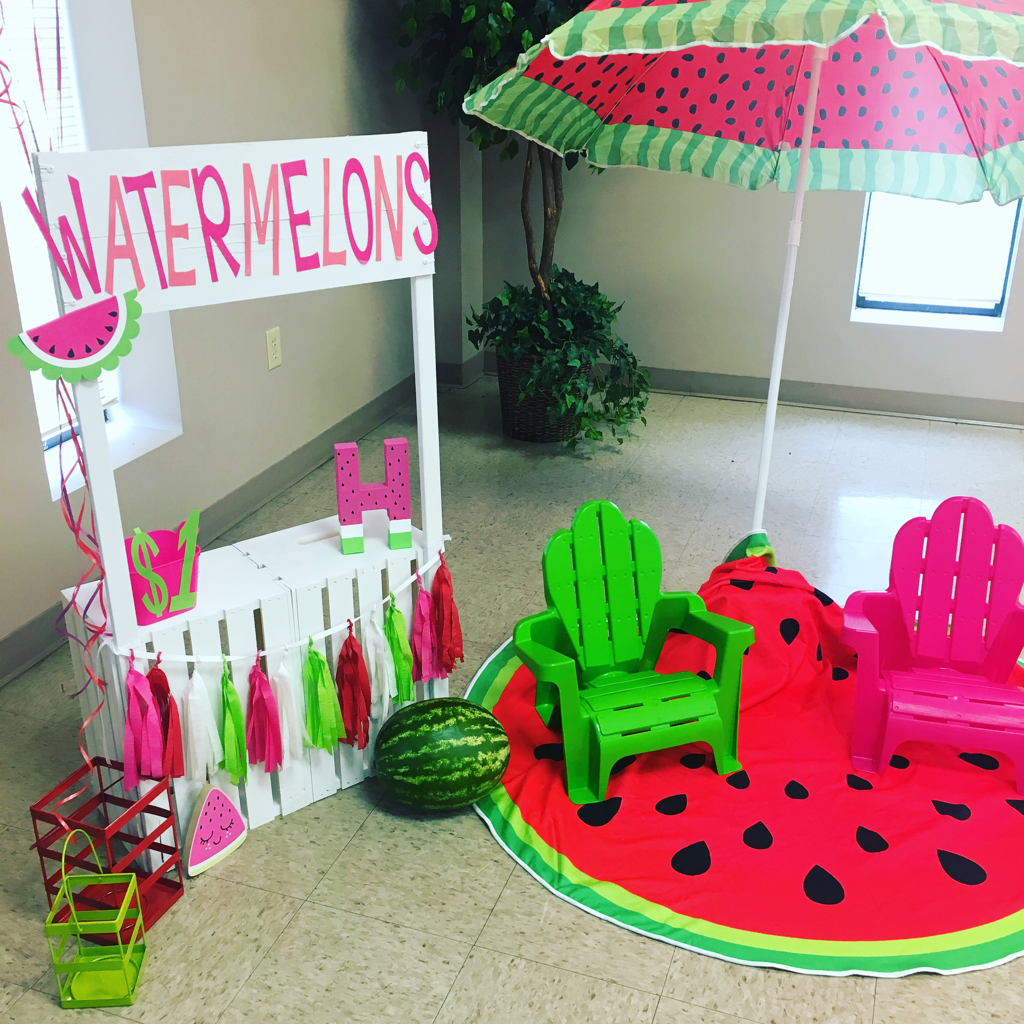 I also utilized the coat rack for some extra decoration space. I bought the large square chalkboard at Michaels on the clearance years ago and I use it ALL.THE.TIME. I found the small pink piñata at 5Below and it inspired me to create the jumbo watermelon slices. 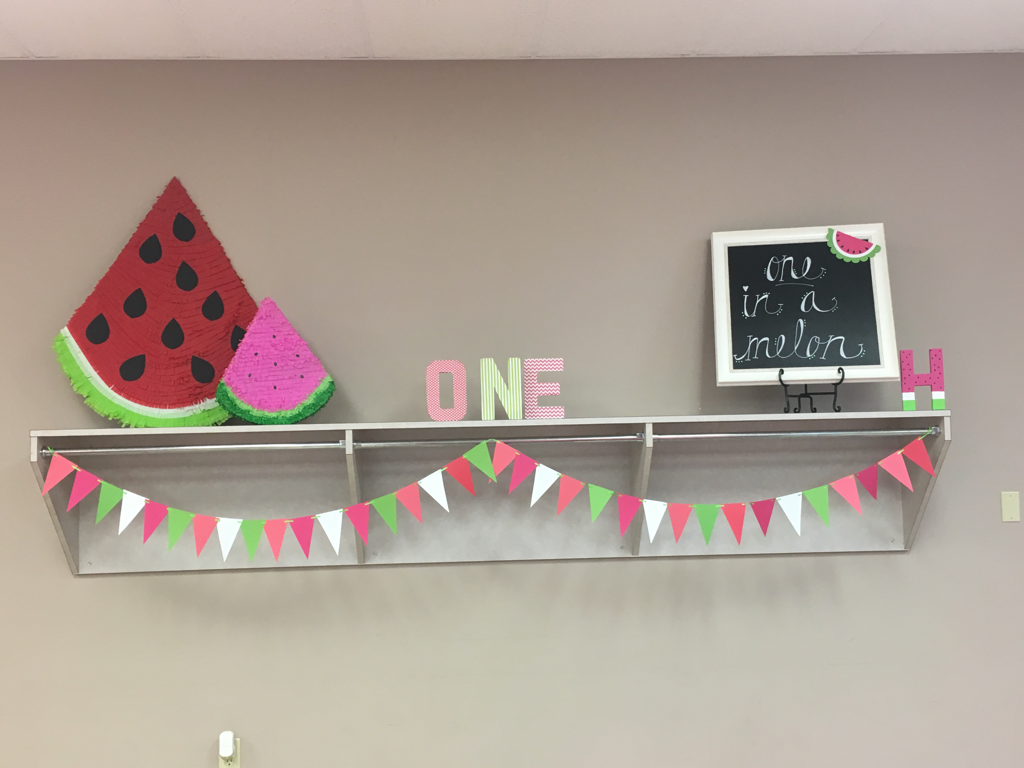 The large watermelon slices were so easy and inexpensive to make. The back is made from cardboard; the front is strips of crepe paper which I cut to fringe and simply glued in place. The large seeds are cut from black card stock. The project was a little bit tedious but so worth it in my opinion. For the food, I went with a classic birthday favorite and a few simple snacks. Chocolate and vanilla cupcakes for our guests, and a smash cake for my sweet Hattie. The cupcakes were frosted with pink buttercream, topped with mini chocolate chips, and placed in a green cupcake liner to keep with the theme of the party. I baked the cupcakes in a white liner and just placed them in the green liner before serving so the green color would remain bright. Ranch dip and chips as well as cheesy sausage dip and crackers were also on the menu. Watermelon was on the menu too because you can't have a watermelon party without it. Our guests could also choose from tropical punch or mini bottles of water to drink. I'm so glad I picked up this metal drink tub on the Target clearance at the beginning of summer; it went so well with our theme.
 To pull everything together, I hung the pink watermelon slice behind the table and surrounded it with a balloon garland. This may be my favorite thing ever! Balloon garlands are super easy to make, inexpensive, and they make a huge impact! I hope you enjoyed our "One in a Melon" birthday bash as much as we did. Let me know in the comments what your favorite part was! 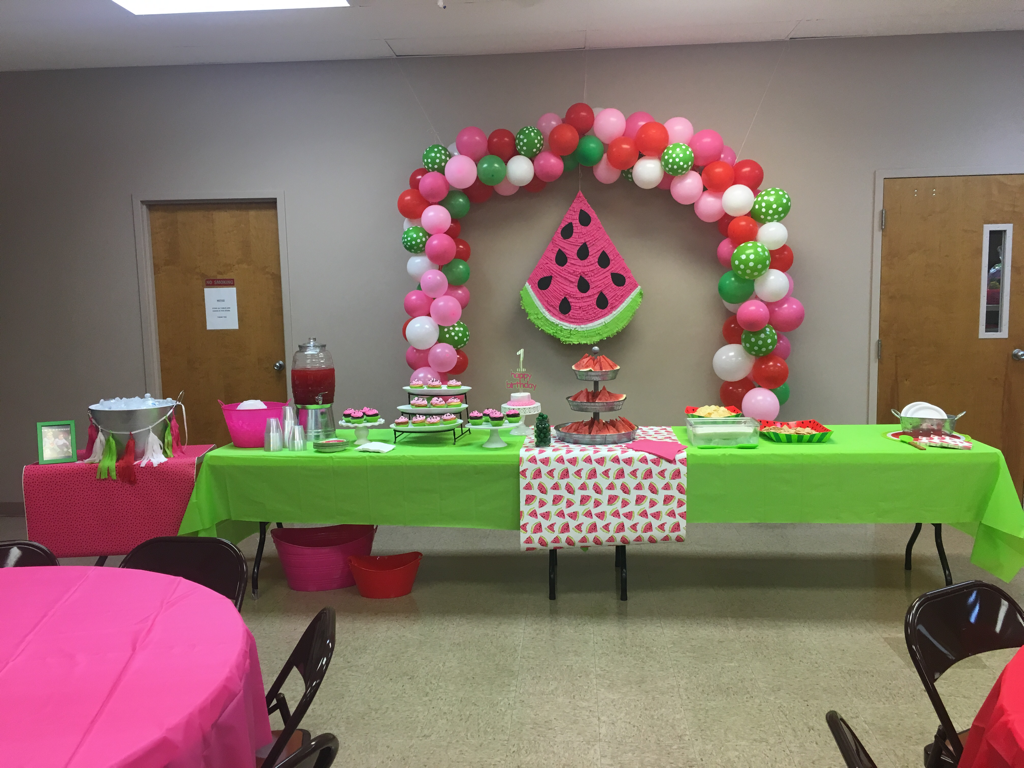 Last week I hosted the "Treat Yo Self" themed party for my FHA girls. For dinner, we enjoyed some breakfast favorites including pineapple orange punch. I used at 2.5 gallon dispenser for serving and as you can see from the picture, most of the punch was gone before dinner was even served! 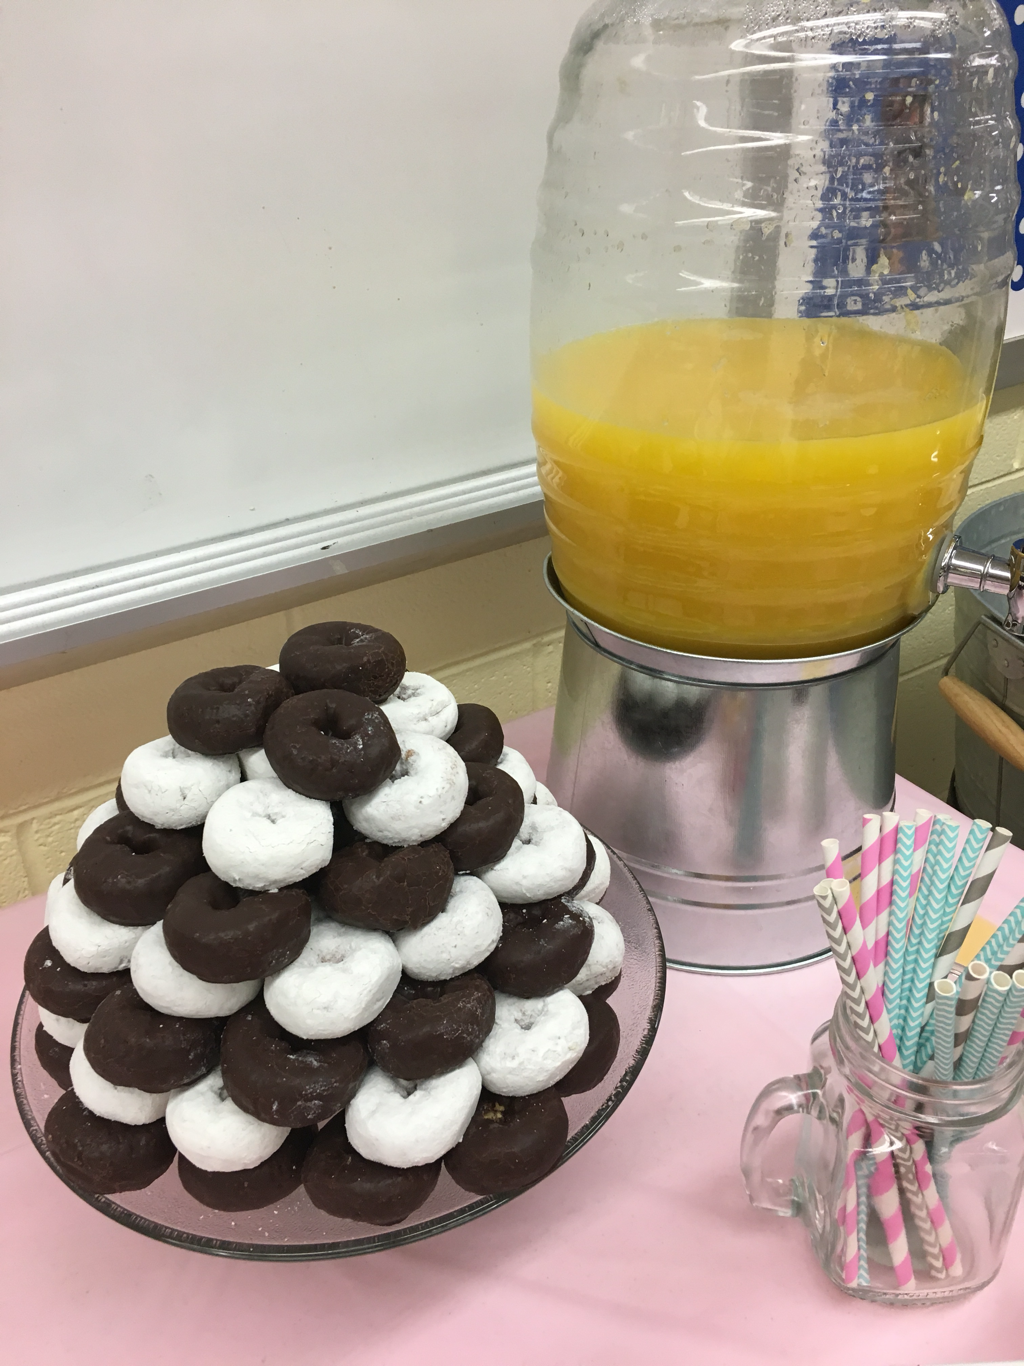 At the request of my students, here is the recipe!
Pineapple Orange Punch 4 cans frozen orange juice concentrate 10 cans water 4 cups sugar 1 large can pineapple juice (46 oz) 1 (2 liter) bottle of 7up 1. Thaw frozen concentrate in the refrigerator overnight or several hours. Pour into a drink dispenser or a large mixing bowl. 2. Mix 5 cans of boiling water with 4 cups of sugar. Stir to dissolve and add to the orange juice. 3. Add the 5 remaining cans of water and pineapple juice. 4. Chill until ready to serve. 5. Add 7up just before serving. Garnish with fresh pineapple wedges. Time for another exciting adventure with the sweet FHA girls! For our February meeting, we decided to treat ourselves to diy spa products. When I began planning our spa night I struggled to find inspiration. I shopped and doodled ideas for a long time but nothing really felt like the perfect fit. A few months back I was cruising the aisles of Home Goods in search of another cake stand to add to my collection when I came across their cocktail napkin section; these little cuties were right in front. I instantly knew I had found my inspiration for spa night and treat yo self was born! 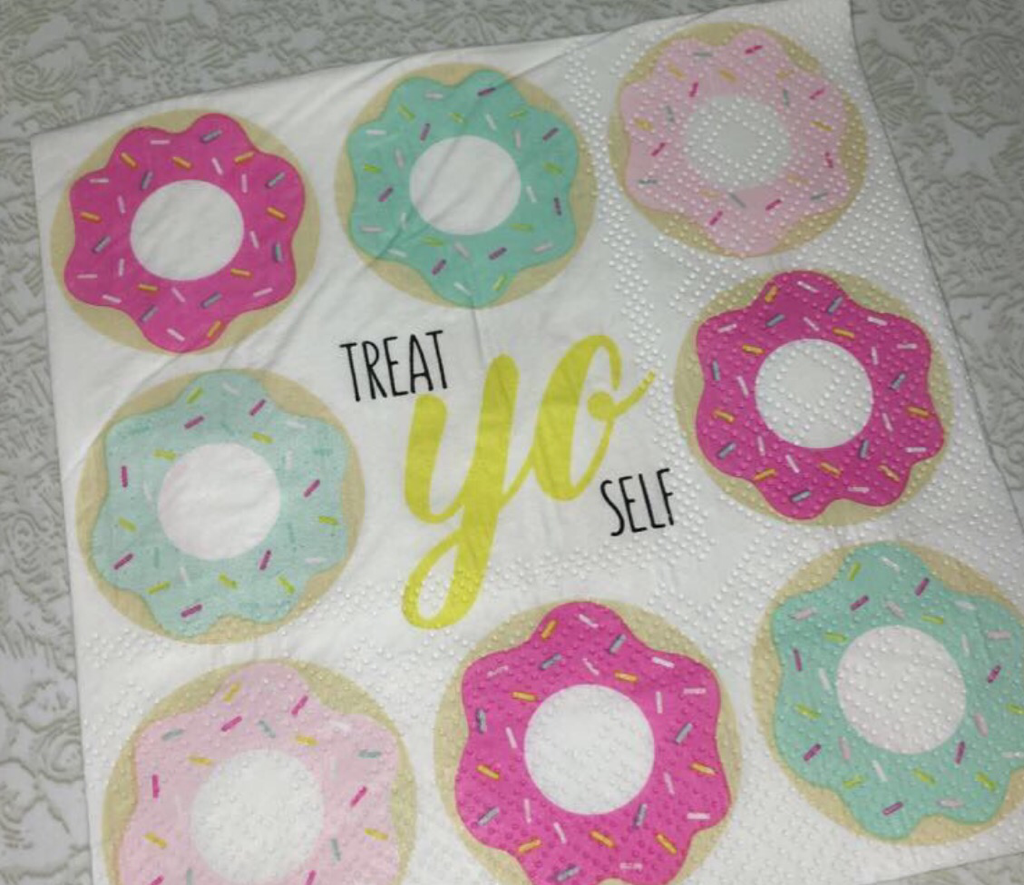 After finding these, spa night turned in to a pampering pajama party with breakfast for dinner. Cheesy scrambled eggs, brown sugar bacon, and loaded hashbrowns were on the menu. Of course we didn't forget about the donuts!  Simple decorations made for easy set-up and even easier cleanup. I cut this cute donut garland using my silhouette machine and cardstock in colors to match our napkins. 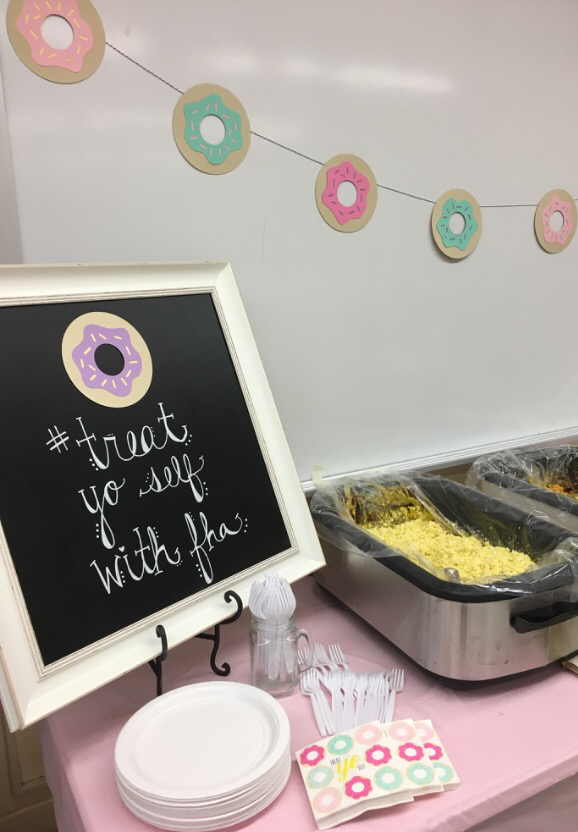 Each of the FHA members was given a pink bag with their instructions and take home containers for their spa products. I found the bags in packs of 10 at Dollar Tree in the party section. Our take home containers were also from Dollar Tree; we used the 2 ounce snack containers that are also found in packs of 10. Students rotated to 5 different stations and had the opportunity to make a body scrub, lip gloss, face mask, lip scrub, and a hair mask. 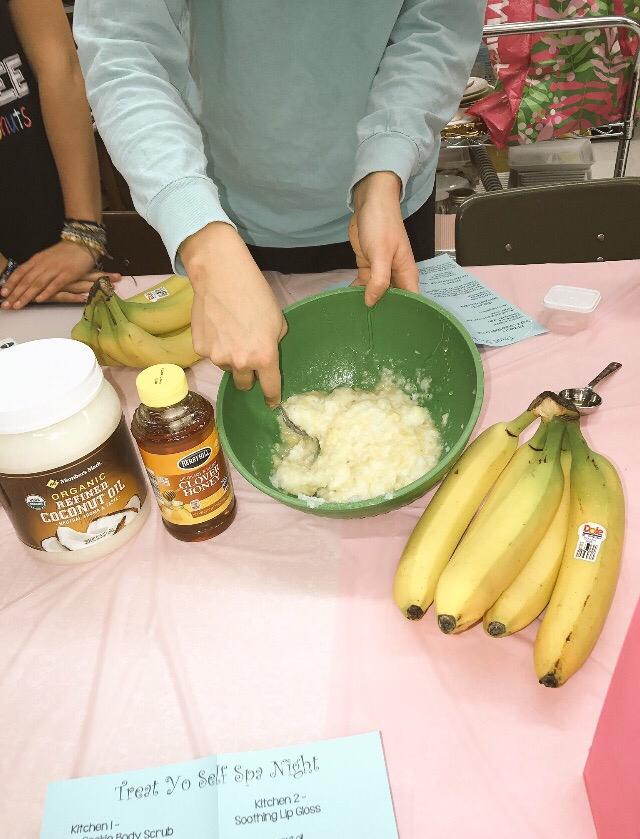 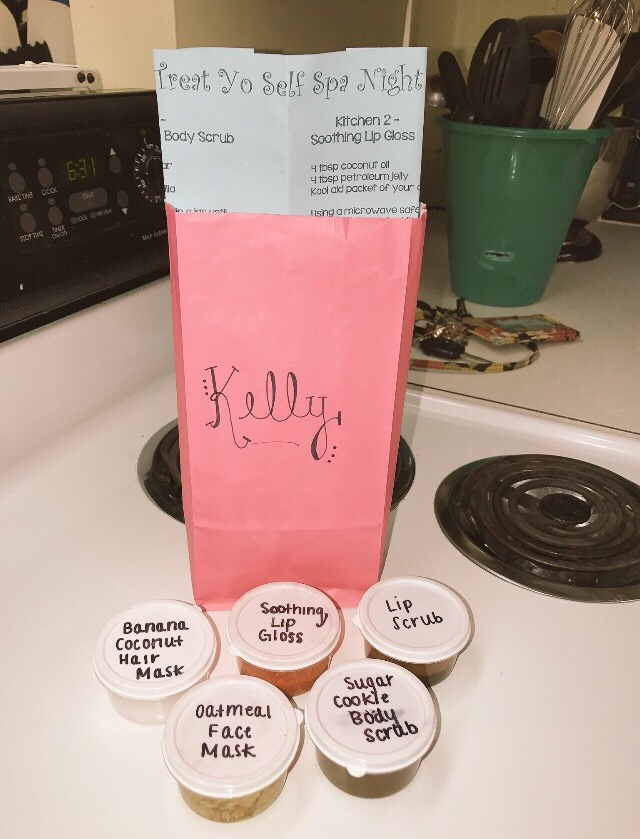 Spa night was a big success! Here's hoping your February is full of opportunities to treat yo self!
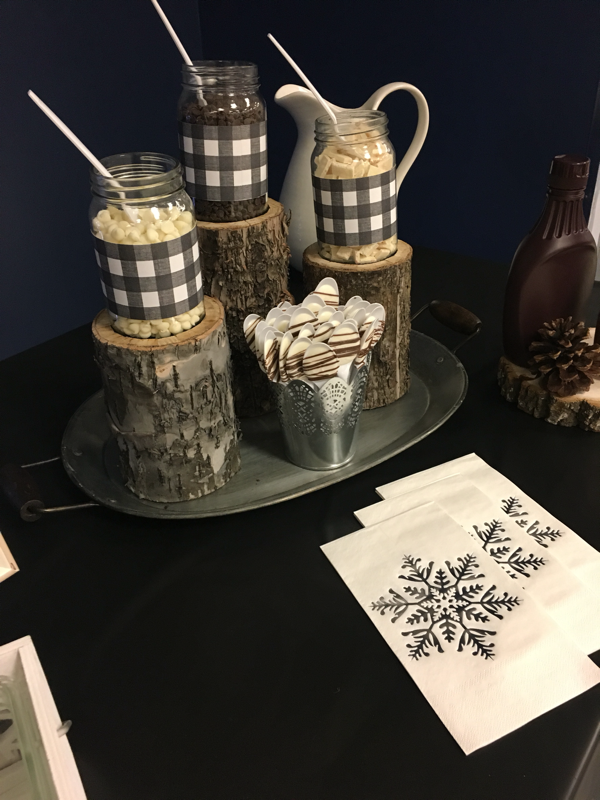
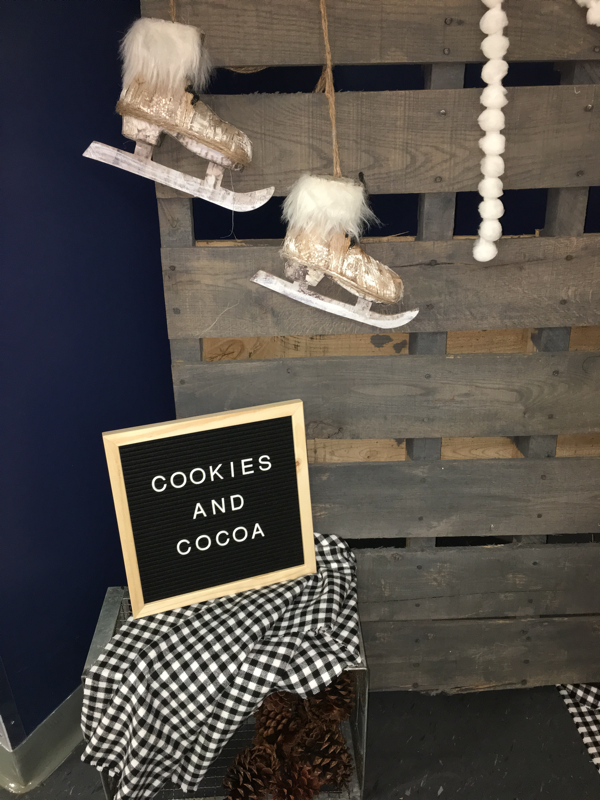
I'm sorry it's been so long since I posted. As it turns out, life gets busy with birthdays, holidays, and buying a condo (there's so much more to come about that later). My very favorite holiday season is here and in full swing. My classroom loves this time of year as we spend many hours creating all kinds of special gifts, glittered ornaments, and yummy treats. Among those treats are everyone's favorite; Christmas cookies! As I mentioned before, this December will mark the fourth annual FHA holiday cookie exchange. Each member of FHA bakes 3 1/2 dozen cookies to share among friends. Over the years, this event has become highly anticipated and very competitive. Welcome to the 2016 Cookie Exchange, we're so plaid you're here... 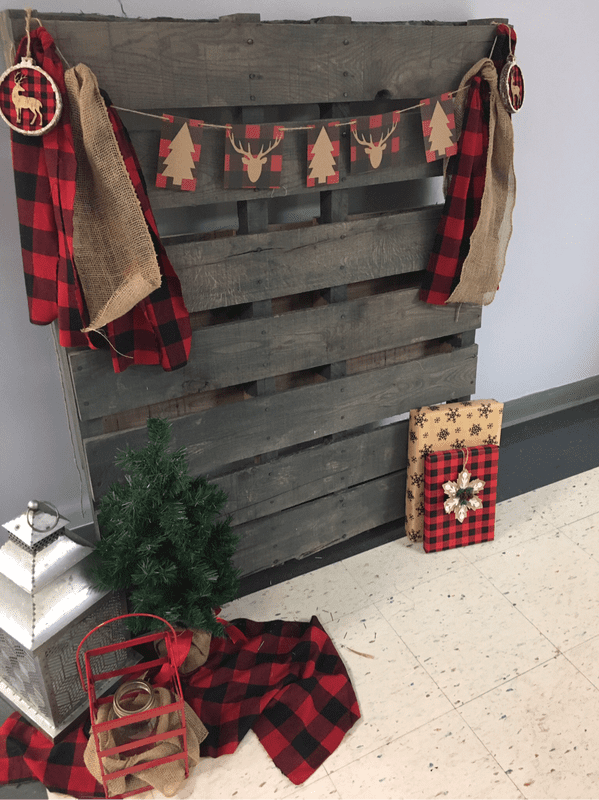 This garland tutorial can be found in So Plaid You're Here - Part 1. I decided to hang it on one of my favorite decorative pieces, the wooden pallet. This pallet was free from a local sporting goods store and after a coat of grey stain, I can't get enough of it. It can be used for all seasons or occasions. I was also very excited to find the buffalo plaid wrapping paper in the dollar section at Michaels. To accompany our yummy cookies, we served fresh hot cocoa with all the fixings. 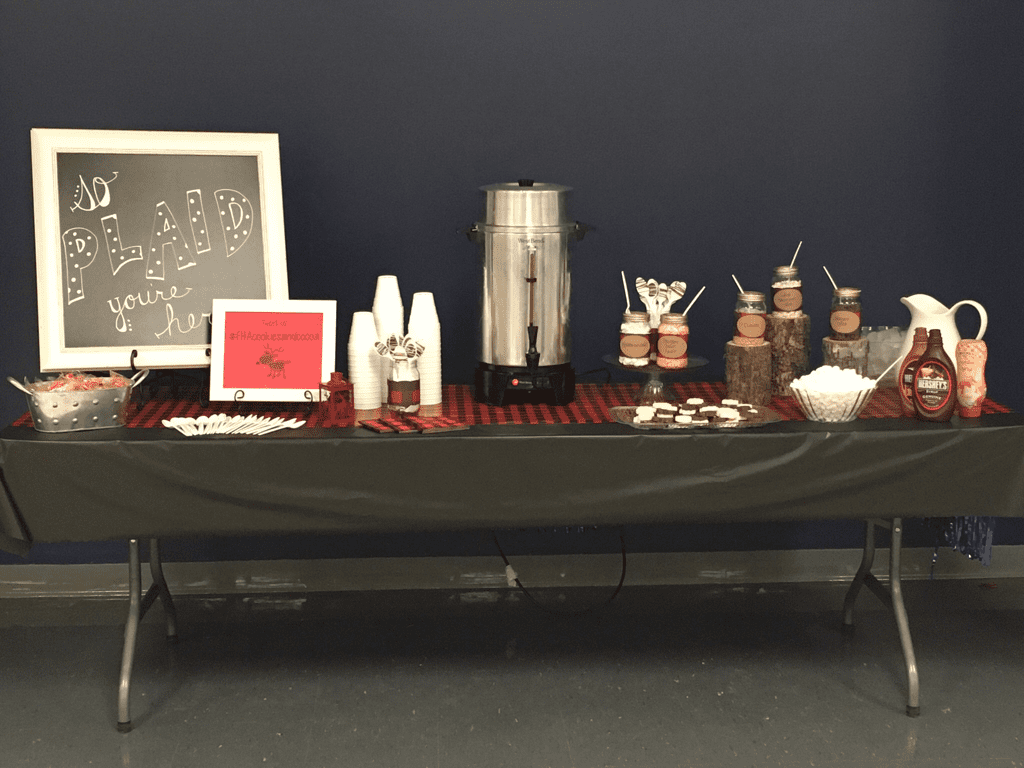 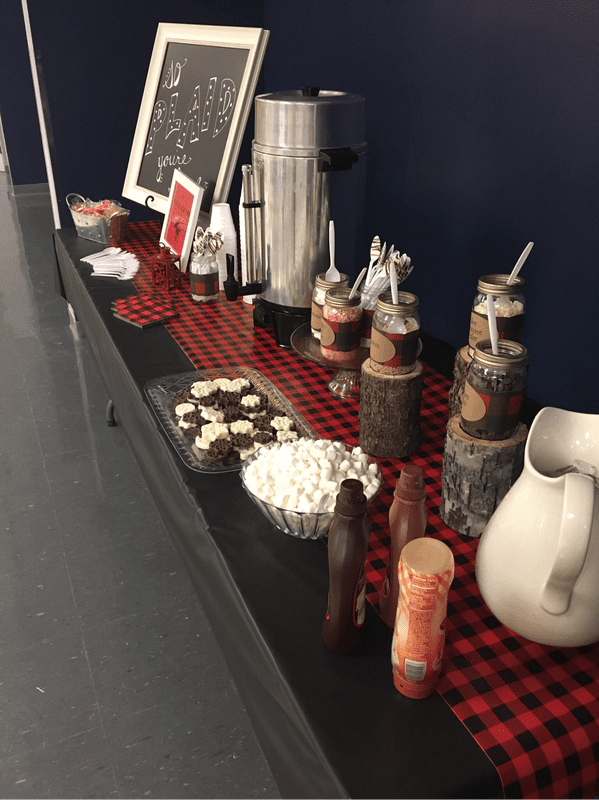 I enlisted the help of my dollar tree mason jars to hold the toppings. Piped chocolate snowflakes and spoons were also created to make for extra rich cocoa. These tree stump candleholders were purchased from hobby lobby and were the perfect way to display our mason jars. 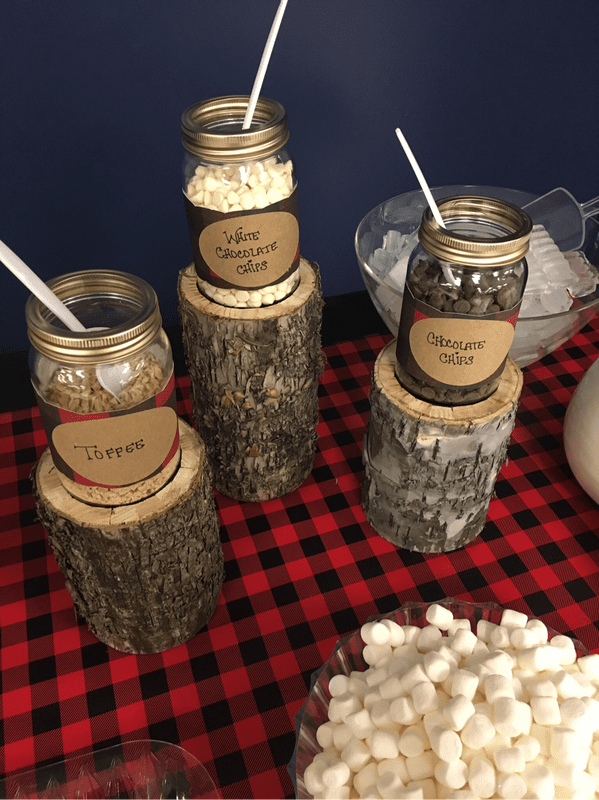 As the students arrived, they labeled their cookies and claimed their take-home boxes. 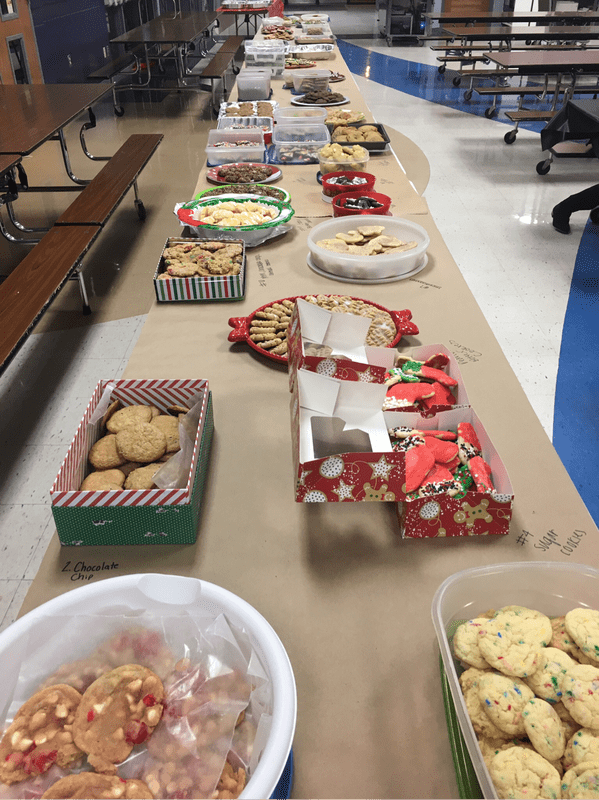 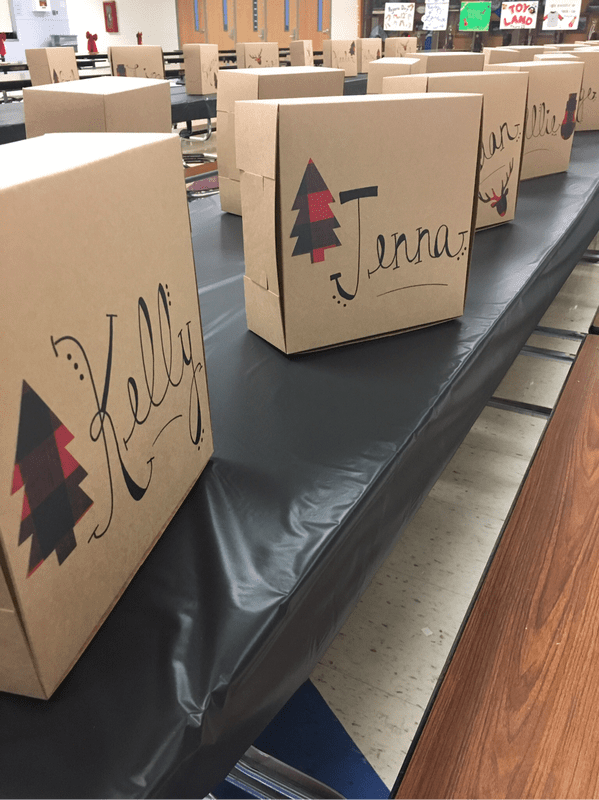 The cookies this year were nothing short of spectacular! 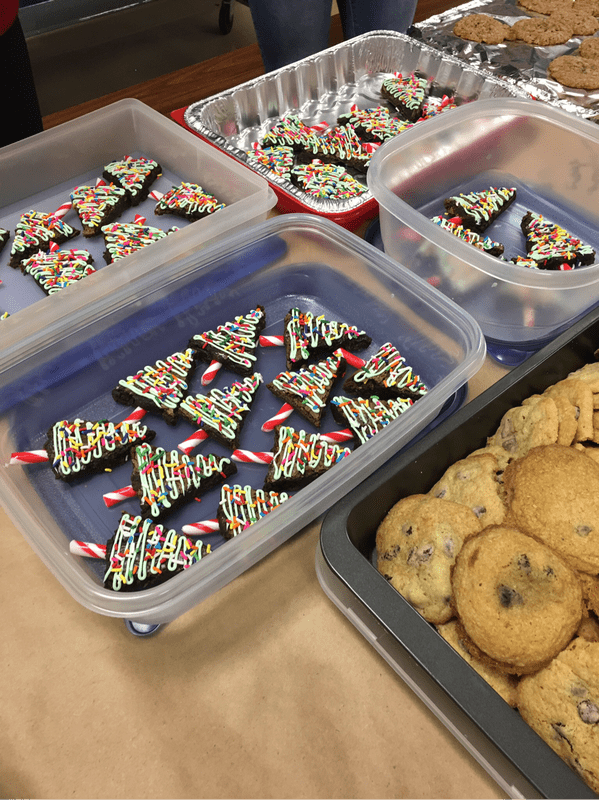 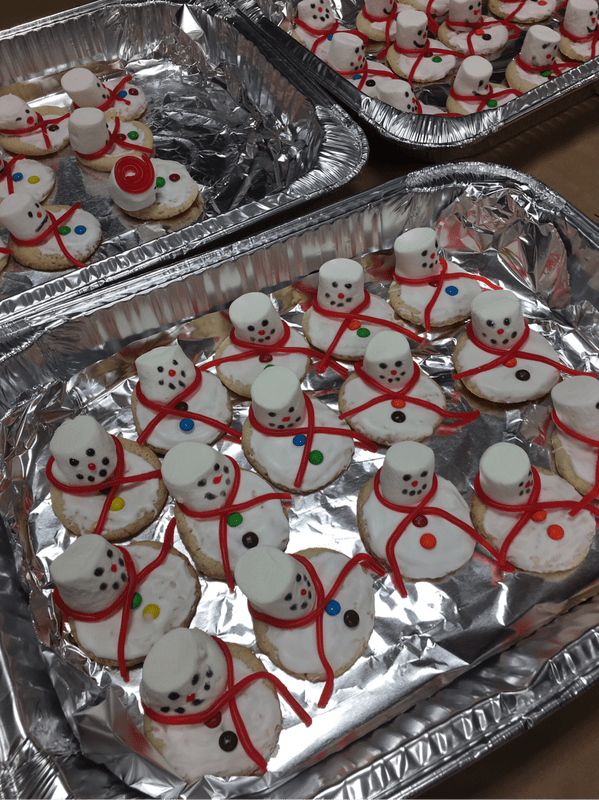 Prizes are given each year for the best cookies. Students are given the chance to vote for things such as most holiday spirit and best tasting cookie. Our prize bags included a cookie mix and some holiday baking accessories. 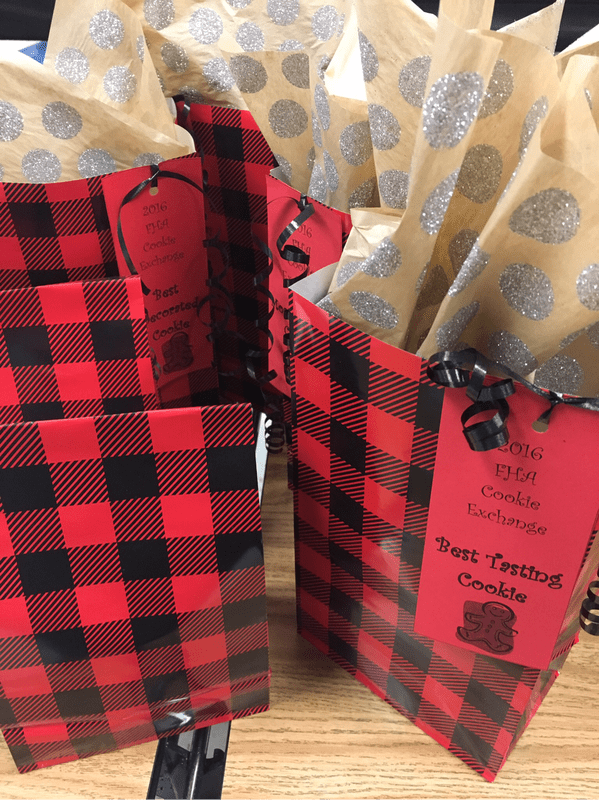 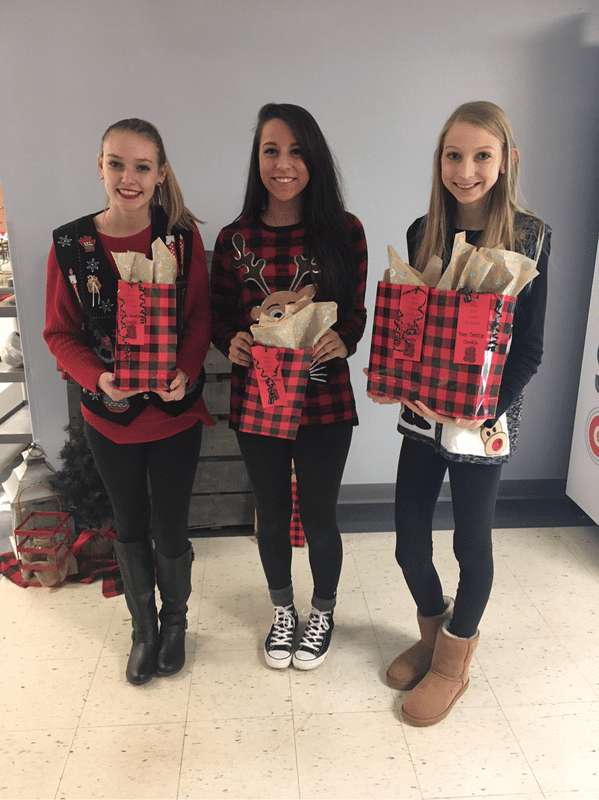 The 2016 Cookie Exchange was extremely successful; we already can't wait for next year! Here's hoping that your holiday season is merry, bright, and full of time spent with all those you love. Merry Christmas! 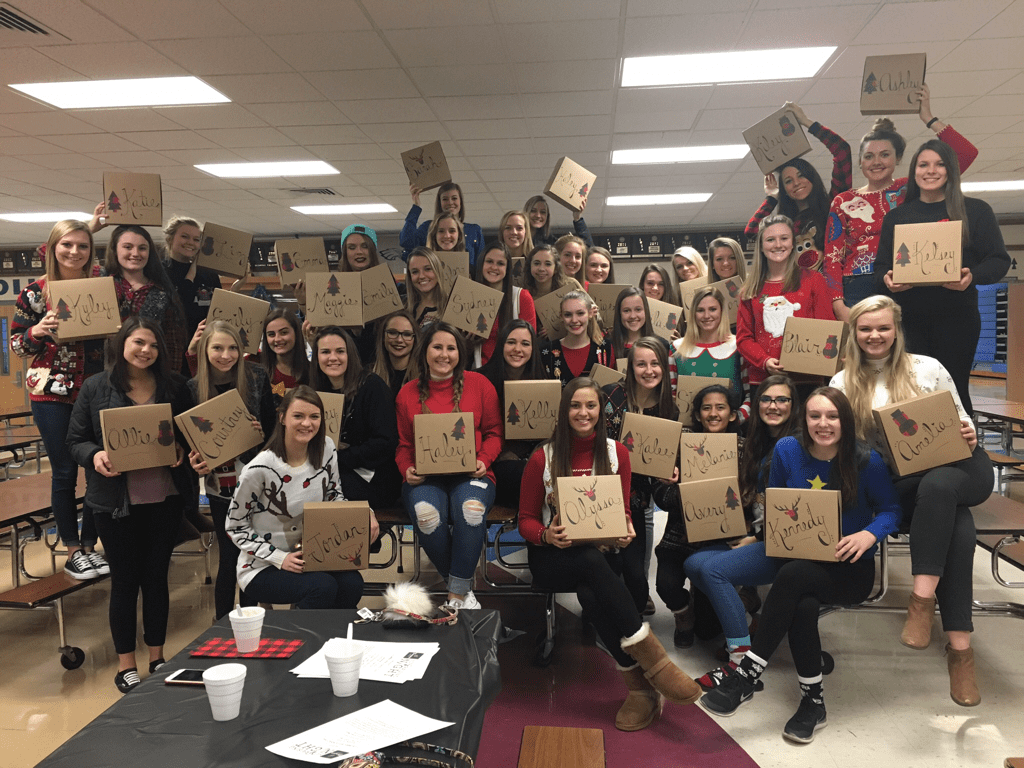 |
Archives
April 2020
Categories
All
|


 RSS Feed
